Title: 2001 - 2008 RM 250 (WIP)
Post by: 𝖙𝖋𝖈 on June 12, 2016, 10:25:00 PM
Post by: 𝖙𝖋𝖈 on June 12, 2016, 10:25:00 PM
Edit: have updated the title as I think this shape ran from 01 to 08 at least. Either way any differences were subtle and it will be released as just RM250 with no specific year attached.
Hey all, first model in Blender. Going pretty well so far!
This has to be my favorite bike of all time, not necessarily the year but I was able to find a few good reference pictures of the 2003 and the frame also looked easier to build over the 2001.
Hope some of you out there will get some enjoyment out of this once it's released!
Title: Re: 2003 RM 250 (WIP)
Post by: pacopastor34 on June 12, 2016, 10:37:19 PM
Post by: pacopastor34 on June 12, 2016, 10:37:19 PM
It's the 1st of my favourite bikes of all of time with no doubt. Thank you!
Don't you feel like the current default 2-stroke sound is not realistic for a 250? It's more like a 50cc?
Don't you feel like the current default 2-stroke sound is not realistic for a 250? It's more like a 50cc?
Title: Re: 2003 RM 250 (WIP)
Post by: GDUBMX on June 12, 2016, 11:36:25 PM
Post by: GDUBMX on June 12, 2016, 11:36:25 PM
Braaapp! Nice one mate, and Paco let's not get started on 2 stroke sounds please lol :)
Title: Re: 2003 RM 250 (WIP)
Post by: 𝖙𝖋𝖈 on June 13, 2016, 06:00:29 PM
Post by: 𝖙𝖋𝖈 on June 13, 2016, 06:00:29 PM
Getting somewhere ;D
Title: Re: 2003 RM 250 (WIP)
Post by: ChrisK on June 13, 2016, 09:16:15 PM
Post by: ChrisK on June 13, 2016, 09:16:15 PM
your realy good because it's your first bike and u still learn blender.
but why is all so "round"?
but why is all so "round"?
Title: Re: 2003 RM 250 (WIP)
Post by: pacopastor34 on June 13, 2016, 09:17:54 PM
Post by: pacopastor34 on June 13, 2016, 09:17:54 PM
Maybe too smooth?
Title: Re: 2003 RM 250 (WIP)
Post by: 𝖙𝖋𝖈 on June 13, 2016, 09:31:26 PM
Post by: 𝖙𝖋𝖈 on June 13, 2016, 09:31:26 PM
Thanks :)
Actually all it is, is that I hadn't fixed the mesh to give it sharper edges. Just spent an hour cleaning it up
Actually all it is, is that I hadn't fixed the mesh to give it sharper edges. Just spent an hour cleaning it up
Title: Re: 2003 RM 250 (WIP)
Post by: Vortex_Damien on June 13, 2016, 09:38:05 PM
Post by: Vortex_Damien on June 13, 2016, 09:38:05 PM
Looking a lot better.. plz post wireframe pictures helps us help you ;)
Title: Re: 2003 RM 250 (WIP)
Post by: 𝖙𝖋𝖈 on June 13, 2016, 09:42:29 PM
Post by: 𝖙𝖋𝖈 on June 13, 2016, 09:42:29 PM
No you'll all laugh at me :D
Title: Re: 2003 RM 250 (WIP)
Post by: pacopastor34 on June 13, 2016, 10:12:28 PM
Post by: pacopastor34 on June 13, 2016, 10:12:28 PM
Quote from: TheFatController on June 13, 2016, 09:42:29 PM
No you'll all laugh at me :D
Never, you know we can't! You look the kind of person that plays Fifa, Nba or whatever 1vs1 game and says: I'd never played this game...and then beats you! I know the people like you. 8) 8) ;) ;)
Have you used blender before? If your answer is no I give up with my models.For sure.
Edit: Short explaining: you look the kind of person that can get use to a program or something easily. Sometimes I don't know how understandable is my English.lol.
Title: Re: 2003 RM 250 (WIP)
Post by: 𝖙𝖋𝖈 on June 13, 2016, 11:14:56 PM
Post by: 𝖙𝖋𝖈 on June 13, 2016, 11:14:56 PM
Haha it's OK..
Yeah I guess I pick software up pretty quickly, but always assume it's going to be harder than it actually is.
Sorry, this is my first time using Blender, only 3d experience previously was SketchUp which is a world apart, but please don't stop making models ;) I love the KX!
Yeah I guess I pick software up pretty quickly, but always assume it's going to be harder than it actually is.
Sorry, this is my first time using Blender, only 3d experience previously was SketchUp which is a world apart, but please don't stop making models ;) I love the KX!
Title: Re: 2003 RM 250 (WIP)
Post by: pacopastor34 on June 14, 2016, 09:23:53 AM
Post by: pacopastor34 on June 14, 2016, 09:23:53 AM
Quote from: TheFatController on June 13, 2016, 11:14:56 PM
Haha it's OK..
Yeah I guess I pick software up pretty quickly, but always assume it's going to be harder than it actually is.
Sorry, this is my first time using Blender, only 3d experience previously was SketchUp which is a world apart, but please don't stop making models ;) I love the KX!
Dont worry, I won't stop! I'm doing it slower with the KX500 but I want to do a better model and more detailed parts.
Title: Re: 2003 RM 250 (WIP)
Post by: 𝖙𝖋𝖈 on June 14, 2016, 11:18:26 AM
Post by: 𝖙𝖋𝖈 on June 14, 2016, 11:18:26 AM
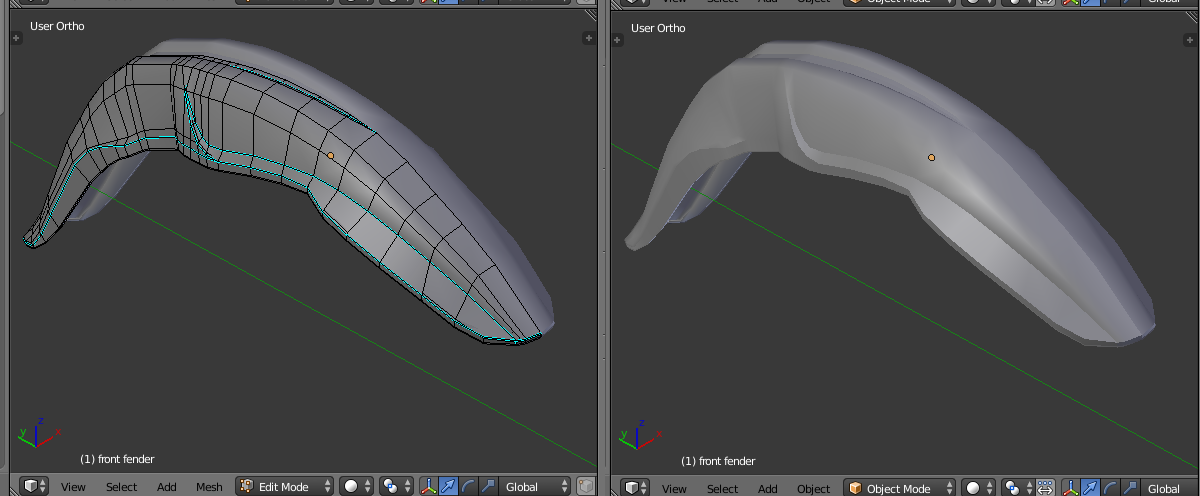
Definitely worth it.. I've gone back (again) and cleaned up a bunch of stuff.. So many poly's I didn't need floating around, the more you do the more you learn huh..
Hows this mesh looking?

Hows this mesh looking?
Title: Re: 2003 RM 250 (WIP)
Post by: 𝖙𝖋𝖈 on June 14, 2016, 01:00:36 PM
Post by: 𝖙𝖋𝖈 on June 14, 2016, 01:00:36 PM
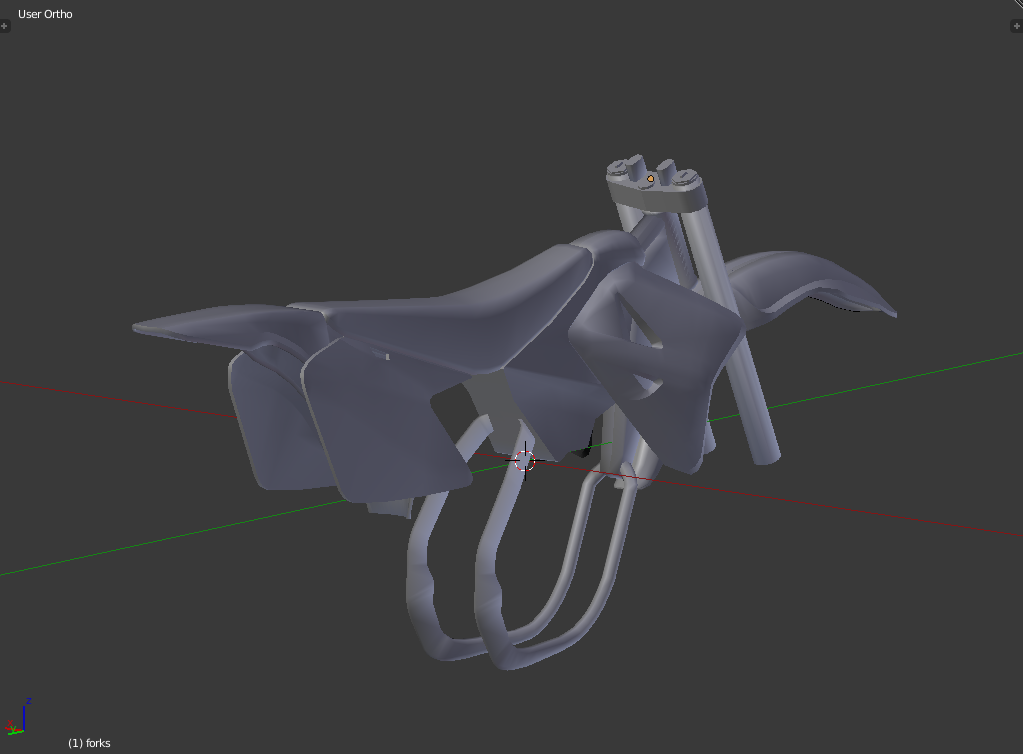
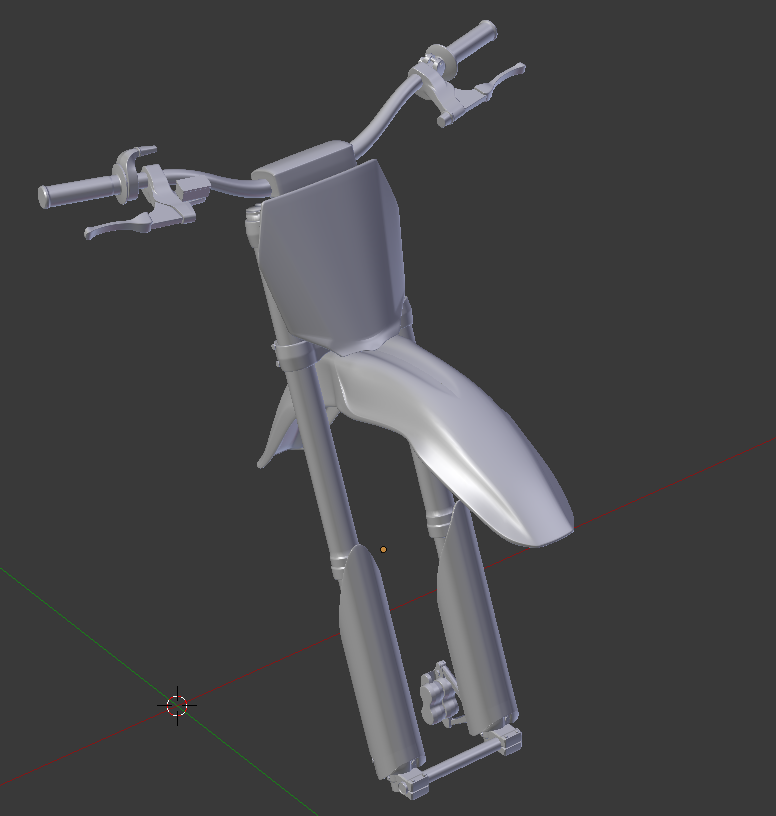
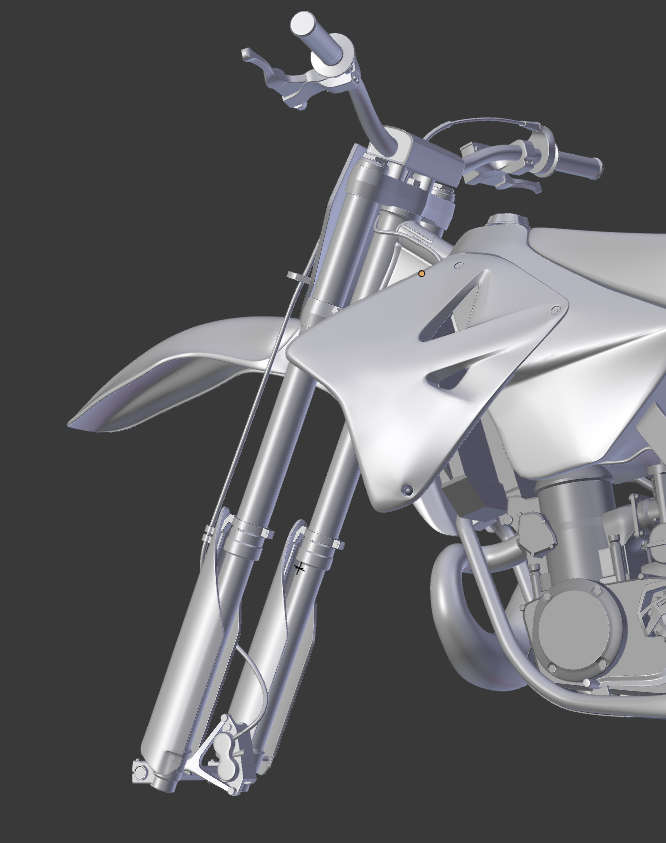
Started to add forks.. Will keep updating it as nice to see progression and hopefully people will notice things I might be doing wrong!
Title: Re: 2003 RM 250 (WIP)
Post by: Snappe on June 14, 2016, 01:16:21 PM
Post by: Snappe on June 14, 2016, 01:16:21 PM
The only thing I would suggest is to keep your polys a uniform size (see pic)
Looking good though! Very good for a first model!

Looking good though! Very good for a first model!
Title: Re: 2003 RM 250 (WIP)
Post by: 𝖙𝖋𝖈 on June 14, 2016, 01:34:21 PM
Post by: 𝖙𝖋𝖈 on June 14, 2016, 01:34:21 PM
Thanks Snappe! Trying my best here :D
Weirdly it's easier to work with after removing more of the overly complicated geometry I did when I first built parts. When I made them originally I couldn't get the shapes right but after minimising its a lot easier to shape so I guess maybe less is more sometimes!
Weirdly it's easier to work with after removing more of the overly complicated geometry I did when I first built parts. When I made them originally I couldn't get the shapes right but after minimising its a lot easier to shape so I guess maybe less is more sometimes!
Title: Re: 2003 RM 250 (WIP)
Post by: pacopastor34 on June 14, 2016, 01:42:38 PM
Post by: pacopastor34 on June 14, 2016, 01:42:38 PM
Looking very good mate!! I'm agree with Snappe said. It's better to do uniform edges distance. If you want to keep a shape, try adding a new edge by knife tool.(I think that is its name in blender)
Title: Re: 2003 RM 250 (WIP)
Post by: GDUBMX on June 14, 2016, 09:58:44 PM
Post by: GDUBMX on June 14, 2016, 09:58:44 PM
wow, im amazed at your progression Fats. really cool to see you modeling mate. keep it up :D
Title: Re: 2003 RM 250 (WIP)
Post by: 𝖙𝖋𝖈 on June 14, 2016, 10:05:26 PM
Post by: 𝖙𝖋𝖈 on June 14, 2016, 10:05:26 PM
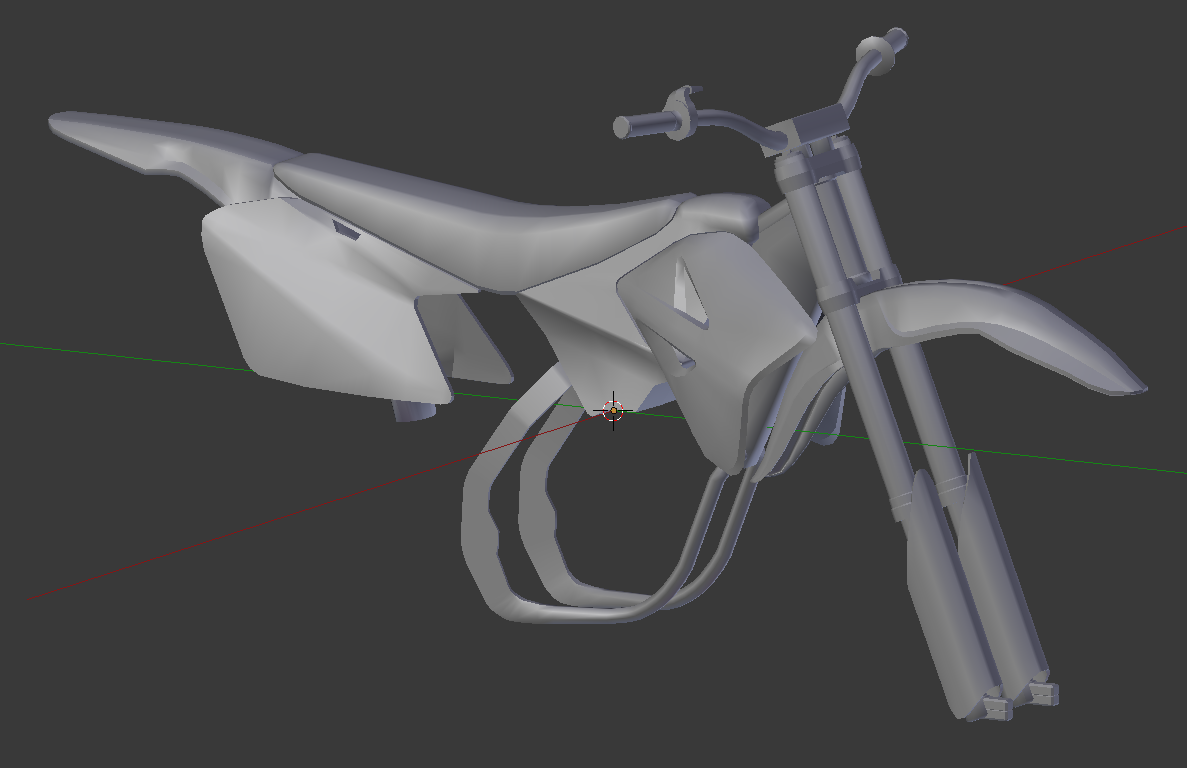
Think that's enough for today ;D
Title: Re: 2003 RM 250 (WIP)
Post by: pacopastor34 on June 14, 2016, 10:13:54 PM
Post by: pacopastor34 on June 14, 2016, 10:13:54 PM
Quote from: TheFatController on June 14, 2016, 10:05:26 PM
Think that's enough for today ;D
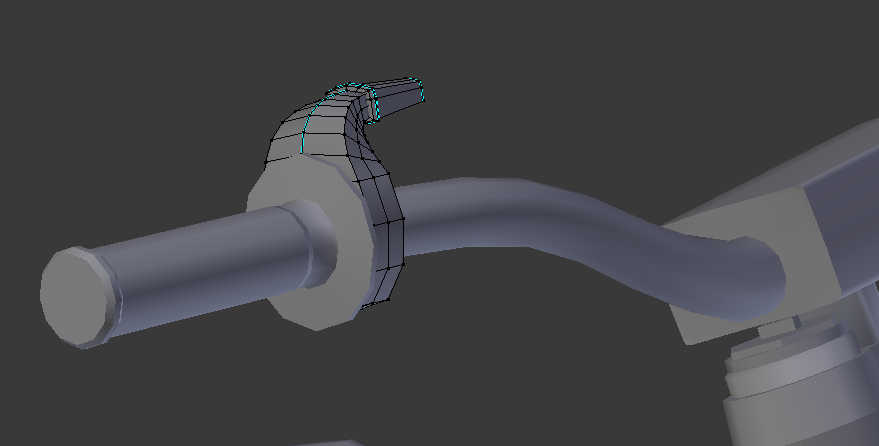
What a progression. Surprised with the throttle. Wireframe? ::)
Title: Re: 2003 RM 250 (WIP)
Post by: 𝖙𝖋𝖈 on June 14, 2016, 10:18:11 PM
Post by: 𝖙𝖋𝖈 on June 14, 2016, 10:18:11 PM
Thanks guys..
Title: Re: 2003 RM 250 (WIP)
Post by: BadStar on June 14, 2016, 10:39:23 PM
Post by: BadStar on June 14, 2016, 10:39:23 PM
Now slap some wheels on it and a engine and let's ride that sucker! (Oh and a throttle cable)
Amazing work man!
Amazing work man!
Title: Re: 2003 RM 250 (WIP)
Post by: GDUBMX on June 14, 2016, 11:22:31 PM
Post by: GDUBMX on June 14, 2016, 11:22:31 PM
Yeah honestly Fats, very impressive to see how quick you have picked this up and started rolling it out. It gives us noobs hope at starting to learn... Hahha
Title: Re: 2003 RM 250 (WIP)
Post by: pacopastor34 on June 15, 2016, 12:05:14 AM
Post by: pacopastor34 on June 15, 2016, 12:05:14 AM
Quote from: BadStar on June 14, 2016, 10:39:23 PM
Now slap some wheels on it and a engine and let's ride that sucker! (Oh and a throttle cable)
Amazing work man!
But don't put it brakes! better without brakes!
Title: Re: 2003 RM 250 (WIP)
Post by: 2tfanatic on June 15, 2016, 01:46:17 PM
Post by: 2tfanatic on June 15, 2016, 01:46:17 PM
Looking sexy!
Title: Re: 2003 RM 250 (WIP)
Post by: 𝖙𝖋𝖈 on June 15, 2016, 06:10:59 PM
Post by: 𝖙𝖋𝖈 on June 15, 2016, 06:10:59 PM
Thanks 8)
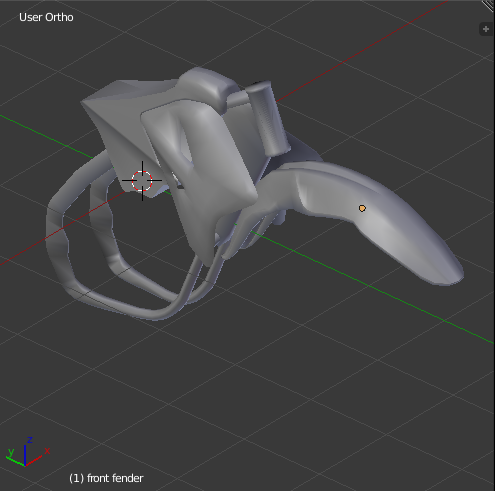
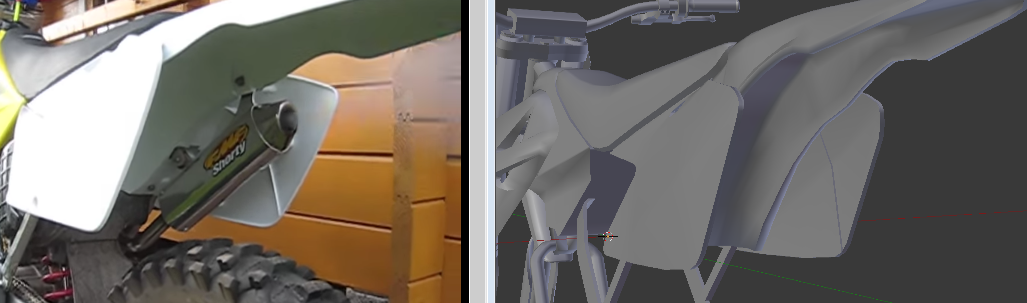
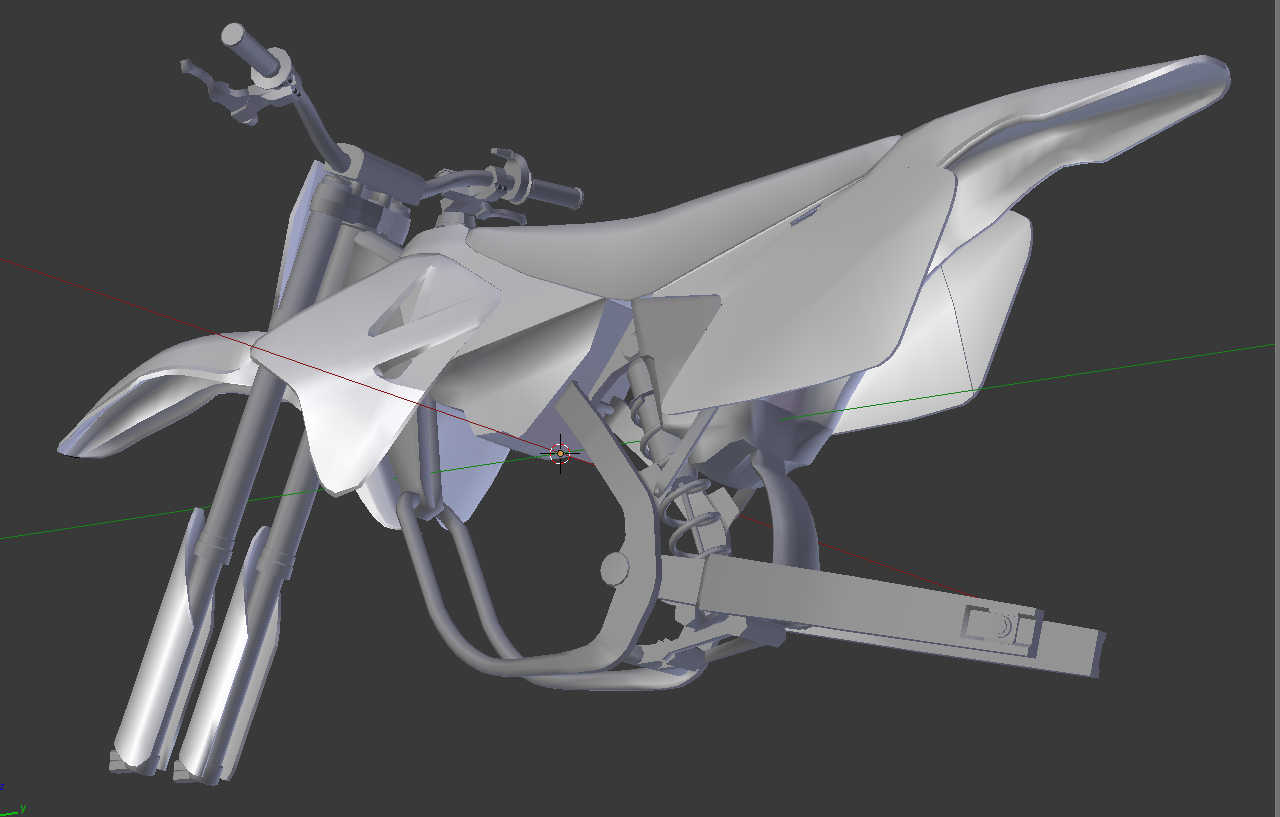
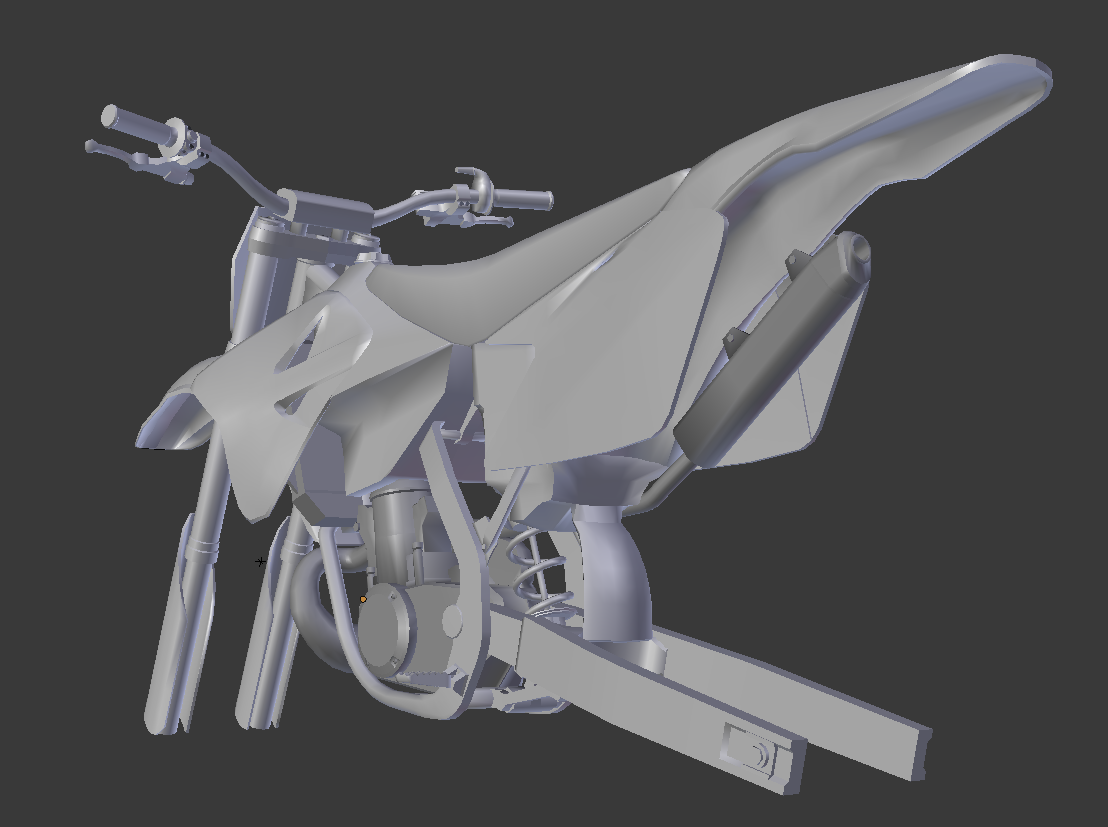
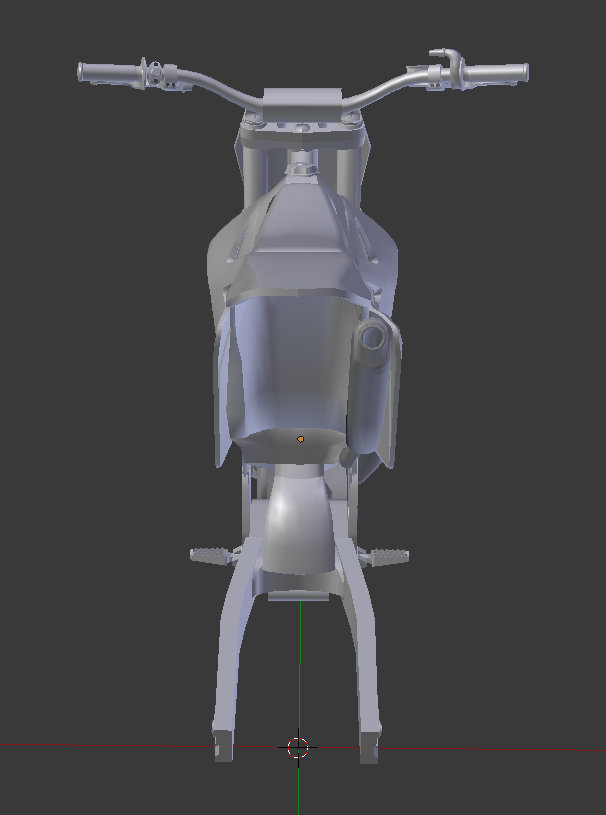
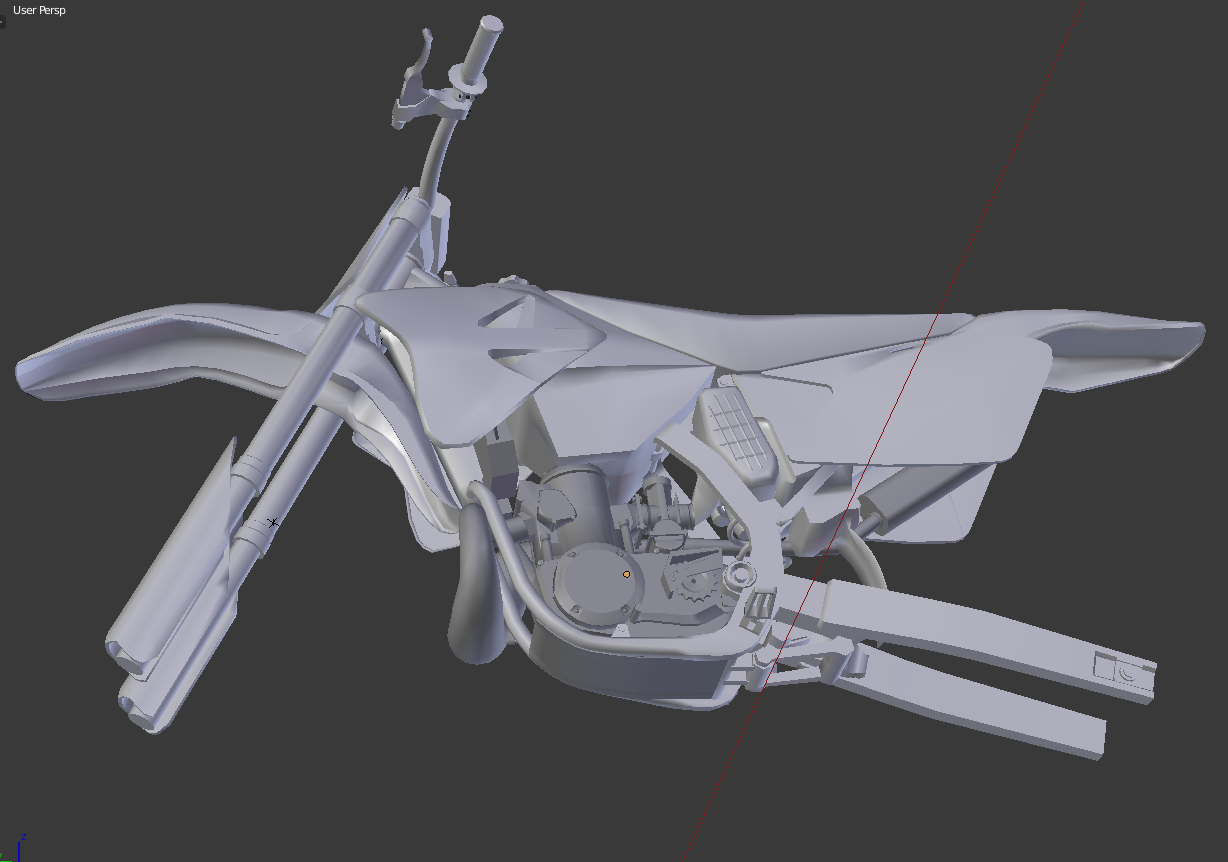
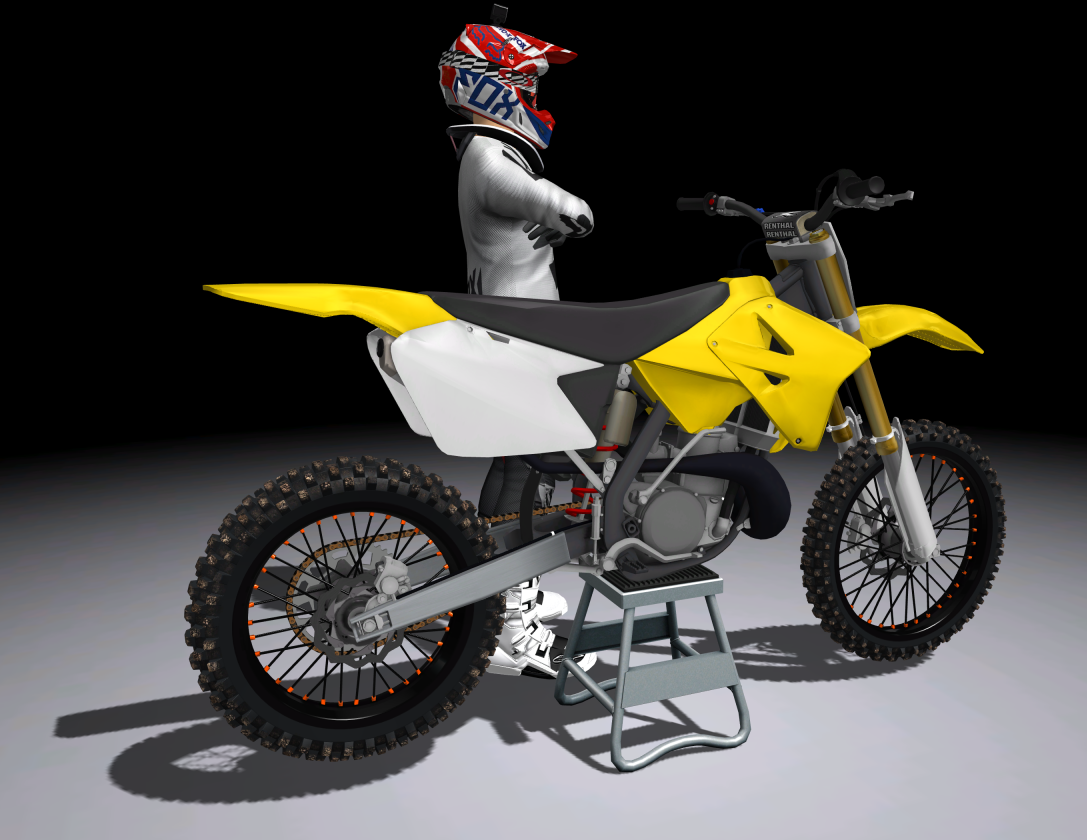
Hands down the hardest part of this model so far the underside of the rear fender. Number plates now line up, just need to apply the mirror modifier so I can shape the right plate for the exhaust, other than that sweet as a nut ;D
Currently sitting at a modest 13,000 tri's.
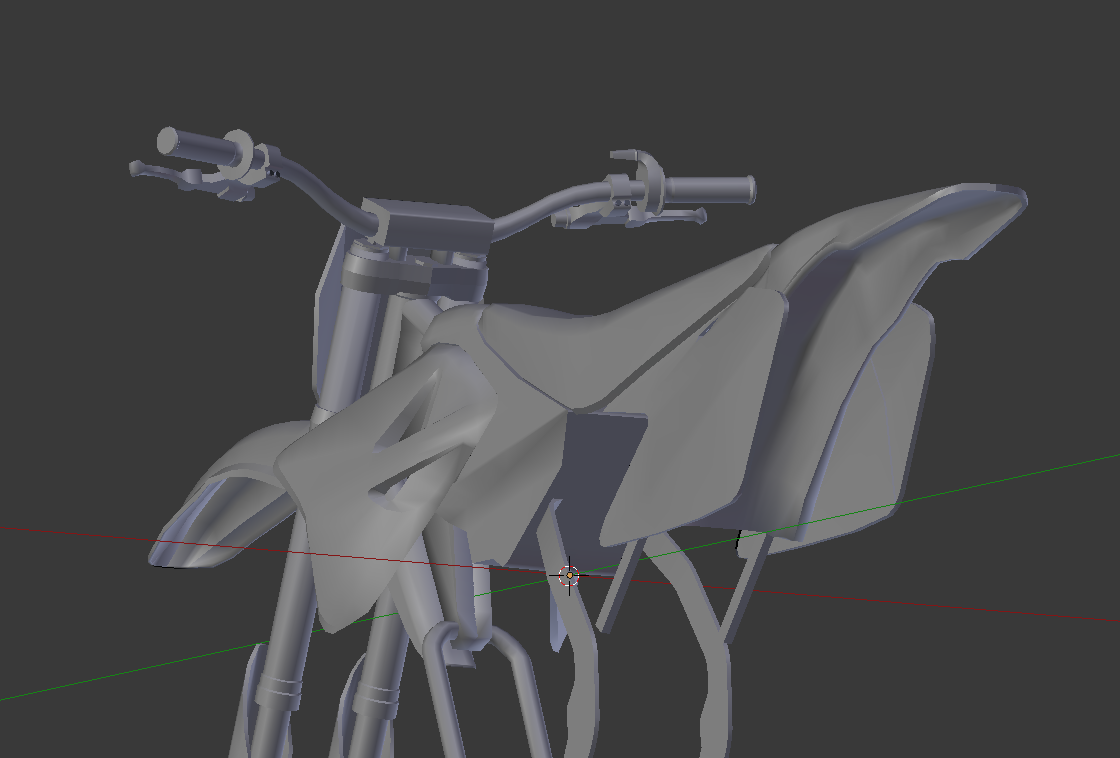
\/ Below, right plate sticks out more IRL due to shape for exhaust which I've not done yet ;)
Hands down the hardest part of this model so far the underside of the rear fender. Number plates now line up, just need to apply the mirror modifier so I can shape the right plate for the exhaust, other than that sweet as a nut ;D
Currently sitting at a modest 13,000 tri's.
\/ Below, right plate sticks out more IRL due to shape for exhaust which I've not done yet ;)
Title: Re: 2003 RM 250 (WIP)
Post by: pacopastor34 on June 15, 2016, 06:17:48 PM
Post by: pacopastor34 on June 15, 2016, 06:17:48 PM
Quote from: TheFatController on June 15, 2016, 06:10:59 PM
Thanks 8)
Hands down the hardest part of this model so far the underside of the rear fender. Number plates now line up, just need to apply the mirror modifier so I can shape the right plate for the exhaust, other than that sweet as a nut ;D
Currently sitting at a modest 13,000 tri's.
god, are you sleeping? eating? working? How can you go so fast?
Its looking so so good. :D :D :D
Title: Re: 2003 RM 250 (WIP)
Post by: 𝖙𝖋𝖈 on June 15, 2016, 06:32:36 PM
Post by: 𝖙𝖋𝖈 on June 15, 2016, 06:32:36 PM
Well sure I work but what is this eating and sleeping thing all about? 8)
Title: Re: 2003 RM 250 (WIP)
Post by: pacopastor34 on June 15, 2016, 06:44:55 PM
Post by: pacopastor34 on June 15, 2016, 06:44:55 PM
Quote from: TheFatController on June 15, 2016, 06:32:36 PM
Well sure I work but what is this eating and sleeping thing all about? 8)
hahaha, amazing. I'm sure you will release it with a RC4 Makita Skin...Isn't it?
Title: Re: 2003 RM 250 (WIP)
Post by: 𝖙𝖋𝖈 on June 15, 2016, 06:51:47 PM
Post by: 𝖙𝖋𝖈 on June 15, 2016, 06:51:47 PM
So many good skin choices out there, I think you have from what, 2001 to 2008 roughly the same shape plastics?
Stock rm will come with it, Sobe, hoping gdub will do me one to package with it. The rest is up to you all ;)
Stock rm will come with it, Sobe, hoping gdub will do me one to package with it. The rest is up to you all ;)
Title: Re: 2003 RM 250 (WIP)
Post by: GDUBMX on June 15, 2016, 07:43:34 PM
Post by: GDUBMX on June 15, 2016, 07:43:34 PM
Awesome work fats, funny you mention sobe cus I did a Travis pastrana sobe replica last year which I never released. I'll definitely modify it for this beast though. Would be glad to help out
Title: Re: 2003 RM 250 (WIP)
Post by: 𝖙𝖋𝖈 on June 15, 2016, 10:34:33 PM
Post by: 𝖙𝖋𝖈 on June 15, 2016, 10:34:33 PM
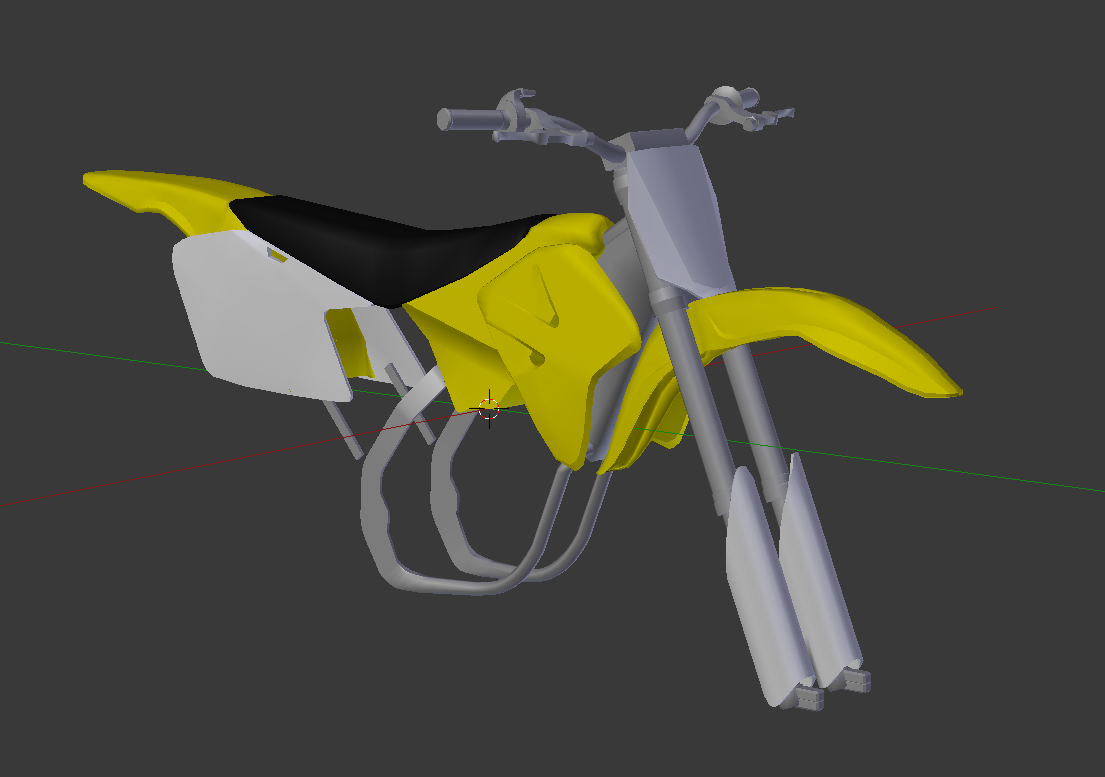
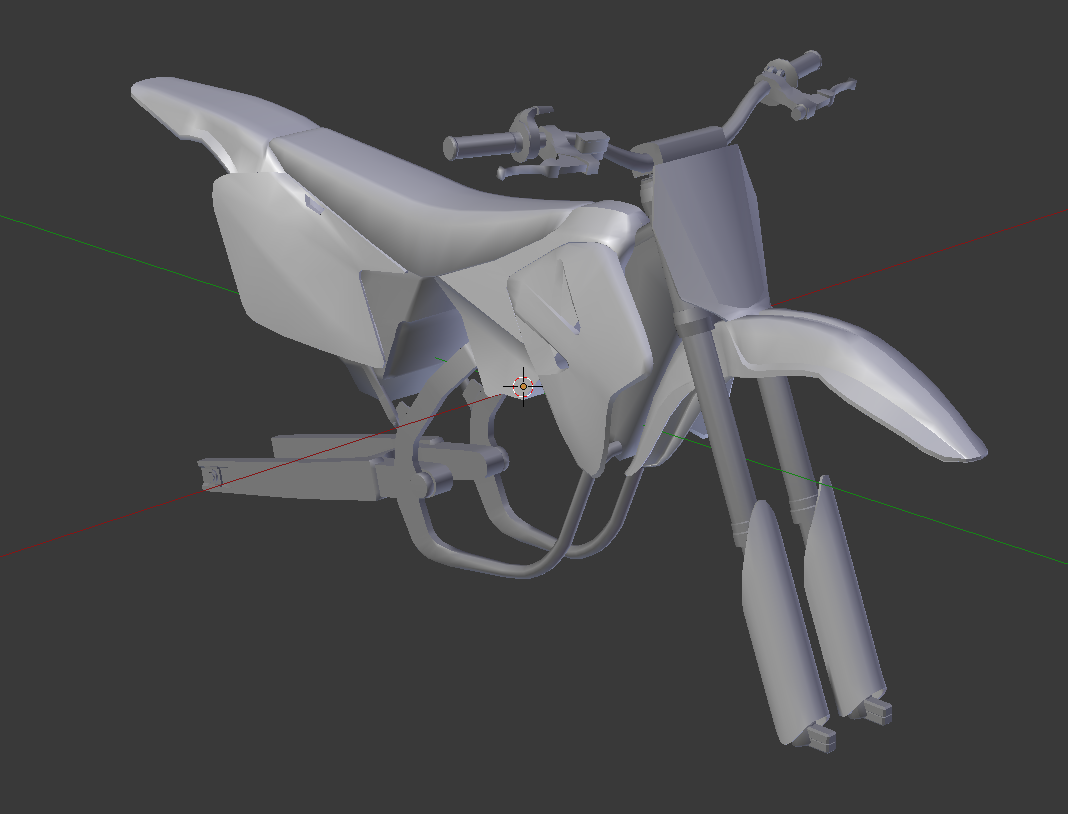
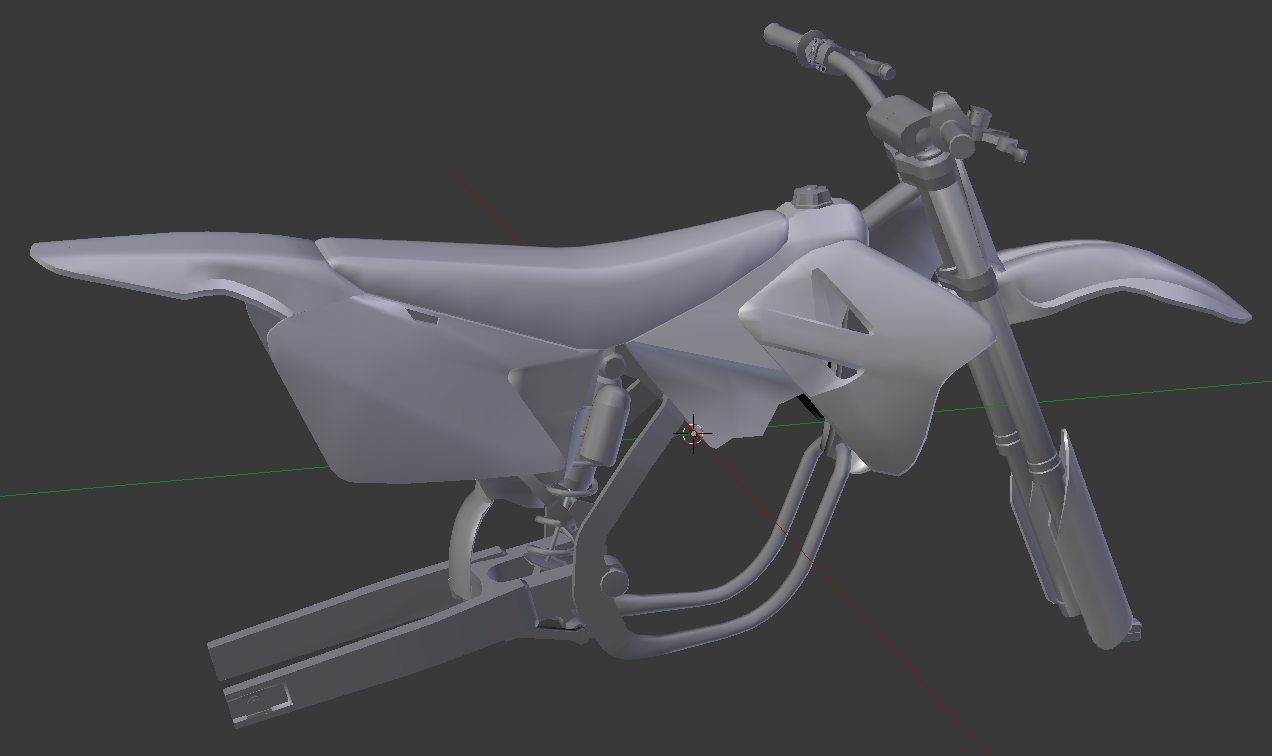
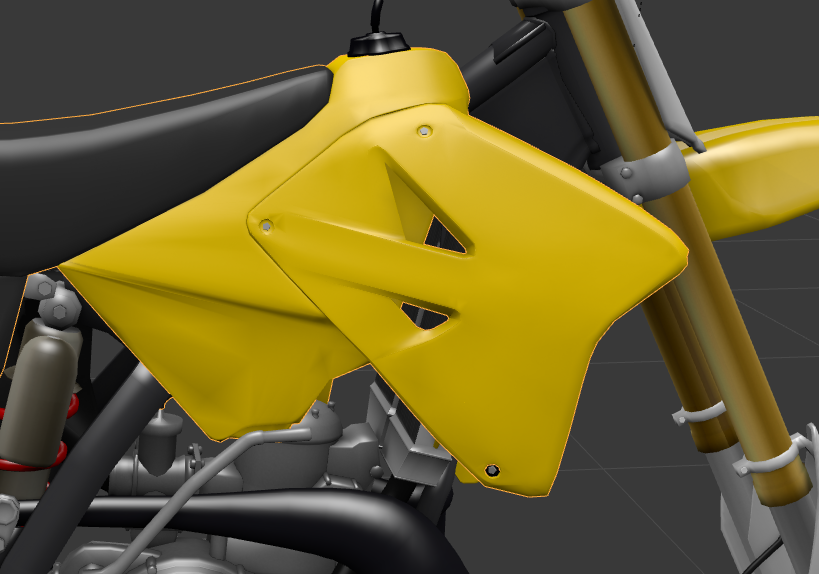
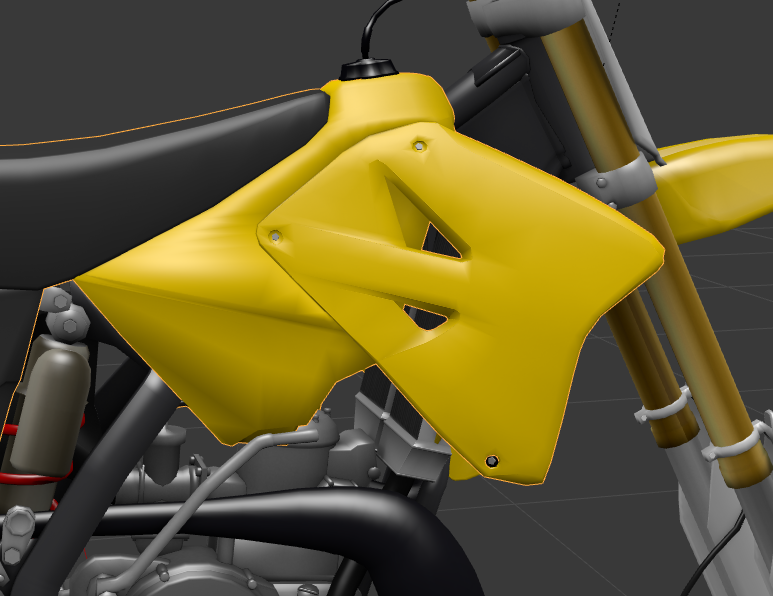
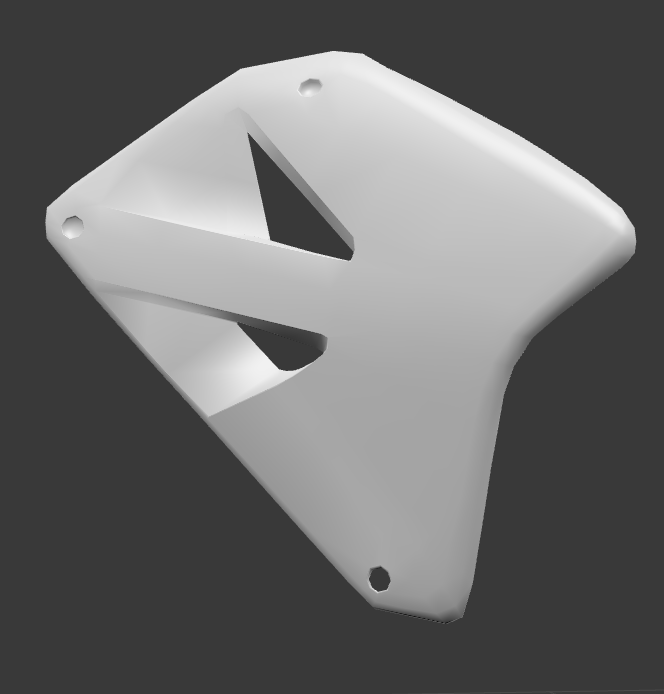
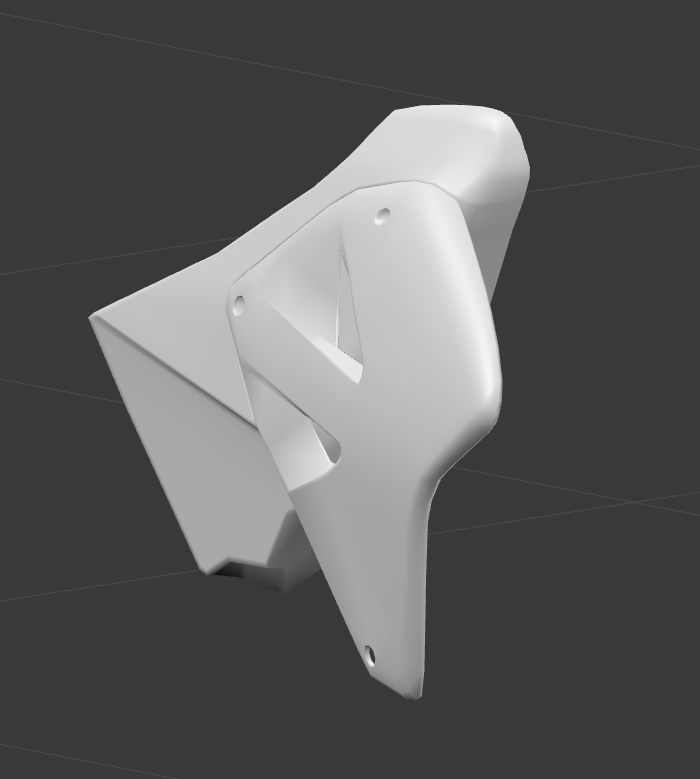
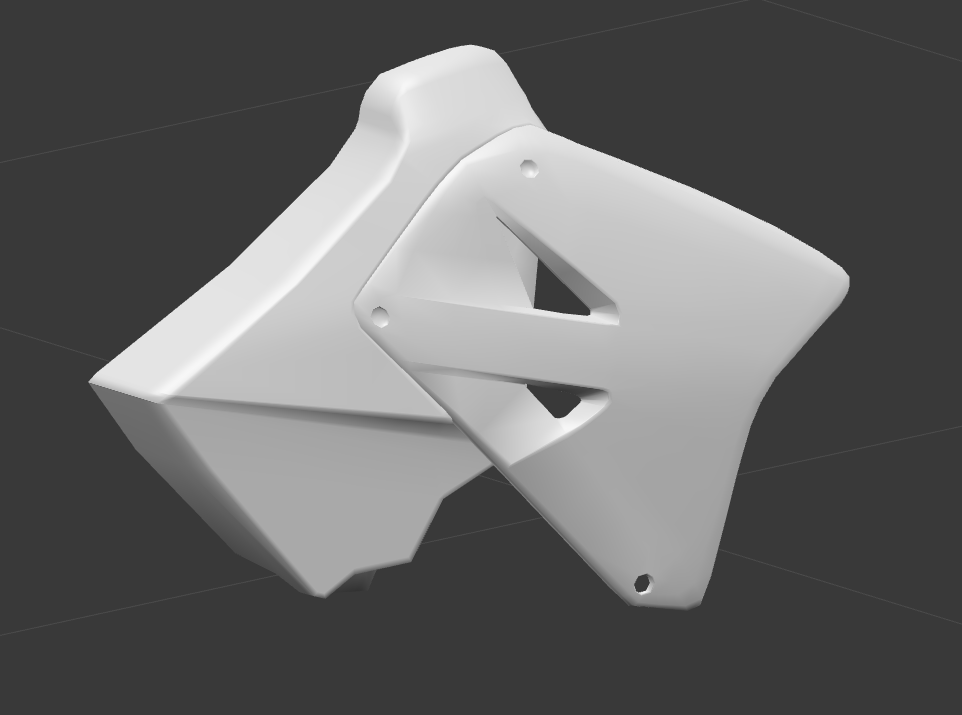
Reshaped tank and shrouds :D
Title: Re: 2003 RM 250 (WIP)
Post by: 𝖙𝖋𝖈 on June 16, 2016, 02:01:12 AM
Post by: 𝖙𝖋𝖈 on June 16, 2016, 02:01:12 AM
Thanks, no problems there, the pivot point is for one of the parts I was just using for mirror, and everything is it's own piece/scene.
Title: Re: 2003 RM 250 (WIP)
Post by: darkbelow13 on June 16, 2016, 02:28:56 AM
Post by: darkbelow13 on June 16, 2016, 02:28:56 AM
Can't wait! One of my all time favorite bikes.
Title: Re: 2003 RM 250 (WIP)
Post by: 𝖙𝖋𝖈 on June 16, 2016, 10:04:12 AM
Post by: 𝖙𝖋𝖈 on June 16, 2016, 10:04:12 AM
So, what is Snappe's Blender template all about? Surely it's not too late to import my stuff into it? Where can I get hold of it?
Title: Re: 2003 RM 250 (WIP)
Post by: pacopastor34 on June 16, 2016, 10:28:36 AM
Post by: pacopastor34 on June 16, 2016, 10:28:36 AM
Quote from: TheFatController on June 16, 2016, 10:04:12 AM
So, what is Snappe's Blender template all about? Surely it's not too late to import my stuff into it? Where can I get hold of it?
Snappe's what? I would appreciate info about that. Is something like a template with pivot points for blender? Or something more?
Title: Re: 2003 RM 250 (WIP)
Post by: GDUBMX on June 16, 2016, 10:38:20 AM
Post by: GDUBMX on June 16, 2016, 10:38:20 AM
This perhaps?
http://forum.mx-bikes.com/index.php?topic=974.0
http://forum.mx-bikes.com/index.php?topic=974.0
Title: Re: 2003 RM 250 (WIP)
Post by: pacopastor34 on June 16, 2016, 11:05:53 AM
Post by: pacopastor34 on June 16, 2016, 11:05:53 AM
Quote from: gdubmx on June 16, 2016, 10:38:20 AM
This perhaps?
http://forum.mx-bikes.com/index.php?topic=974.0
Thank you. I didn't see that!! I don't know why.
Title: Re: 2003 RM 250 (WIP)
Post by: 𝖙𝖋𝖈 on June 16, 2016, 11:49:08 AM
Post by: 𝖙𝖋𝖈 on June 16, 2016, 11:49:08 AM
Oh I see :D.. Wasn't sure it was part of that but was on my phone when I asked. Thanks!
Title: Re: 2003 RM 250 (WIP)
Post by: Vortex_Damien on June 16, 2016, 12:19:02 PM
Post by: Vortex_Damien on June 16, 2016, 12:19:02 PM
Wow thanks going to help a lot! didn't know that existed aha sweet
Title: Re: 2003 RM 250 (WIP)
Post by: pacopastor34 on June 16, 2016, 12:43:20 PM
Post by: pacopastor34 on June 16, 2016, 12:43:20 PM
Quote from: Vortex_Damien on June 16, 2016, 12:19:02 PM
Wow thanks going to help a lot! didn't know that existed aha sweet
I'm wondering why none of us hadn't seen it... :o
Guys, Do you all use the regular rightclick selection in blender or maybe do you use a different layout for selection?
Title: Re: 2003 RM 250 (WIP)
Post by: 𝖙𝖋𝖈 on June 16, 2016, 01:16:22 PM
Post by: 𝖙𝖋𝖈 on June 16, 2016, 01:16:22 PM
I switched my right / left click in user preferences. Couldn't stand accidentally clicking somewhere and placing the 3d cursor.
Maybe that's not what you mean though, can you explain further / differently?
Maybe that's not what you mean though, can you explain further / differently?
Title: Re: 2003 RM 250 (WIP)
Post by: pacopastor34 on June 16, 2016, 01:55:24 PM
Post by: pacopastor34 on June 16, 2016, 01:55:24 PM
Quote from: TheFatController on June 16, 2016, 01:16:22 PM
I switched my right / left click in user preferences. Couldn't stand accidentally clicking somewhere and placing the 3d cursor.
Maybe that's not what you mean though, can you explain further / differently?
Yeah that's it! I am about give blender another opportunity but I've been using 3dmax and I'm not used to the right click. I am going to change that and give it a new try. I like blender modifiers and some more things. Maybe I use blender for modelling and 3dsmax for the unwrapping. I like 3ds max uv unwrap modifier.
Title: Re: 2003 RM 250 (WIP)
Post by: 𝖙𝖋𝖈 on June 16, 2016, 03:18:13 PM
Post by: 𝖙𝖋𝖈 on June 16, 2016, 03:18:13 PM
Yeah great for scale.. I've had issues with reference pictures of front and back, while YouTube and eBay have been great for shape it's still hard to get the right scale.
Title: Re: 2003 RM 250 (WIP)
Post by: Snappe on June 16, 2016, 03:23:24 PM
Post by: Snappe on June 16, 2016, 03:23:24 PM
Quote from: TheFatController on June 16, 2016, 01:16:22 PM
I switched my right / left click in user preferences.
This is essential IMO!
Quote from: geofanatec on June 16, 2016, 02:53:47 PM
Yes that is what I am talking about with the template.
I can't believe nobody saw this??
Sorry I guess I didn't really announce it well enough :-/
Title: Re: 2003 RM 250 (WIP)
Post by: 𝖙𝖋𝖈 on June 16, 2016, 03:26:35 PM
Post by: 𝖙𝖋𝖈 on June 16, 2016, 03:26:35 PM
I just figured the bike template was the folder / file structure :)
Title: Re: 2003 RM 250 (WIP)
Post by: 𝖙𝖋𝖈 on June 16, 2016, 06:31:41 PM
Post by: 𝖙𝖋𝖈 on June 16, 2016, 06:31:41 PM
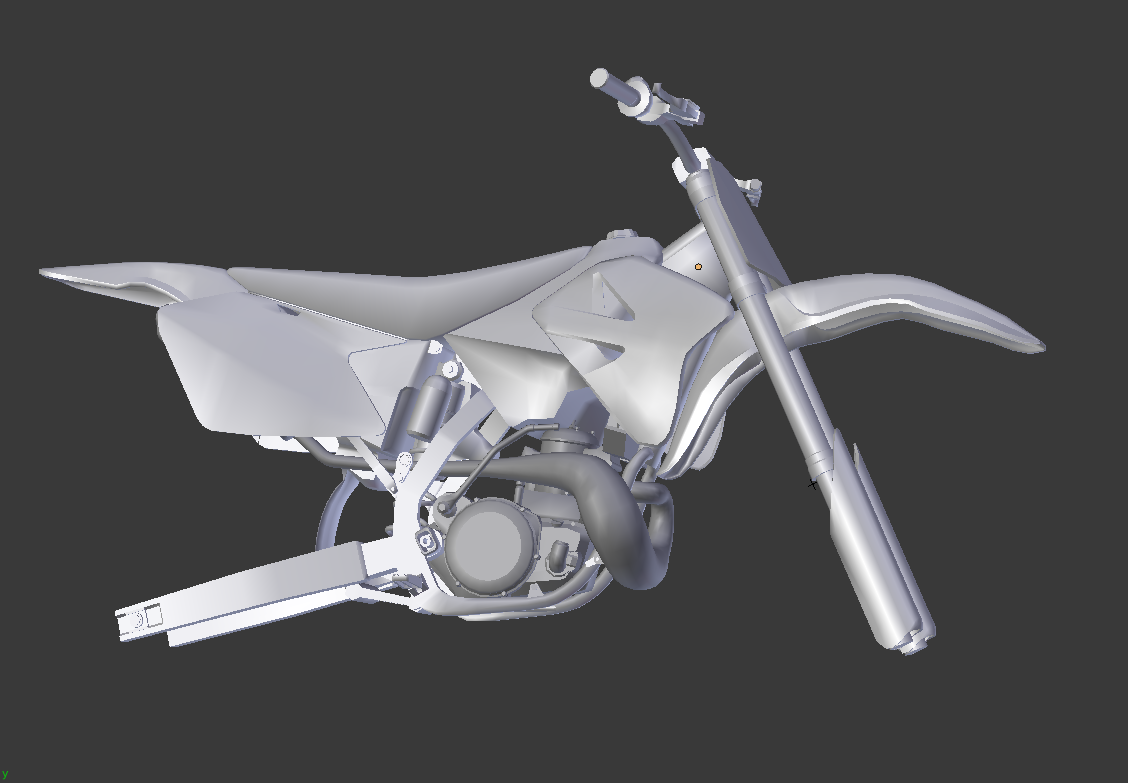
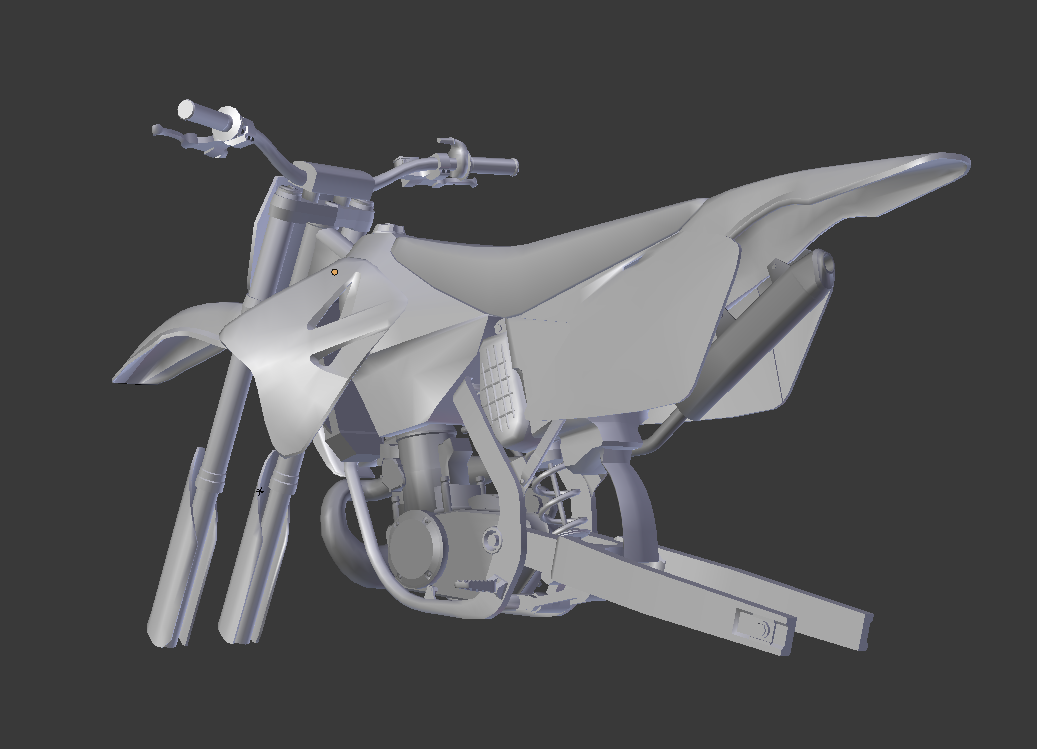
Found an hour or two today..
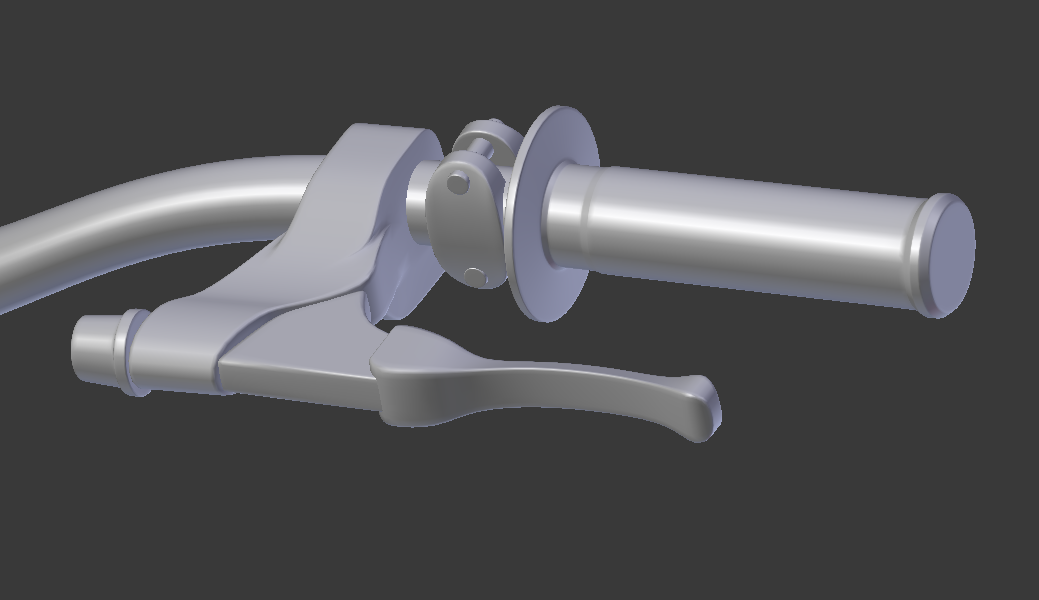
Final tank shape, final shroud shape, frame mounts, swing arm, airbox, front brake reservoir, kill switch.. Once I get going! 8)
Final tank shape, final shroud shape, frame mounts, swing arm, airbox, front brake reservoir, kill switch.. Once I get going! 8)
Title: Re: 2003 RM 250 (WIP)
Post by: StoneRider on June 16, 2016, 07:10:23 PM
Post by: StoneRider on June 16, 2016, 07:10:23 PM
i can't wait to skin this one... ;D

Title: Re: 2003 RM 250 (WIP)
Post by: 𝖙𝖋𝖈 on June 16, 2016, 08:25:53 PM
Post by: 𝖙𝖋𝖈 on June 16, 2016, 08:25:53 PM
Yeah nice! I'm looking forward to skinning it.. Dreading modelling the engine though :(
Title: Re: 2003 RM 250 (WIP)
Post by: StoneRider on June 16, 2016, 08:28:34 PM
Post by: StoneRider on June 16, 2016, 08:28:34 PM
you're gonna make it !! that's the unwrape damn thing that you'd be dreading :P
Title: Re: 2003 RM 250 (WIP)
Post by: 𝖙𝖋𝖈 on June 16, 2016, 08:32:34 PM
Post by: 𝖙𝖋𝖈 on June 16, 2016, 08:32:34 PM
Not so bothered about that, maybe I will be when it comes to it..
Title: Re: 2003 RM 250 (WIP)
Post by: 𝖙𝖋𝖈 on June 17, 2016, 12:35:46 PM
Post by: 𝖙𝖋𝖈 on June 17, 2016, 12:35:46 PM
Finished rear shock, swingarm and linkage and fuel cap ;D Getting closer to having to do that damn engine :-\
Title: Re: 2003 RM 250 (WIP)
Post by: pacopastor34 on June 17, 2016, 03:59:08 PM
Post by: pacopastor34 on June 17, 2016, 03:59:08 PM
Quote from: TheFatController on June 17, 2016, 12:35:46 PM
Finished rear shock, swingarm and linkage and fuel cap ;D Getting closer to having to do that damn engine :-\
Absolutely amazing IMO. Very nice. Nobody knows how many hours i will spend riding that bike.
Title: Re: 2003 RM 250 (WIP)
Post by: wattdigger on June 17, 2016, 04:55:02 PM
Post by: wattdigger on June 17, 2016, 04:55:02 PM
This is really impressive for a first model. Definitely makes me want to give blender a try again. I just might!
Title: Re: 2003 RM 250 (WIP)
Post by: StoneRider on June 17, 2016, 05:00:02 PM
Post by: StoneRider on June 17, 2016, 05:00:02 PM
Same Paco... and i'm just amazed by the speed of you learning blender man... are you totally Human ??
Title: Re: 2003 RM 250 (WIP)
Post by: pacopastor34 on June 17, 2016, 05:06:34 PM
Post by: pacopastor34 on June 17, 2016, 05:06:34 PM
Quote from: StoneRider on June 17, 2016, 05:00:02 PMhttps://www.youtube.com/v/bT0Wp9LO4v4
Same Paco... and i'm just amazed by the speed of you learning blender man... are you totally Human ??
Title: Re: 2003 RM 250 (WIP)
Post by: 𝖙𝖋𝖈 on June 17, 2016, 05:24:22 PM
Post by: 𝖙𝖋𝖈 on June 17, 2016, 05:24:22 PM
So.. Anyone for a game of pool? ;D
Title: Re: 2003 RM 250 (WIP)
Post by: StoneRider on June 17, 2016, 05:51:43 PM
Post by: StoneRider on June 17, 2016, 05:51:43 PM
XD
Title: Re: 2003 RM 250 (WIP)
Post by: 𝖙𝖋𝖈 on June 17, 2016, 08:26:16 PM
Post by: 𝖙𝖋𝖈 on June 17, 2016, 08:26:16 PM
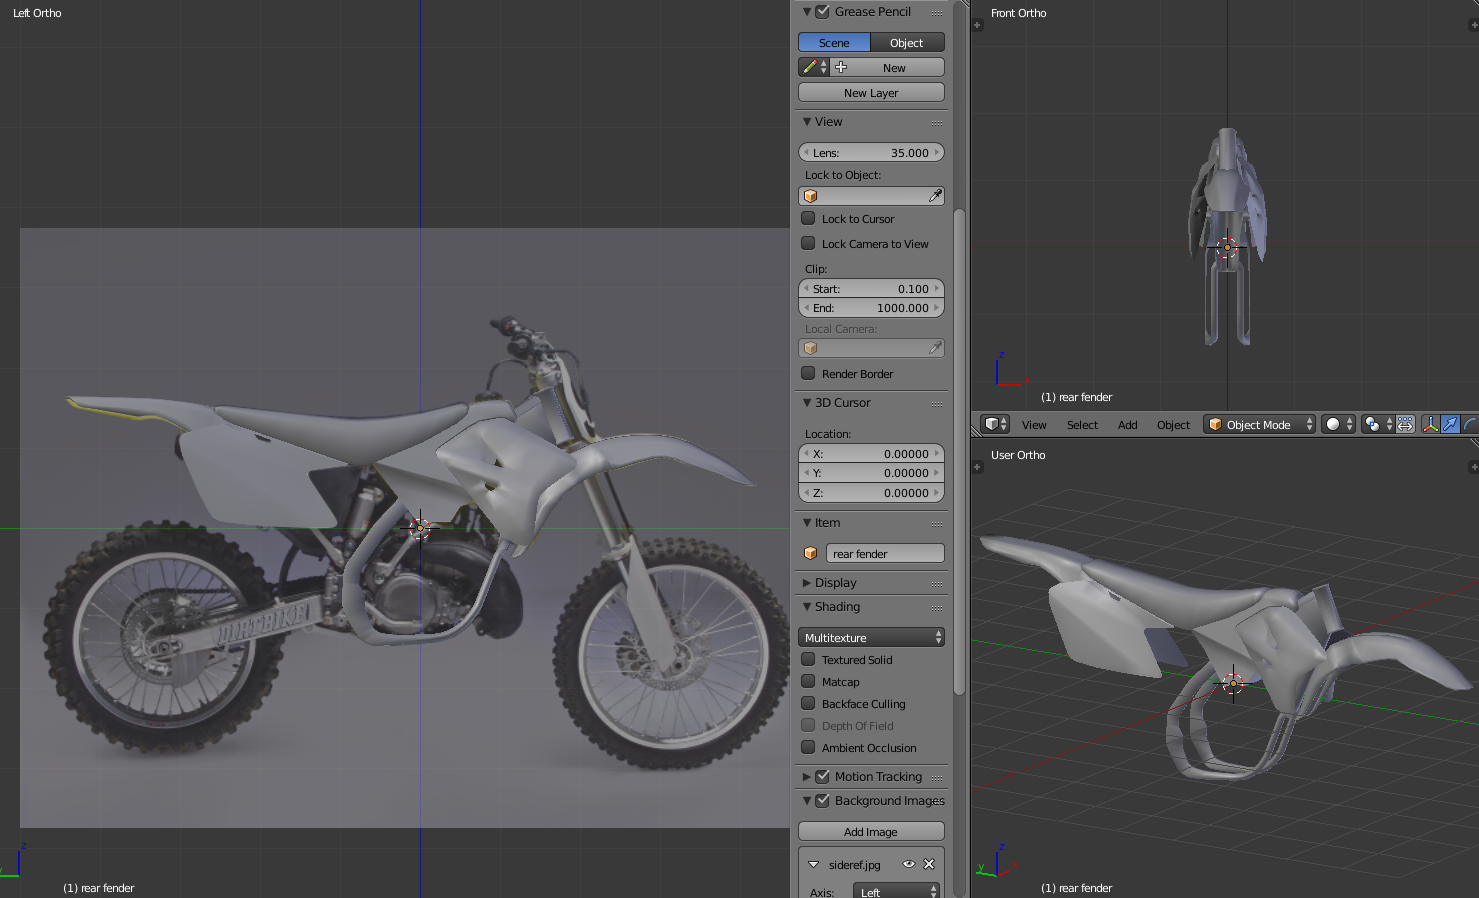
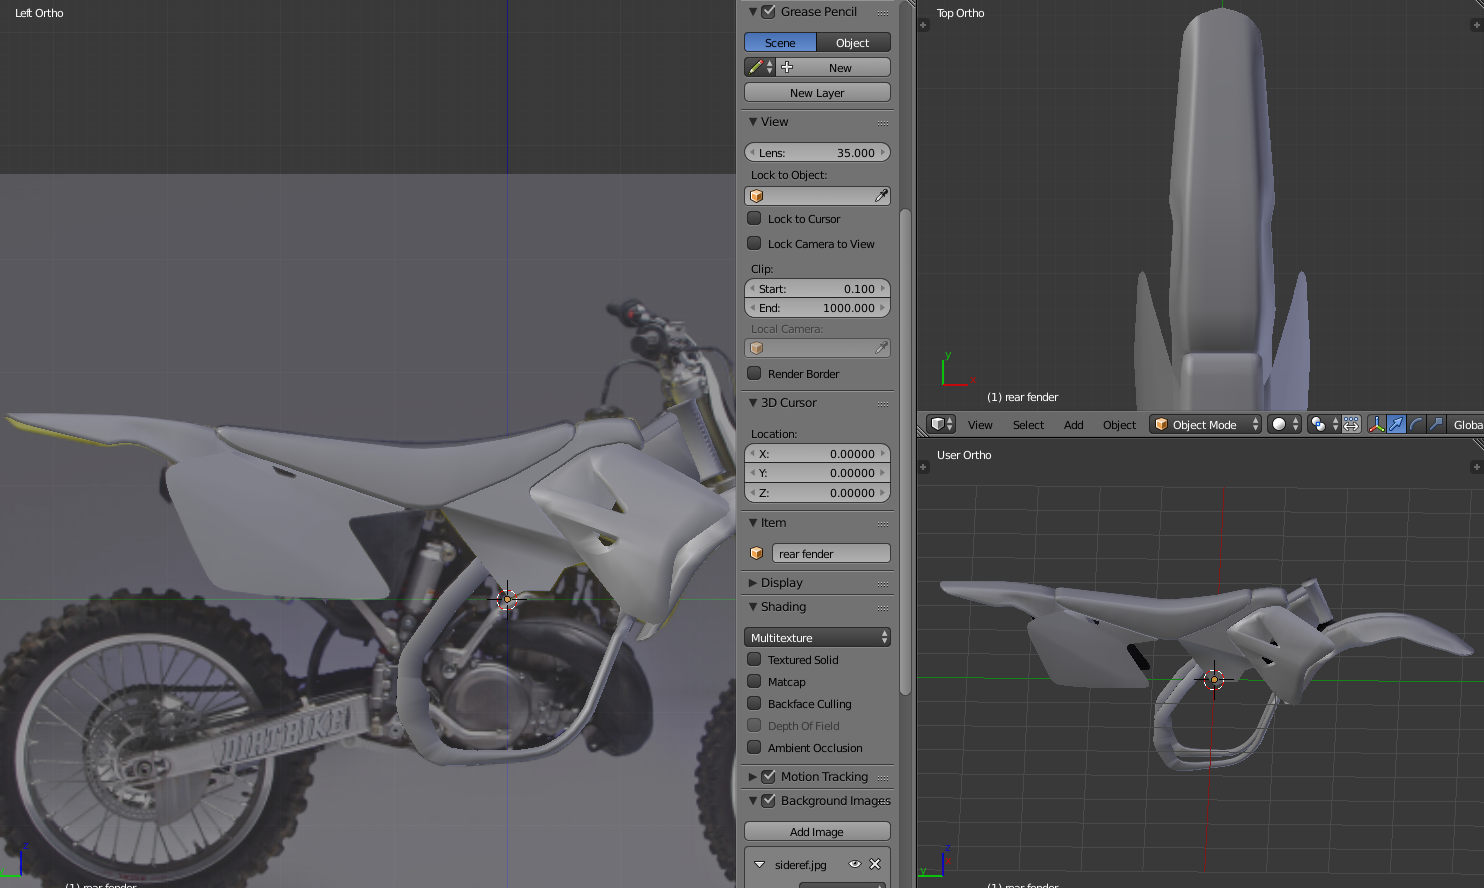
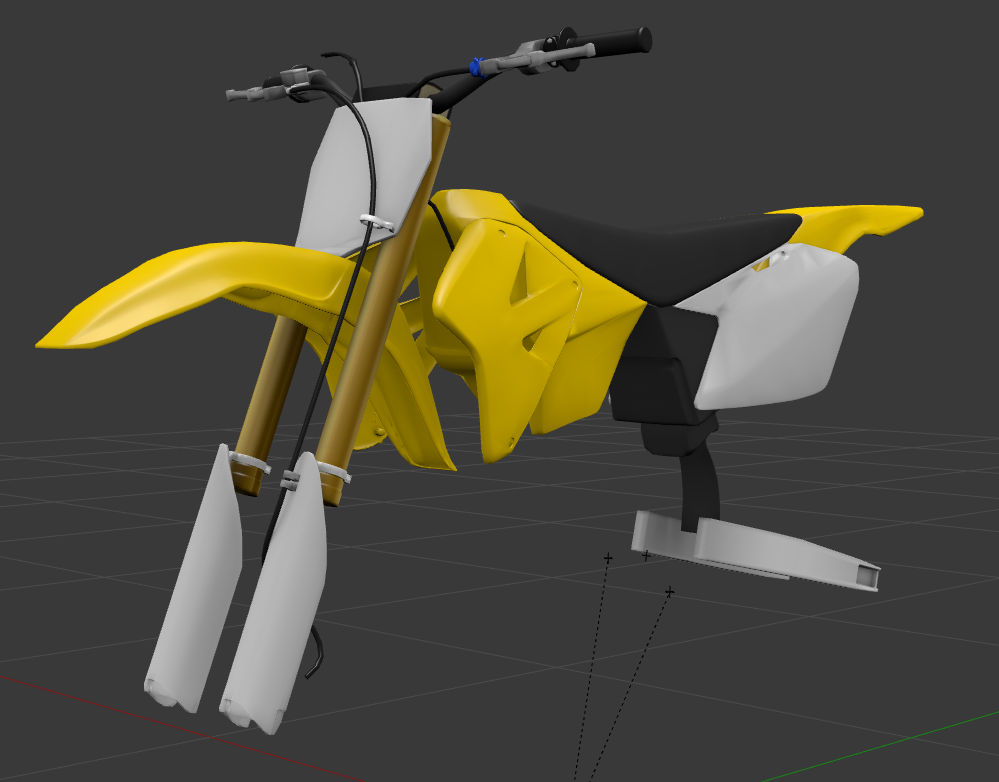
Just spent a couple of hours putting my meshes into Snappes Blender template. Maybe someone can tell me if it looks OK or if I have something wrong?
Chassis is rear fender, frame, airbox, seat, tank, shrouds. Front suspension is fork guards (lost my lower fork for some reason). Steer is bars, front plate, front fender, top forks, rear suspension is swingarm, linkeage.
Oh, and putting my rear number plate mesh in with chassis pivot caused some weird shading..
Title: Re: 2003 RM 250 (WIP)
Post by: pacopastor34 on June 17, 2016, 08:44:17 PM
Post by: pacopastor34 on June 17, 2016, 08:44:17 PM
it seems perfect!
Title: Re: 2003 RM 250 (WIP)
Post by: 𝖙𝖋𝖈 on June 17, 2016, 08:50:49 PM
Post by: 𝖙𝖋𝖈 on June 17, 2016, 08:50:49 PM
Thanks paco! Figured it was worth doing now before it gets too complicated.
Title: Re: 2003 RM 250 (WIP)
Post by: BadStar on June 18, 2016, 02:08:22 AM
Post by: BadStar on June 18, 2016, 02:08:22 AM
Do you ever sit back and realize this is your first model? man, a beauty! Same with Geo.. you guys are impressive.
Bike Gate Never Again!
Bike Gate Never Again!
Title: Re: 2003 RM 250 (WIP)
Post by: 𝖙𝖋𝖈 on June 18, 2016, 03:21:48 PM
Post by: 𝖙𝖋𝖈 on June 18, 2016, 03:21:48 PM
Thanks mate :)
PiBoSo / Snappe / Anyone who knows..
When using the default wheels, what comes with them? Discs? Chainwheel? Front Cog? Chain?
Would be useful to know what I have to model and what I can leave off.. Thanks!
PiBoSo / Snappe / Anyone who knows..
When using the default wheels, what comes with them? Discs? Chainwheel? Front Cog? Chain?
Would be useful to know what I have to model and what I can leave off.. Thanks!
Title: Re: 2003 RM 250 (WIP)
Post by: 𝖙𝖋𝖈 on June 18, 2016, 04:10:27 PM
Post by: 𝖙𝖋𝖈 on June 18, 2016, 04:10:27 PM
Thanks geo, guessing the chainwheel isn't included?
Title: Re: 2003 RM 250 (WIP)
Post by: 𝖙𝖋𝖈 on June 18, 2016, 05:29:33 PM
Post by: 𝖙𝖋𝖈 on June 18, 2016, 05:29:33 PM
Getting somewhere!
Title: Re: 2003 RM 250 (WIP)
Post by: MxFelix on June 18, 2016, 06:05:29 PM
Post by: MxFelix on June 18, 2016, 06:05:29 PM
wtf fats! :o you're so freakin fast :o
I tried to start to model the 2017 KTM 450 sxf but I'm soooo slow :(
I needed the same time you needed for almost a whole bike to finish the side plates ;D
I tried to start to model the 2017 KTM 450 sxf but I'm soooo slow :(
I needed the same time you needed for almost a whole bike to finish the side plates ;D
Title: Re: 2003 RM 250 (WIP)
Post by: 𝖙𝖋𝖈 on June 18, 2016, 06:08:38 PM
Post by: 𝖙𝖋𝖈 on June 18, 2016, 06:08:38 PM
Picked up the basics pretty quickly, have a good head for spacial awareness. Thanks!
Engine needs better placement and scale so more on that later. From side pics it looks perfect but from YouTube walk arounds it needs tweaks.
Engine needs better placement and scale so more on that later. From side pics it looks perfect but from YouTube walk arounds it needs tweaks.
Title: Re: 2003 RM 250 (WIP)
Post by: BadStar on June 18, 2016, 11:03:08 PM
Post by: BadStar on June 18, 2016, 11:03:08 PM
Fats is whipping this together so he has time to show me how to export a single basic F*&^King cube into Mapview.. fml !! hahaha
Title: Re: 2003 RM 250 (WIP)
Post by: 𝖙𝖋𝖈 on June 19, 2016, 12:56:05 AM
Post by: 𝖙𝖋𝖈 on June 19, 2016, 12:56:05 AM
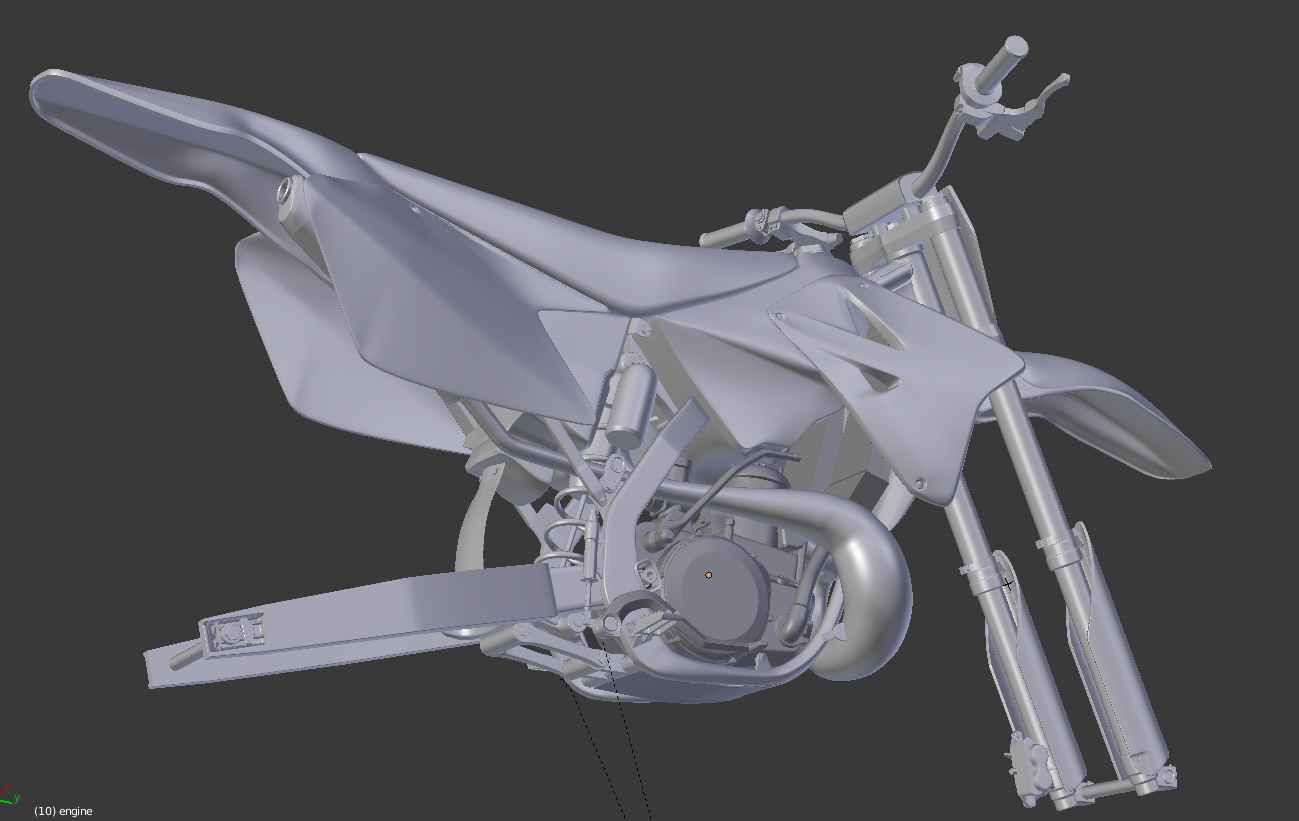
Got pipe? ;D
Can't wait to get this in game.. Planning on doing 2 or 3 versions - stock, one with handguards and disc covers, not sure on a third yet but hate to say it, it probably won't be a DRZ unless someone wants to model the engine.. Not even finished and know I'm not doing that again in a hurry! ;D
So how we looking? Two or three engine pieces left, hoses and cables, wheel stuff (calipers, discs, axles, chainwheel).. Sure there is more :-\
Title: Re: 2003 RM 250 (WIP)
Post by: Vortex_Damien on June 19, 2016, 01:05:32 AM
Post by: Vortex_Damien on June 19, 2016, 01:05:32 AM
Mudflap looks a little misshaped and missing a carb ;).. other then its looking super solid cant wait to teach you normal maps :)
Title: Re: 2003 RM 250 (WIP)
Post by: BadStar on June 19, 2016, 02:03:07 AM
Post by: BadStar on June 19, 2016, 02:03:07 AM
XR450 or WR450 to bring that crowd over the mxb.
Edit.. nevermind just saw the no go on engine again lol
Edit.. nevermind just saw the no go on engine again lol
Title: Re: 2003 RM 250 (WIP)
Post by: 𝖙𝖋𝖈 on June 19, 2016, 02:06:02 AM
Post by: 𝖙𝖋𝖈 on June 19, 2016, 02:06:02 AM
Lol.. Well I wanted to make an older yz250, maybe 01, and maybe a 426, but like I said... Engine ;D
Can't wait to get it done damo! Modeling has temporarily taken over my spare time lol
Can't wait to get it done damo! Modeling has temporarily taken over my spare time lol
Title: Re: 2003 RM 250 (WIP)
Post by: 𝖙𝖋𝖈 on June 20, 2016, 12:24:23 AM
Post by: 𝖙𝖋𝖈 on June 20, 2016, 12:24:23 AM
Not done much, reshaped air box, reshaped underside of rear fender (again.. and again lol) added kick starter, engine mounts, frame differences by side, tank tweaks..
Title: Re: 2003 RM 250 (WIP)
Post by: BadStar on June 20, 2016, 12:31:11 AM
Post by: BadStar on June 20, 2016, 12:31:11 AM
An 01 or so YZ125/250 would be cool
Title: Re: 2003 RM 250 (WIP)
Post by: 𝖙𝖋𝖈 on June 21, 2016, 01:04:59 AM
Post by: 𝖙𝖋𝖈 on June 21, 2016, 01:04:59 AM
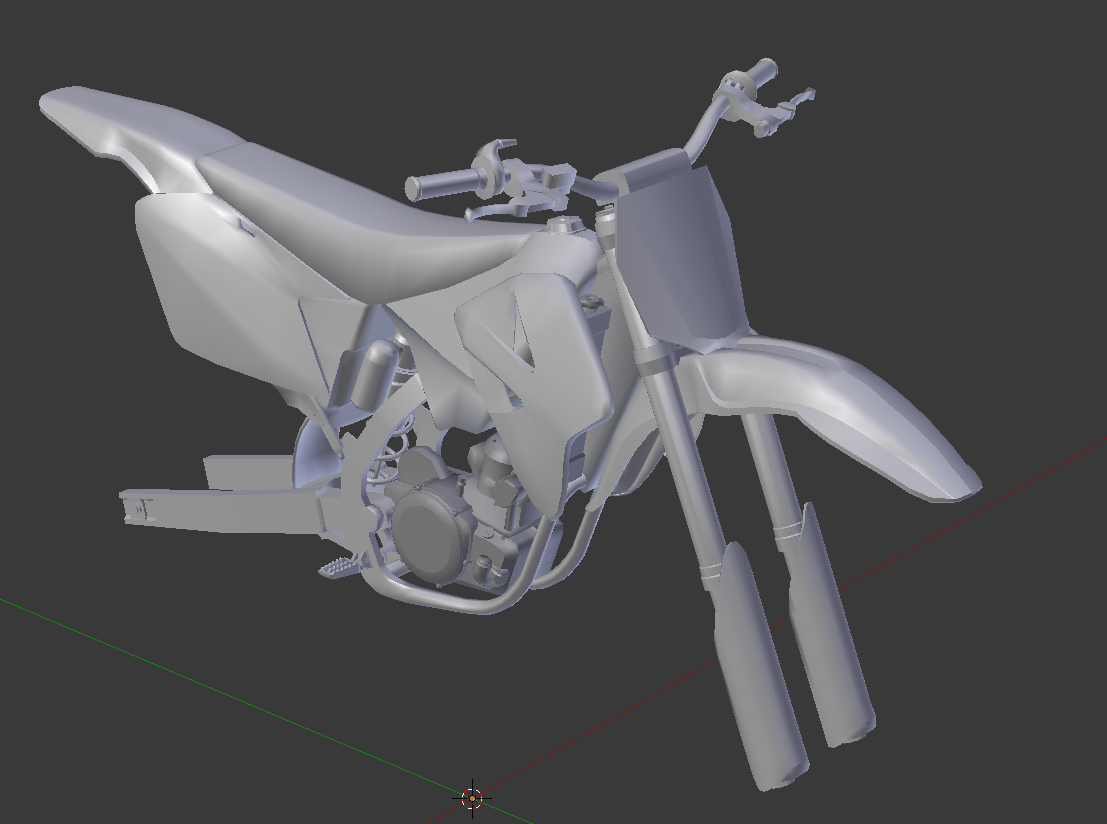
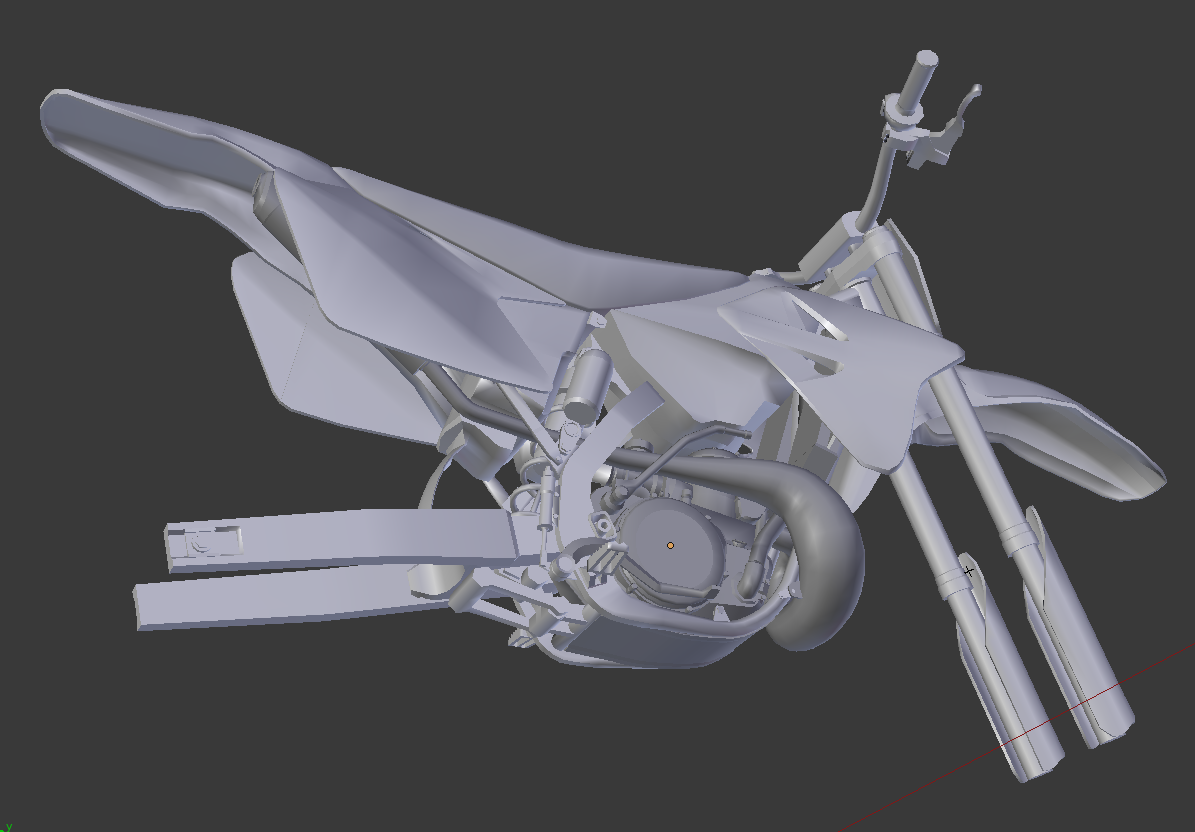
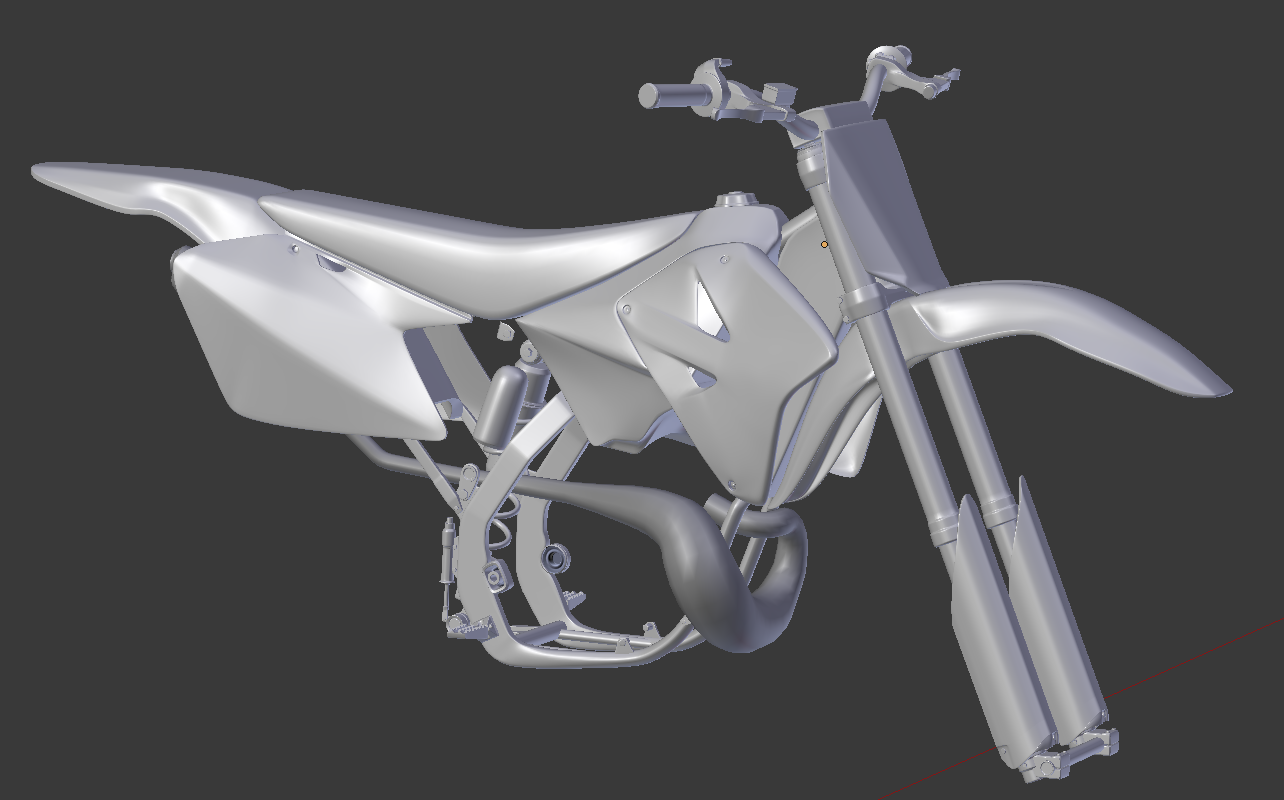
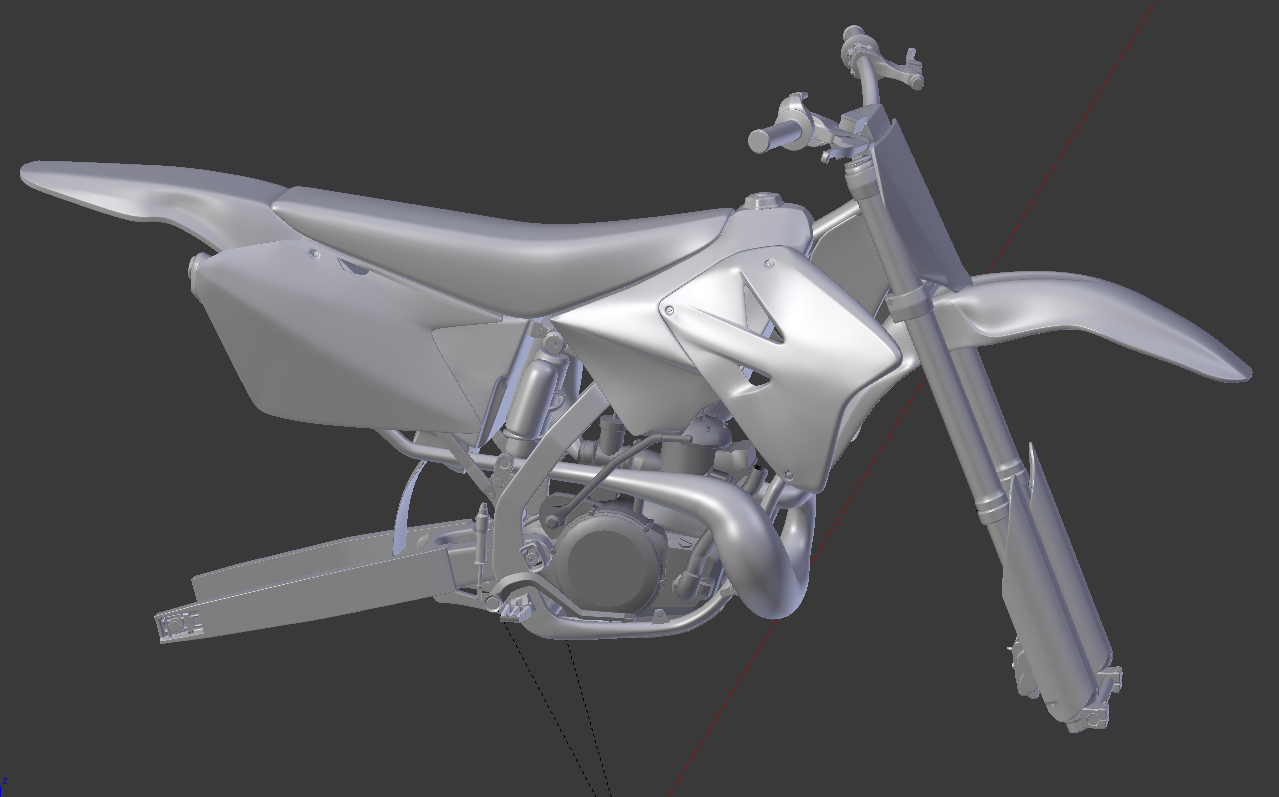
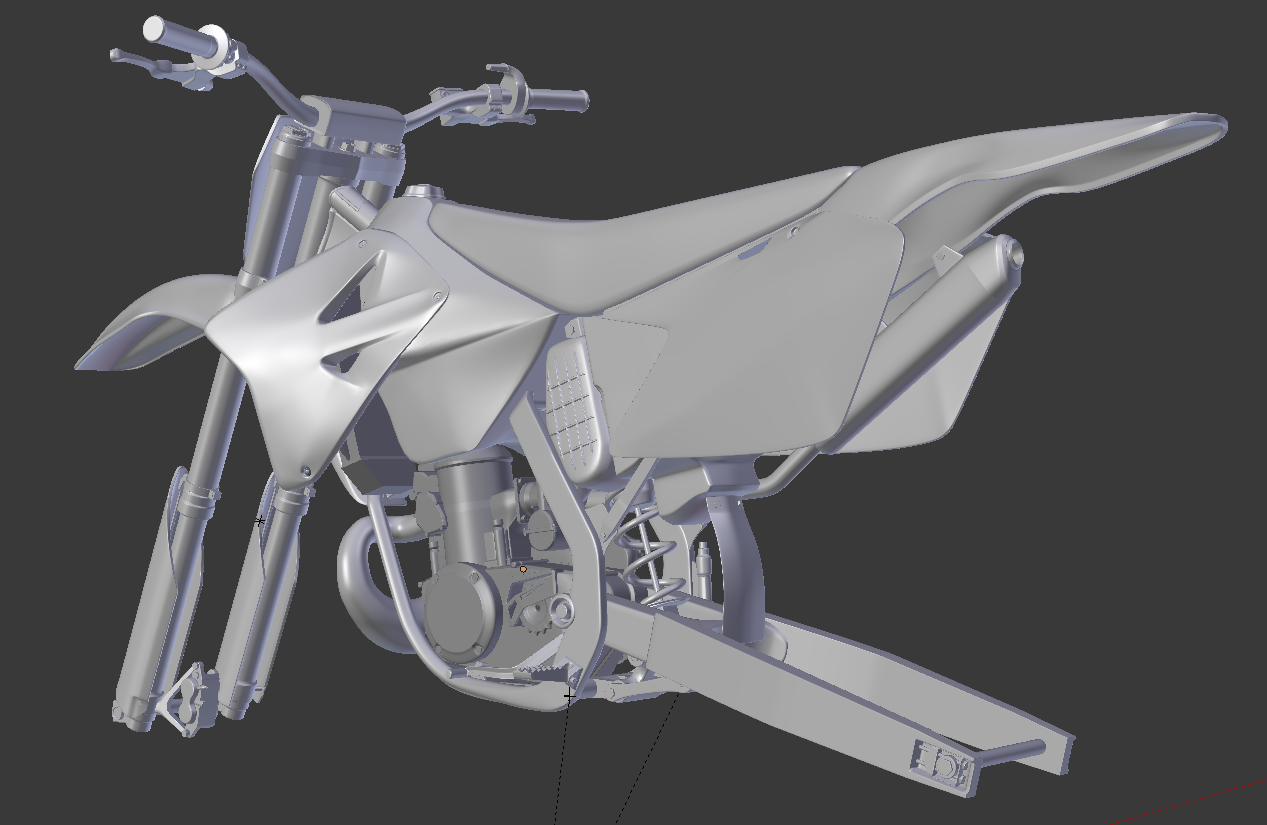
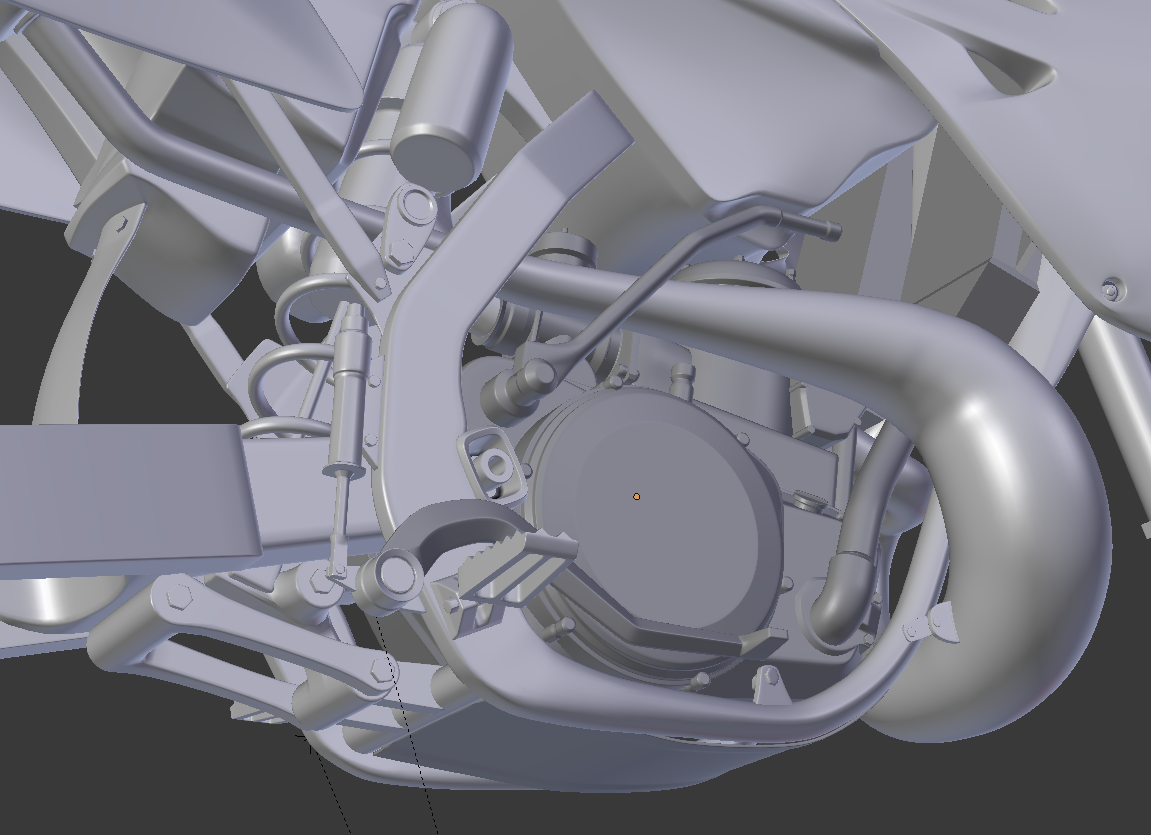
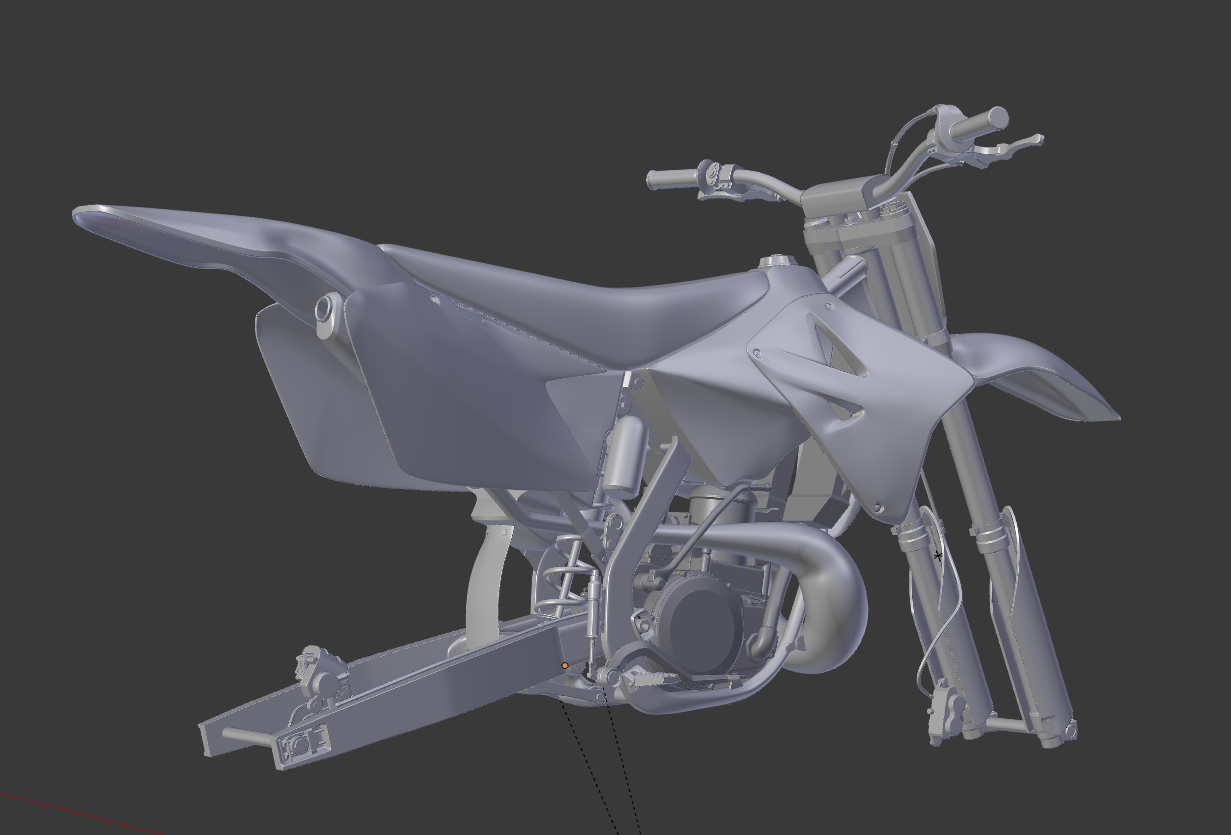
Engine finished!... Bar a few hoses and small bits, carb is finally done and in place! 8) Happy days!
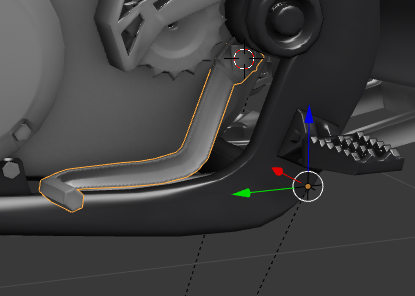
Also added rear brake thingy that connects to the rear brake pedal behind the footpeg, not sure the word for it.. Is it a pressure regulator? Added brake pedal and gear shifter, front sprocket and guard, skid plate, rad hose, few more engine bolts.. Think that's all. Now just small bits, front and rear calipers. ;D
Also added rear brake thingy that connects to the rear brake pedal behind the footpeg, not sure the word for it.. Is it a pressure regulator? Added brake pedal and gear shifter, front sprocket and guard, skid plate, rad hose, few more engine bolts.. Think that's all. Now just small bits, front and rear calipers. ;D
Title: Re: 2003 RM 250 (WIP)
Post by: Vortex_Damien on June 21, 2016, 02:39:30 AM
Post by: Vortex_Damien on June 21, 2016, 02:39:30 AM
Super impressive.. well done :)
Title: Re: 2003 RM 250 (WIP)
Post by: 𝖙𝖋𝖈 on June 21, 2016, 10:56:14 AM
Post by: 𝖙𝖋𝖈 on June 21, 2016, 10:56:14 AM
Thanks :D plastics clean up today if I get time. Could do with some rounder edges on the tank and going to attempt bolt holes.
Title: Re: 2003 RM 250 (WIP)
Post by: Vortex_Damien on June 21, 2016, 11:25:02 AM
Post by: Vortex_Damien on June 21, 2016, 11:25:02 AM
8 sides minimum for a circle ;)
Title: Re: 2003 RM 250 (WIP)
Post by: pacopastor34 on June 21, 2016, 11:32:03 AM
Post by: pacopastor34 on June 21, 2016, 11:32:03 AM
Quote from: TheFatController on June 21, 2016, 10:56:14 AM
Thanks :D plastics clean up today if I get time. Could do with some rounder edges on the tank and going to attempt bolt holes.
Very nice work!!! I learnt yesterday to make holes. It's easier than I thought. Let's go! Just unwrapping to finish!!! Add me to steam fats!
Title: Re: 2003 RM 250 (WIP)
Post by: 𝖙𝖋𝖈 on June 21, 2016, 12:22:23 PM
Post by: 𝖙𝖋𝖈 on June 21, 2016, 12:22:23 PM
How are you adding your holes paco? I think I should have included them in my mesh to begin with because a few methods are not working out well!
Title: Re: 2003 RM 250 (WIP)
Post by: pacopastor34 on June 21, 2016, 03:58:12 PM
Post by: pacopastor34 on June 21, 2016, 03:58:12 PM
I use 3D Max but I guess in blender should be the same. Polygons are polygons.
https://m.youtube.com/watch?v=Bc52fcrHvAA
Hope it helps you
https://m.youtube.com/watch?v=Bc52fcrHvAA
Hope it helps you
Title: Re: 2003 RM 250 (WIP)
Post by: 𝖙𝖋𝖈 on June 21, 2016, 04:36:45 PM
Post by: 𝖙𝖋𝖈 on June 21, 2016, 04:36:45 PM
Thanks paco, tried everything short of creating them from scratch so will have a go, hopefully it won't take too much!
Title: Re: 2003 RM 250 (WIP)
Post by: BadStar on June 21, 2016, 09:03:03 PM
Post by: BadStar on June 21, 2016, 09:03:03 PM
I can't wait to do a youtube edit with this bike @ Glen Helen.. woot!
Title: Re: 2003 RM 250 (WIP)
Post by: 𝖙𝖋𝖈 on June 22, 2016, 12:48:48 AM
Post by: 𝖙𝖋𝖈 on June 22, 2016, 12:48:48 AM

Title: Re: 2003 RM 250 (WIP)
Post by: ChrisK on June 22, 2016, 07:59:47 AM
Post by: ChrisK on June 22, 2016, 07:59:47 AM
Its the brake pump or mastercylinder for ur footbrake idk the name in english. Realy nice bike, and u working realy fast that cant be your first bike :)
Title: Re: 2003 RM 250 (WIP)
Post by: 𝖙𝖋𝖈 on June 22, 2016, 11:03:31 AM
Post by: 𝖙𝖋𝖈 on June 22, 2016, 11:03:31 AM
Master cyliner.. Thanks Chris! Used to cars not bikes ;D
Title: Re: 2003 RM 250 (WIP)
Post by: 𝖙𝖋𝖈 on June 22, 2016, 12:04:37 PM
Post by: 𝖙𝖋𝖈 on June 22, 2016, 12:04:37 PM
Edit: Never mind.. Thanks gdub for the explanation!
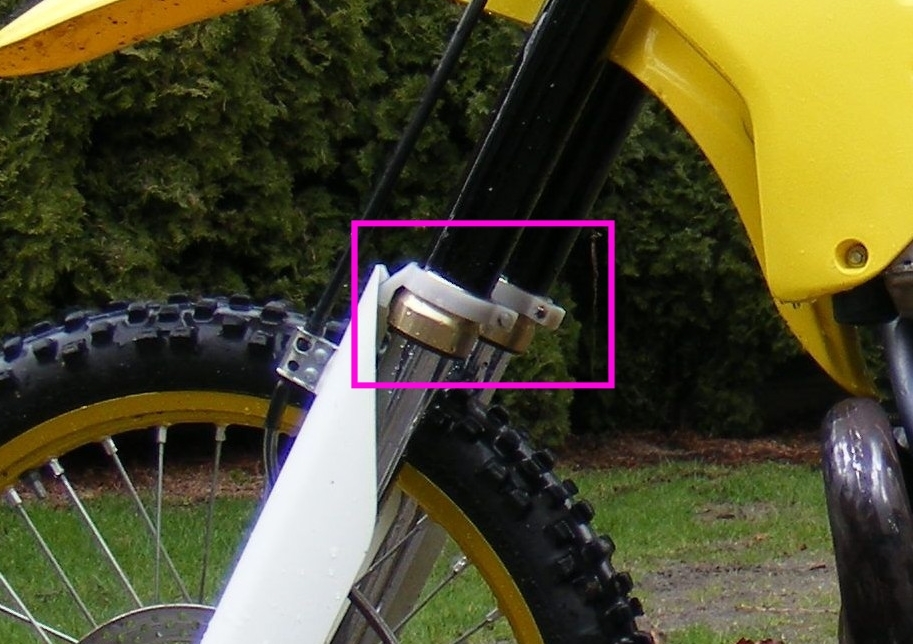
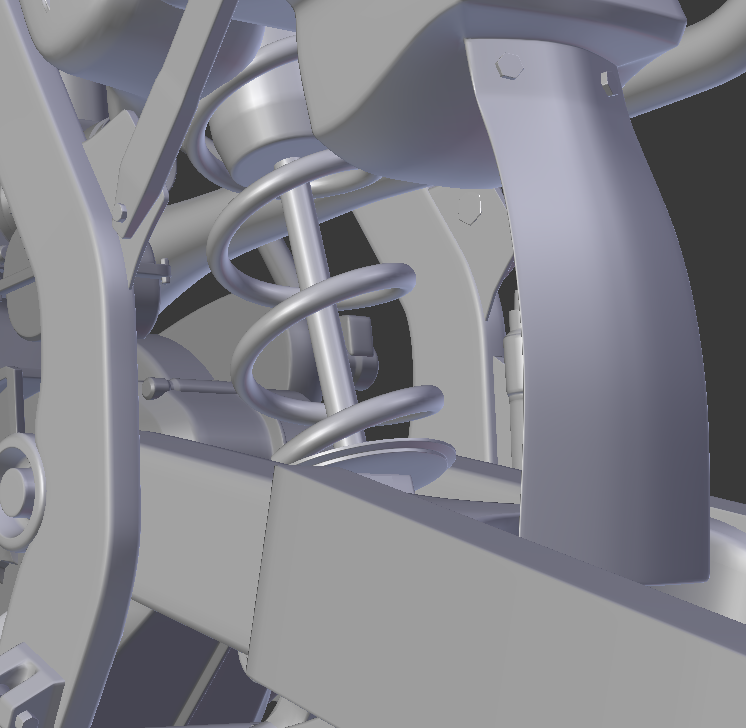
Maybe someone can help out.. What are these?
It looks like they're connected to the fork guards, and if so do they move with the fork guards up and down the top part of the shock? Seems a little weird..
Maybe someone can help out.. What are these?
It looks like they're connected to the fork guards, and if so do they move with the fork guards up and down the top part of the shock? Seems a little weird..
Title: Re: 2003 RM 250 (WIP)
Post by: PizzaChet on June 22, 2016, 04:05:06 PM
Post by: PizzaChet on June 22, 2016, 04:05:06 PM
Those are the guides for the slider guards. Prevents them from flopping around in race conditions. 8)
Title: Re: 2003 RM 250 (WIP)
Post by: 𝖙𝖋𝖈 on June 22, 2016, 04:06:47 PM
Post by: 𝖙𝖋𝖈 on June 22, 2016, 04:06:47 PM
Thanks guys..
Yup Pizza.. gdub said they were to stop fork guards flapping around as found on older bikes and don't travel with the guards but instead on a rail or something inside the guard.
geo, didn't even know these things existed! Interesting..
Yup Pizza.. gdub said they were to stop fork guards flapping around as found on older bikes and don't travel with the guards but instead on a rail or something inside the guard.
geo, didn't even know these things existed! Interesting..
Title: Re: 2003 RM 250 (WIP)
Post by: 𝖙𝖋𝖈 on June 22, 2016, 06:07:13 PM
Post by: 𝖙𝖋𝖈 on June 22, 2016, 06:07:13 PM
Well, guess it's about time I entered the world of high poly. Boy this is gonna take some time :-\

Title: Re: 2003 RM 250 (WIP)
Post by: pacopastor34 on June 22, 2016, 06:35:07 PM
Post by: pacopastor34 on June 22, 2016, 06:35:07 PM
Quote from: TheFatController on June 22, 2016, 06:07:13 PM
Well, guess it's about time I entered the world of high poly. Boy this is gonna take some time :-\
Very nice. What's a good polycount? I keep doing the kx500 and in some parts I think it is very high poly. I know there is not a limit...but my graphic card hasn't got the same opinion.
Title: Re: 2003 RM 250 (WIP)
Post by: 𝖙𝖋𝖈 on June 22, 2016, 06:43:32 PM
Post by: 𝖙𝖋𝖈 on June 22, 2016, 06:43:32 PM
I was sat at about 14000 tri's before I started the high poly version.. Not sure what a good limit is but I know some GP bikes models are 50 - 60k. Geo is attempting to find out but would be interested to know, Damien what's the RMZ up to?
Title: Re: 2003 RM 250 (WIP)
Post by: Vortex_Damien on June 22, 2016, 11:42:55 PM
Post by: Vortex_Damien on June 22, 2016, 11:42:55 PM
the high poly version is made for bakes.. you will not see any of that in game.. it is for your normal map baking. as far as the in game model my rmz was 56k but i could have easily made the count less it if i wanted too. 14000 offers alot of room for detail that you would not normally put in the low poly but if you can do it all on your high poly things should look pretty good :)
Title: Re: 2003 RM 250 (WIP)
Post by: Vortex_Damien on June 23, 2016, 06:11:10 AM
Post by: Vortex_Damien on June 23, 2016, 06:11:10 AM
Could retopo the model but that will take more time
I like to start with the Low poly then work on the high poly using the low poly as a base
I like to start with the Low poly then work on the high poly using the low poly as a base
Title: Re: 2003 RM 250 (WIP)
Post by: Snappe on June 23, 2016, 02:40:44 PM
Post by: Snappe on June 23, 2016, 02:40:44 PM
Quote from: Vortex_Damien on June 22, 2016, 11:42:55 PM
the high poly version is made for bakes.. you will not see any of that in game.. it is for your normal map baking.
This ^
Also don't forget to make lods if your model is very high poly.
Title: Re: 2003 RM 250 (WIP)
Post by: 𝖙𝖋𝖈 on June 23, 2016, 02:41:53 PM
Post by: 𝖙𝖋𝖈 on June 23, 2016, 02:41:53 PM
Thanks for the tips all.. Although I'm now going to have to make a low poly version of my high poly due to having to change some geometry to get high poly to work better. It's all a learning curve I guess!
Title: Re: 2003 RM 250 (WIP)
Post by: 𝖙𝖋𝖈 on June 23, 2016, 10:09:41 PM
Post by: 𝖙𝖋𝖈 on June 23, 2016, 10:09:41 PM
Damn rear end took a while..
Just engine left to high poly!
Just engine left to high poly!
Title: Re: 2003 RM 250 (WIP)
Post by: 𝖙𝖋𝖈 on June 24, 2016, 02:41:10 AM
Post by: 𝖙𝖋𝖈 on June 24, 2016, 02:41:10 AM
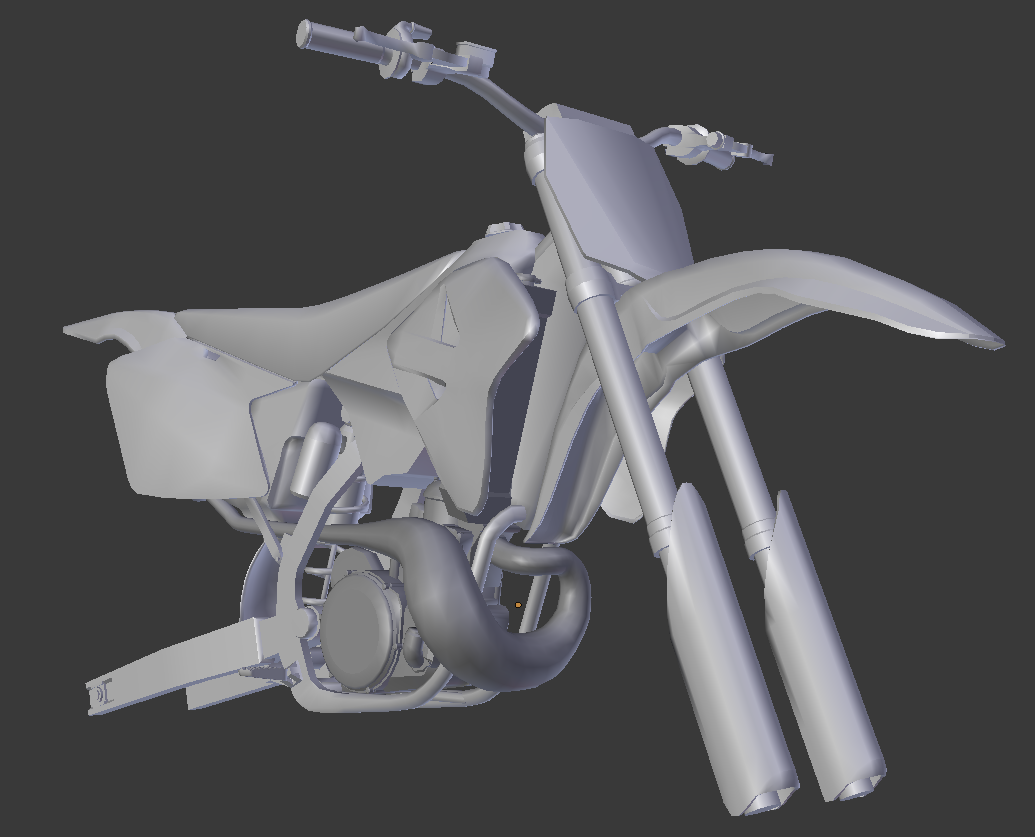
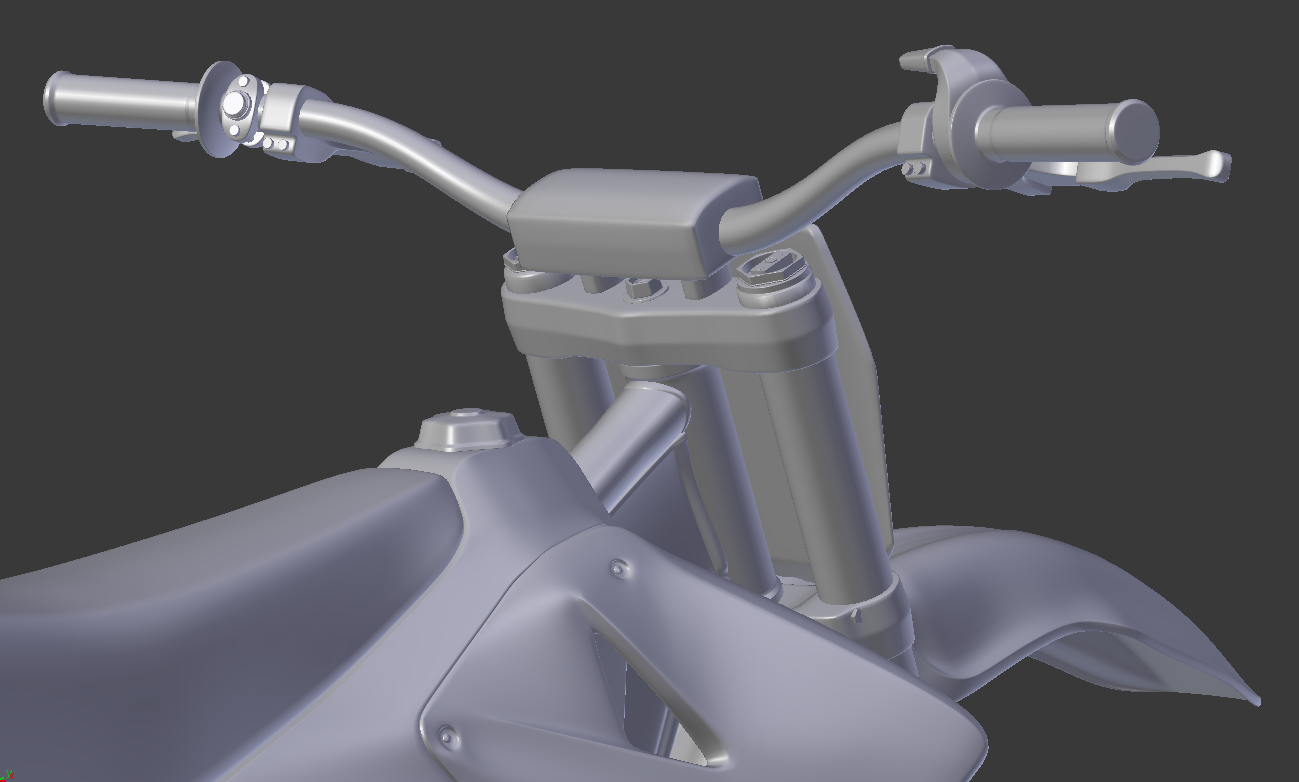
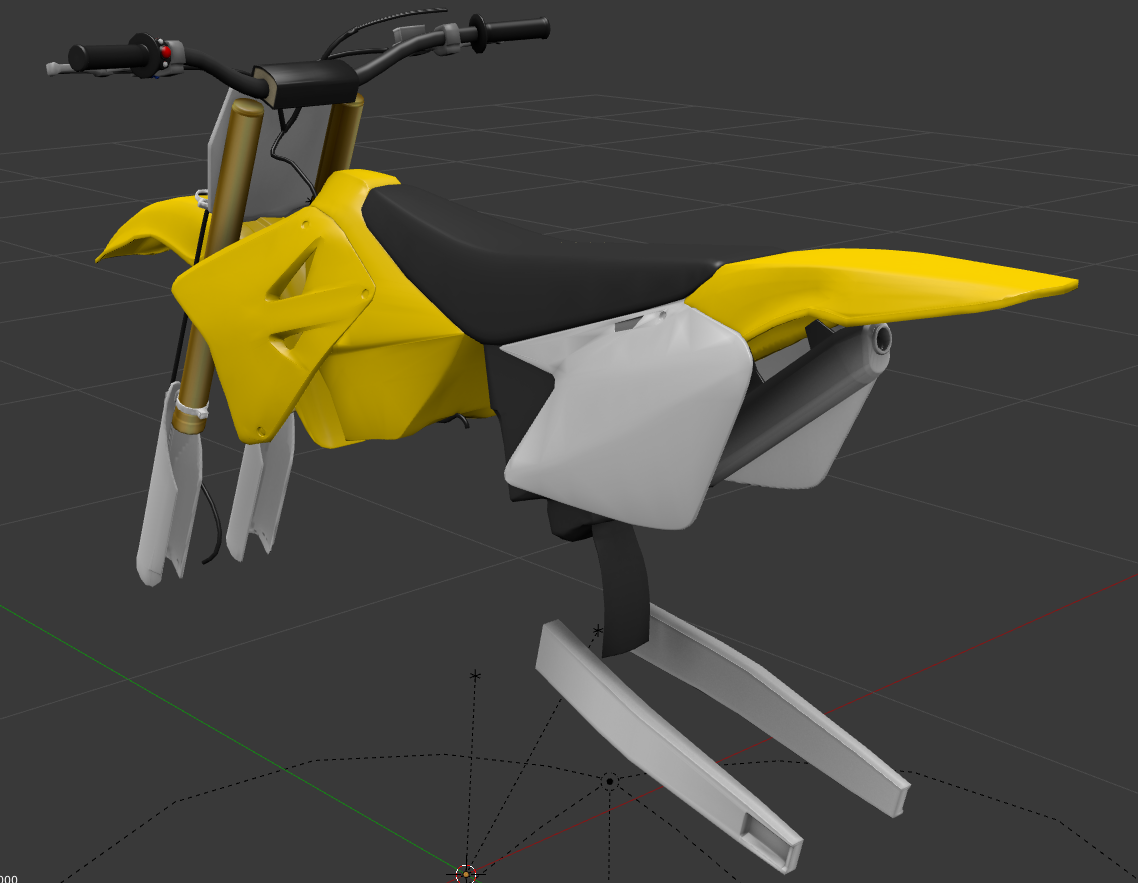
Hows the front end looking? :D
Title: Re: 2003 RM 250 (WIP)
Post by: GDUBMX on June 24, 2016, 11:34:00 AM
Post by: GDUBMX on June 24, 2016, 11:34:00 AM
Wow man, really come on loads eh! Can't wait to try this in game. Nice work mate
Title: Re: 2003 RM 250 (WIP)
Post by: 𝖙𝖋𝖈 on June 24, 2016, 06:15:02 PM
Post by: 𝖙𝖋𝖈 on June 24, 2016, 06:15:02 PM
Getting closer!
Title: Re: 2003 RM 250 (WIP)
Post by: PizzaChet on June 24, 2016, 06:35:54 PM
Post by: PizzaChet on June 24, 2016, 06:35:54 PM
Damn nice! Really coming along Fats. Is it just me, or are the shock shaft and spring coil too small in diameter? Looks a little wimpy.
Title: Re: 2003 RM 250 (WIP)
Post by: 𝖙𝖋𝖈 on June 24, 2016, 06:38:53 PM
Post by: 𝖙𝖋𝖈 on June 24, 2016, 06:38:53 PM
Thanks.. Well it is stock, I worked the diameters as best I could by lining it up with the picture and using reference pics but maybe I'll give it some more protein ;)
Title: Re: 2003 RM 250 (WIP)
Post by: 𝖙𝖋𝖈 on June 24, 2016, 07:10:35 PM
Post by: 𝖙𝖋𝖈 on June 24, 2016, 07:10:35 PM
Better?
Title: Re: 2003 RM 250 (WIP)
Post by: 𝖙𝖋𝖈 on June 25, 2016, 11:01:47 AM
Post by: 𝖙𝖋𝖈 on June 25, 2016, 11:01:47 AM
Cables 8)
Title: Re: 2003 RM 250 (WIP)
Post by: pacopastor34 on June 25, 2016, 11:39:18 AM
Post by: pacopastor34 on June 25, 2016, 11:39:18 AM
Did you cut the cable in two pieces? In the middle of the lower and upper forks?
Very nice! Can't wait to skin it and race!
Again, who is ready to help me to do a new 250 sounds? I think the default sound sounds like a 50cc...
Very nice! Can't wait to skin it and race!
Again, who is ready to help me to do a new 250 sounds? I think the default sound sounds like a 50cc...
Title: Re: 2003 RM 250 (WIP)
Post by: 𝖙𝖋𝖈 on June 25, 2016, 11:54:11 AM
Post by: 𝖙𝖋𝖈 on June 25, 2016, 11:54:11 AM
Yup paco, the front cable top half is part of the steering and the bottom half is part of the front suspension, I've tried to make it as straight as possible so it hopefully doesn't stick out when it compresses!
Also, the throttle cable runs all the way down to the carb and again the part from the throttle to the stem is part of the steering and everything else is part of the chassis. This will be the same for the rear brake cable.
I can't wait to skin it too! Not overly fussed about making new two stroke sounds, I tried before doing some for RC and they were met with laughter haha (not from RC, I think he was grateful, but the community in general and I can't blame them too much). I actually come from a recording, sound editing and music production background and had a very hard time trying to get something to sound realistic. It was such a painful process I'd much rather use stock sounds for now in the hope that they will change over time.
Title: Re: 2003 RM 250 (WIP)
Post by: pacopastor34 on June 25, 2016, 02:33:48 PM
Post by: pacopastor34 on June 25, 2016, 02:33:48 PM
Quote from: TheFatController on June 25, 2016, 11:54:11 AMPerfect. About the sounds I'm coming from the music production and sound editing. More than 10 years making music. It's quite hard to loop bike sounds and adjust them for the pitch up/down system. A lot of harder than the 4 stroke sounds. The easy one is the idle sound haha. The rest are very difficult. I can't imagine how fun should be ride with a good 2 stroke sound.
Yup paco, the front cable top half is part of the steering and the bottom half is part of the front suspension, I've tried to make it as straight as possible so it hopefully doesn't stick out when it compresses!
Also, the throttle cable runs all the way down to the carb and again the part from the throttle to the stem is part of the steering and everything else is part of the chassis. This will be the same for the rear brake cable.
I can't wait to skin it too! Not overly fussed about making new two stroke sounds, I tried before doing some for RC and they were met with laughter haha (not from RC, I think he was grateful, but the community in general and I can't blame them too much). I actually come from a recording, sound editing and music production background and had a very hard time trying to get something to sound realistic. It was such a painful process I'd much rather use stock sounds for now in the hope that they will change over time.
Title: Re: 2003 RM 250 (WIP)
Post by: 𝖙𝖋𝖈 on June 25, 2016, 09:05:00 PM
Post by: 𝖙𝖋𝖈 on June 25, 2016, 09:05:00 PM
And the high poly is just about finished!
Title: Re: 2003 RM 250 (WIP)
Post by: 𝖙𝖋𝖈 on June 26, 2016, 08:44:24 AM
Post by: 𝖙𝖋𝖈 on June 26, 2016, 08:44:24 AM
Thanks! Currently sits at 1.4 million tri's.
After taking off sub surf and removing doubles I was able to get it down to 80k so now just need to manually clean it up a bit.
After taking off sub surf and removing doubles I was able to get it down to 80k so now just need to manually clean it up a bit.
Title: Re: 2003 RM 250 (WIP)
Post by: 𝖙𝖋𝖈 on June 27, 2016, 01:29:54 AM
Post by: 𝖙𝖋𝖈 on June 27, 2016, 01:29:54 AM
Not so fun anymore :-\
Title: Re: 2003 RM 250 (WIP)
Post by: PizzaChet on June 27, 2016, 02:56:23 AM
Post by: PizzaChet on June 27, 2016, 02:56:23 AM
Quote from: TheFatController on June 24, 2016, 07:10:35 PMSorry mang. They look perfect now! Laughed at "protein". Been pretty busy cuz I just got married again yesterday and am packing for honeymoon waiting for laundry to dry. lol. Amazing progress rate, mate.
Better?
Title: Re: 2003 RM 250 (WIP)
Post by: 𝖙𝖋𝖈 on June 27, 2016, 09:13:17 AM
Post by: 𝖙𝖋𝖈 on June 27, 2016, 09:13:17 AM
Thanks man, have a good honeymoon!
Title: Re: 2003 RM 250 (WIP)
Post by: 𝖙𝖋𝖈 on June 27, 2016, 12:32:34 PM
Post by: 𝖙𝖋𝖈 on June 27, 2016, 12:32:34 PM
Title: Re: 2003 RM 250 (WIP)
Post by: Braap570 on June 27, 2016, 12:59:01 PM
Post by: Braap570 on June 27, 2016, 12:59:01 PM
so sick!
Title: Re: 2003 RM 250 (WIP)
Post by: pacopastor34 on June 27, 2016, 01:16:44 PM
Post by: pacopastor34 on June 27, 2016, 01:16:44 PM
Great work mate! Just photoshop work left!
Title: Re: 2003 RM 250 (WIP)
Post by: 𝖙𝖋𝖈 on June 27, 2016, 01:20:24 PM
Post by: 𝖙𝖋𝖈 on June 27, 2016, 01:20:24 PM
Thanks.. Dunno about that though, still have a lot of unwrapping left to do, then gimp, then all the bikeed stuff..
Title: Re: 2003 RM 250 (WIP)
Post by: pacopastor34 on June 27, 2016, 01:28:09 PM
Post by: pacopastor34 on June 27, 2016, 01:28:09 PM
Quote from: TheFatController on June 27, 2016, 01:20:24 PM
Thanks.. Dunno about that though, still have a lot of unwrapping left to do, then gimp, then all the bikeed stuff..
Let me know if you need some help for bike ed or exporting. I'm waiting you in steam :P Add me! Mijhail Kipricov is my nickname.
Title: Re: 2003 RM 250 (WIP)
Post by: 𝖙𝖋𝖈 on June 27, 2016, 01:28:56 PM
Post by: 𝖙𝖋𝖈 on June 27, 2016, 01:28:56 PM
Oh yeah completely forgot! Have been busy but will do ;)
Title: Re: 2003 RM 250 (WIP)
Post by: 𝖙𝖋𝖈 on June 27, 2016, 03:14:23 PM
Post by: 𝖙𝖋𝖈 on June 27, 2016, 03:14:23 PM
Nope, Steam can't find anyone with that name ???
Title: Re: 2003 RM 250 (WIP)
Post by: pacopastor34 on June 27, 2016, 03:33:09 PM
Post by: pacopastor34 on June 27, 2016, 03:33:09 PM
Quote from: TheFatController on June 27, 2016, 03:14:23 PMCheck --> fatselektor <-- without The signs.
Nope, Steam can't find anyone with that name ???
Title: Re: 2003 RM 250 (WIP)
Post by: 𝖙𝖋𝖈 on June 27, 2016, 08:56:53 PM
Post by: 𝖙𝖋𝖈 on June 27, 2016, 08:56:53 PM
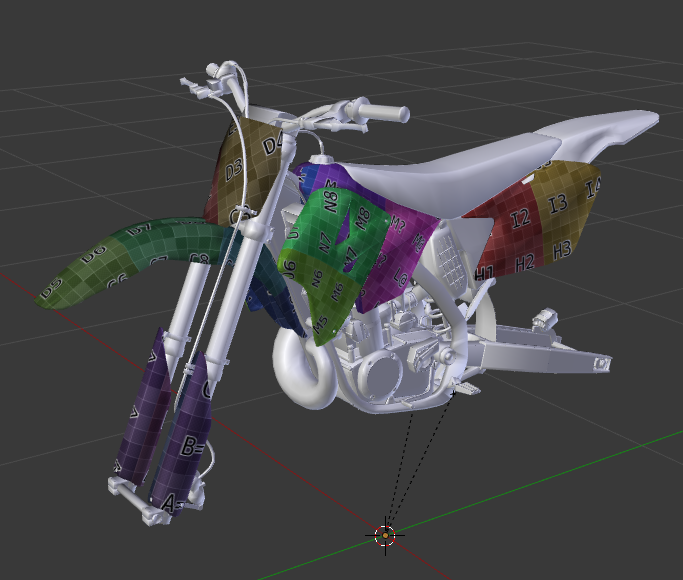
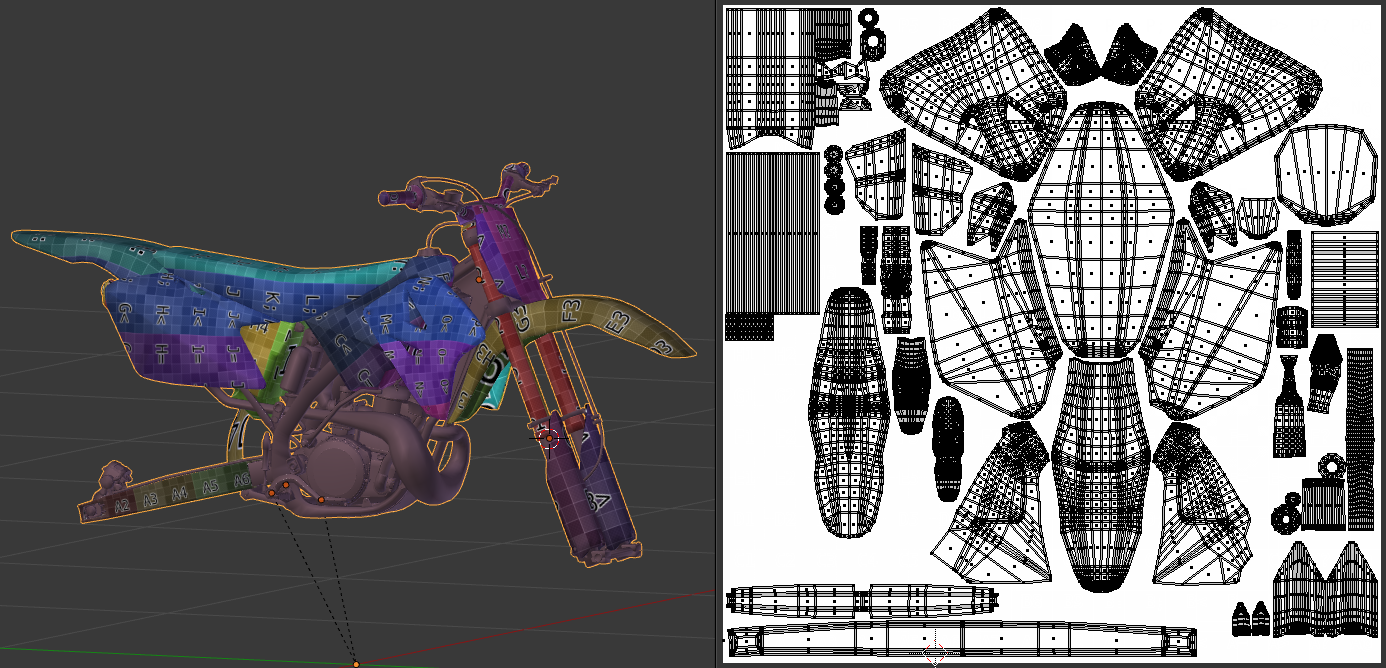
OK!.. Think the first UV template is just about finished, just gotta add cables.
I've tried to add everything that I like (and hopefully you guys will like) to be able to customise in one image rather than as it is with the stock bikes where if you're new to skinning you really have to hunt around through onboard and engine (is it engine.tga? bike.tga? something)..
So we have plastics (shrouds and fenders), fork tubes, lower fork guards, seat, number plates, swingarm, bars, bar pad, grips, exhaust, tank, airbox (can be stickered as IRL) and will add cables.
Then it's on to frame and engine.. and all the damn small fiddly bits lol :-\
Title: Re: 2001 - 2008 RM 250 (WIP)
Post by: 𝖙𝖋𝖈 on June 28, 2016, 02:10:02 PM
Post by: 𝖙𝖋𝖈 on June 28, 2016, 02:10:02 PM
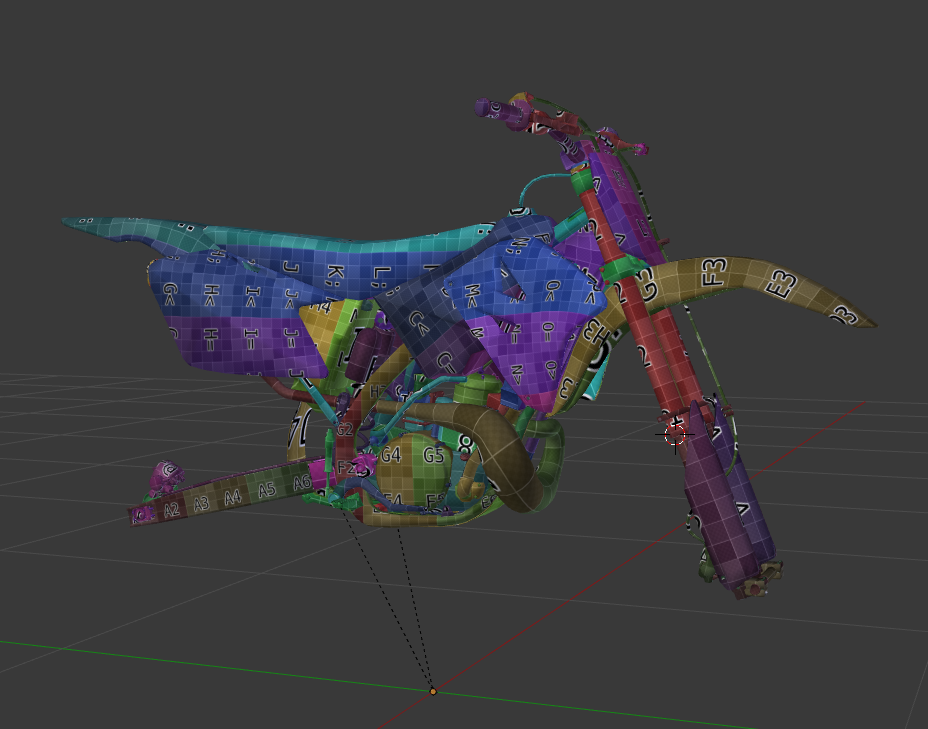
Wonder if anyone can help with some Blender advice?
I'm having trouble figuring out how to have more than one UV map for my mesh. I've joined everything together so I can see all pieces on my UV layout at once when it edit mode and somehow (don't ask me how) I've managed to create another UV image. So far I have 'livery' and 'parts'. As you can see above I've done livery (with a few additions to completely fill out the template) and I've tried unwrapping the frame to the parts UV map by selecting it as the 'active UV map' from the UV editor window.
When I view livery I see what is supposed to be there. When I view parts I see my frame, but also the entire livery UV map too..
I've searched through about an hour of tutorial videos on UV's and can only find people explaining the principals, not going into too much detail. If anyone can help that would be great, or link to a tutorial that shows how you should do it.
Am I supposed to assign a different material to the parts I want on a separate UV map? :o
Title: Re: 2001 - 2008 RM 250 (WIP)
Post by: pacopastor34 on June 28, 2016, 03:05:30 PM
Post by: pacopastor34 on June 28, 2016, 03:05:30 PM
To have separate materials in game it should be separated .tga in order to do separate .shd. To have separate UV you have to have separate objects. I can explain you better this afternoon by steam. I can tell you what I do or what I should do but sometimes I am soooo lazy to do it.
I'll be at home in just 1 hour.
I'll be at home in just 1 hour.
Title: Re: 2001 - 2008 RM 250 (WIP)
Post by: 𝖙𝖋𝖈 on June 28, 2016, 04:35:00 PM
Post by: 𝖙𝖋𝖈 on June 28, 2016, 04:35:00 PM
Thanks mate, I might not be on until tomorro2 but I'll try and catch you
Title: Re: 2001 - 2008 RM 250 (WIP)
Post by: 𝖙𝖋𝖈 on June 28, 2016, 07:00:59 PM
Post by: 𝖙𝖋𝖈 on June 28, 2016, 07:00:59 PM
So you separate objects into say the two templates I want, unwrap them, then the mesh uv's remain no matter what is separated, joined etc.. ?
Title: Re: 2001 - 2008 RM 250 (WIP)
Post by: 𝖙𝖋𝖈 on June 28, 2016, 09:07:27 PM
Post by: 𝖙𝖋𝖈 on June 28, 2016, 09:07:27 PM
Thanks geo, yup I've done that once with the grips, same both sides and no need to texture both individually so unwrapped and copied the mesh over to the other side with damo's help.
So if I join mesh then uv's might meet rearranging but if I move a mesh into another object the unwrap should be preserved.
So if I join mesh then uv's might meet rearranging but if I move a mesh into another object the unwrap should be preserved.
Title: Re: 2001 - 2008 RM 250 (WIP)
Post by: pacopastor34 on June 28, 2016, 09:16:53 PM
Post by: pacopastor34 on June 28, 2016, 09:16:53 PM
Quote from: TheFatController on June 28, 2016, 09:07:27 PMAt least in 3D Max UV Unwrap is preserved if you detach a part of a mesh to an object.
Thanks geo, yup I've done that once with the grips, same both sides and no need to texture both individually so unwrapped and copied the mesh over to the other side with damo's help.
So if I join mesh then uv's might meet rearranging but if I move a mesh into another object the unwrap should be preserved.
Title: Re: 2001 - 2008 RM 250 (WIP)
Post by: 𝖙𝖋𝖈 on June 28, 2016, 10:17:19 PM
Post by: 𝖙𝖋𝖈 on June 28, 2016, 10:17:19 PM
Well thanks guys, will get back on it tomorrow and see how it goes ;)
Title: Re: 2001 - 2008 RM 250 (WIP)
Post by: 𝖙𝖋𝖈 on June 29, 2016, 11:31:38 AM
Post by: 𝖙𝖋𝖈 on June 29, 2016, 11:31:38 AM
Seem to have the 2nd UV up and running so thanks Paco and Geo :)
However, being new to UV maps I'm having trouble working out the best way to do the frame.. Any ideas?
This is what I have currently, I've selected the faces I want to be most important to paint the frame and pinned them, then unwrapped the spare which are inner:
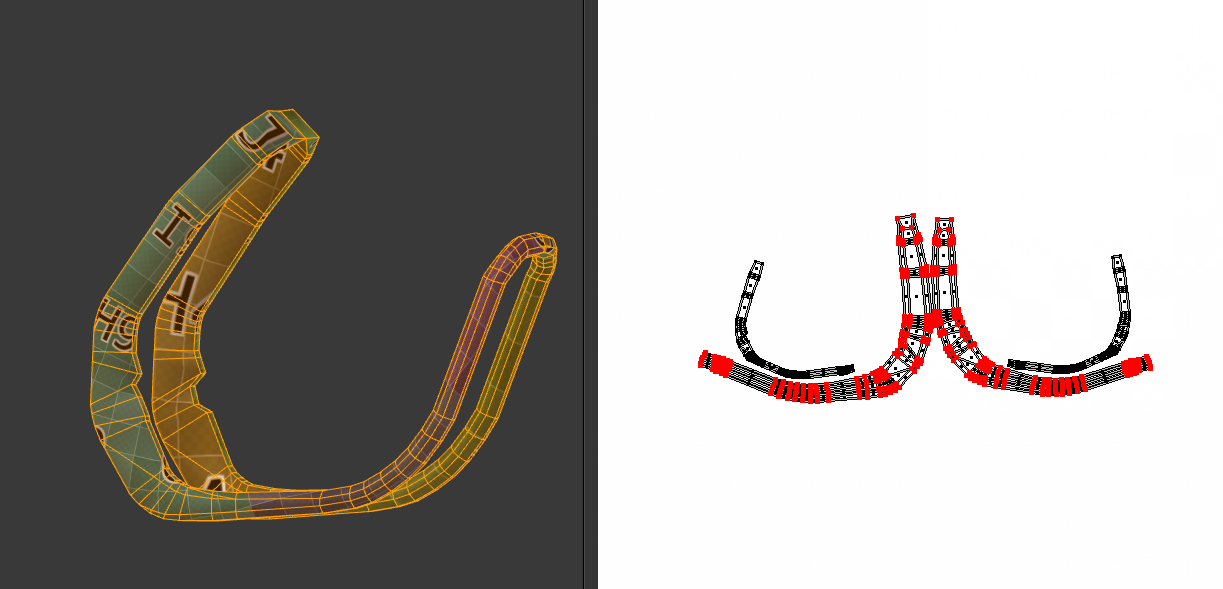
However, being new to UV maps I'm having trouble working out the best way to do the frame.. Any ideas?
This is what I have currently, I've selected the faces I want to be most important to paint the frame and pinned them, then unwrapped the spare which are inner:
Title: Re: 2001 - 2008 RM 250 (WIP)
Post by: pacopastor34 on June 29, 2016, 12:04:01 PM
Post by: pacopastor34 on June 29, 2016, 12:04:01 PM
Quote from: TheFatController on June 29, 2016, 11:31:38 AMI can't remember how I did those parts in blender. In 3D max I used a Unwrap mode named PEEL. You mark the seams on the edges you want and the software do the work. It's like if you pelt an animal.
Seem to have the 2nd UV up and running so thanks Paco and Geo :)
However, being new to UV maps I'm having trouble working out the best way to do the frame.. Any ideas?
This is what I have currently, I've selected the faces I want to be most important to paint the frame and pinned them, then unwrapped the spare which are inner:
Title: Re: 2001 - 2008 RM 250 (WIP)
Post by: 𝖙𝖋𝖈 on June 29, 2016, 12:07:25 PM
Post by: 𝖙𝖋𝖈 on June 29, 2016, 12:07:25 PM
yeah and in blender you mark seams, but nothing I do seems to give me the symmetrical result I want.. No matter what both sides are always a different shape / size because I guess the frame has a different notch on one side.
Title: Re: 2001 - 2008 RM 250 (WIP)
Post by: Vortex_Damien on June 29, 2016, 12:53:39 PM
Post by: Vortex_Damien on June 29, 2016, 12:53:39 PM
Always apply rotation and scale before you unwrap it.
Title: Re: 2001 - 2008 RM 250 (WIP)
Post by: 𝖙𝖋𝖈 on June 29, 2016, 12:56:12 PM
Post by: 𝖙𝖋𝖈 on June 29, 2016, 12:56:12 PM
Hmm.. now I'm just confused. No tutorial I've watched has mentioned anything about rotation or scale, is this for unwrapping using projected?
Title: Re: 2001 - 2008 RM 250 (WIP)
Post by: 𝖙𝖋𝖈 on June 29, 2016, 01:05:35 PM
Post by: 𝖙𝖋𝖈 on June 29, 2016, 01:05:35 PM
Oh I think I see, apply scale and rotation to an object that's been resized or rotated in object mode so those changes apply to the mesh directly.. I did it, not sure it made too much difference though will keep trying to figure it out.
Title: Re: 2001 - 2008 RM 250 (WIP)
Post by: 𝖙𝖋𝖈 on June 30, 2016, 12:42:32 AM
Post by: 𝖙𝖋𝖈 on June 30, 2016, 12:42:32 AM
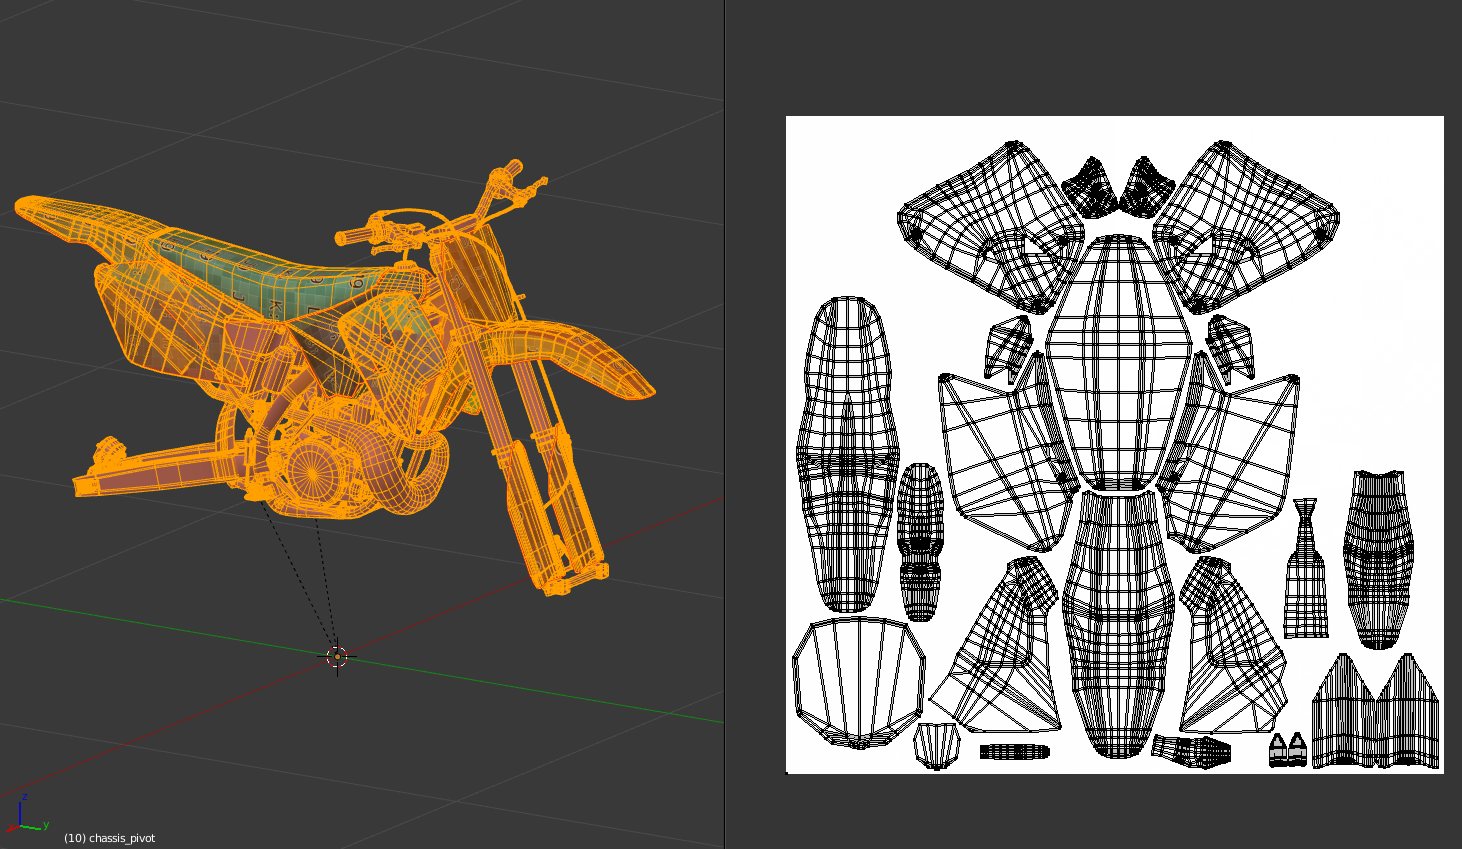
Finally finished UV unwrap!.. I think ;D
Title: Re: 2001 - 2008 RM 250 (WIP)
Post by: 𝖙𝖋𝖈 on June 30, 2016, 12:59:48 AM
Post by: 𝖙𝖋𝖈 on June 30, 2016, 12:59:48 AM
Anyone know of a way to find any missing unwrapped bits? I think I've got them all but want to make sure..
Title: Re: 2001 - 2008 RM 250 (WIP)
Post by: pacopastor34 on June 30, 2016, 01:02:30 AM
Post by: pacopastor34 on June 30, 2016, 01:02:30 AM
Quote from: TheFatController on June 30, 2016, 12:59:48 AMAll I do is select all the mesh with the UV Editor opened and If a part of the mesh or a polygon is not uved appears very weird.
Anyone know of a way to find any missing unwrapped bits? I think I've got them all but want to make sure..
Title: Re: 2001 - 2008 RM 250 (WIP)
Post by: 𝖙𝖋𝖈 on June 30, 2016, 06:08:21 PM
Post by: 𝖙𝖋𝖈 on June 30, 2016, 06:08:21 PM
I've been struggling with this for a while now and can't seem to find ANY tutorials..
I've baked my normal map within blender and can't figure out how to apply the damn thing to the model to test it out, right now it appears as a texture.. Any ideas? Or links to tutorials? Thanks :D
I've baked my normal map within blender and can't figure out how to apply the damn thing to the model to test it out, right now it appears as a texture.. Any ideas? Or links to tutorials? Thanks :D
Title: Re: 2001 - 2008 RM 250 (WIP)
Post by: 𝖙𝖋𝖈 on June 30, 2016, 06:36:35 PM
Post by: 𝖙𝖋𝖈 on June 30, 2016, 06:36:35 PM
Don't Skype but maybe steam? Will be on in an hour or two.. Would be great thanks!
Title: Re: 2001 - 2008 RM 250 (WIP)
Post by: m121c on June 30, 2016, 07:06:10 PM
Post by: m121c on June 30, 2016, 07:06:10 PM
Marmoset Tool Bag 2 is a cool program to view a model in a video-game like engine without having to setup a render or using the shitty view port visuals.
That's what I used for viewing my progress on my Honda before I had it in the game engine.
That's what I used for viewing my progress on my Honda before I had it in the game engine.
Title: Re: 2001 - 2008 RM 250 (WIP)
Post by: Vortex_Damien on July 02, 2016, 06:57:20 AM
Post by: Vortex_Damien on July 02, 2016, 06:57:20 AM
Don't know if fats want me to show you guys butttt ya.. doing the plastic normals for the bike and the textures are currently my version. fats will do a version himself
Title: Re: 2001 - 2008 RM 250 (WIP)
Post by: 𝖙𝖋𝖈 on July 02, 2016, 08:38:05 AM
Post by: 𝖙𝖋𝖈 on July 02, 2016, 08:38:05 AM
Wow that's looking great! Feel free to post as many pics as you want damo, this is intended to be a very open build ;)
Last night I just about finished unwrapping the parts template as individual pieces, and stitched it together in gimp. Fixed a couple of errors but noticed a couple more when I applied it. Was too late to screenshot but aside from two or three pieces it looked perfect!
Thank you very much for streaming your workflow doing this so I was able to do the same :)
Title: Re: 2001 - 2008 RM 250 (WIP)
Post by: pacopastor34 on July 02, 2016, 02:58:55 PM
Post by: pacopastor34 on July 02, 2016, 02:58:55 PM
Quote from: Vortex_Damien on July 02, 2016, 06:57:20 AM
Don't know if fats want me to show you guys butttt ya.. doing the plastic normals for the bike and the textures are currently my version. fats will do a version himself
:o :o :o
Very nice Damo and Fats.
If you need help with geom and gearbox etc... just tell me...It would be sad to don't have a good geometry and engine....like happened with the rmz. A great model but a bad geom.
Title: Re: 2001 - 2008 RM 250 (WIP)
Post by: 𝖙𝖋𝖈 on July 02, 2016, 03:06:12 PM
Post by: 𝖙𝖋𝖈 on July 02, 2016, 03:06:12 PM
Thanks Paco, I was going to do my best to get it in game myself.. If it all goes horribly wrong I'll be sure to give you a shout.. Or RC if you're not on (sorry RC :D)
Title: Re: 2001 - 2008 RM 250 (WIP)
Post by: 𝖙𝖋𝖈 on July 02, 2016, 07:20:34 PM
Post by: 𝖙𝖋𝖈 on July 02, 2016, 07:20:34 PM
Coming along, that's normals and occlusion baked, and best part of textures done for the desirable skinning stuff template, now for the rest of the crap ;D
Title: Re: 2001 - 2008 RM 250 (WIP)
Post by: pacopastor34 on July 02, 2016, 08:25:39 PM
Post by: pacopastor34 on July 02, 2016, 08:25:39 PM
simply amazing:D
Title: Re: 2003 RM 250 (WIP)
Post by: PizzaChet on July 03, 2016, 04:57:47 AM
Post by: PizzaChet on July 03, 2016, 04:57:47 AM
Quote from: TheFatController on June 27, 2016, 09:13:17 AMOh man! Wa8t till I get home and process the GoPro footage of us hitting the dunes in a Polaris 800 4-seater. I'll save the punchline for then.
Thanks man, have a good honeymoon!
Title: Re: 2001 - 2008 RM 250 (WIP)
Post by: 𝖙𝖋𝖈 on July 03, 2016, 01:15:18 PM
Post by: 𝖙𝖋𝖈 on July 03, 2016, 01:15:18 PM
This is probably a question for Snappe although anyone who knows! Pretty stuck.
I've split my mesh pieces, joined them with the MXB Blender template pieces as they should be, now all I need to do is move the empty parent's origins to match my objects, but I can't seem to do that without moving the object itself..
How do I move say in this case 'gear_lever', without moving 'gear_lever_pivot'?
Title: Re: 2001 - 2008 RM 250 (WIP)
Post by: 𝖙𝖋𝖈 on July 03, 2016, 02:05:00 PM
Post by: 𝖙𝖋𝖈 on July 03, 2016, 02:05:00 PM
Never mind, think I've figured it out.
If I select the mesh I want to move and copy it's global location I can then move the empty parent, rotate it how it needs to be, then edit the child mesh, rotate it back and manually type back in the coordinates.
Pain in the bum! ;D
If I select the mesh I want to move and copy it's global location I can then move the empty parent, rotate it how it needs to be, then edit the child mesh, rotate it back and manually type back in the coordinates.
Pain in the bum! ;D
Title: Re: 2001 - 2008 RM 250 (WIP)
Post by: 𝖙𝖋𝖈 on July 03, 2016, 02:58:14 PM
Post by: 𝖙𝖋𝖈 on July 03, 2016, 02:58:14 PM
:o ;D
Title: Re: 2001 - 2008 RM 250 (WIP)
Post by: pacopastor34 on July 03, 2016, 03:21:15 PM
Post by: pacopastor34 on July 03, 2016, 03:21:15 PM
Quote from: TheFatController on July 03, 2016, 02:58:14 PM
:o ;D
Always check the recalculate normals option in FBX2EDF Converter.
Later in bike ed you have to place stand crosses next to the frame.
Title: Re: 2001 - 2008 RM 250 (WIP)
Post by: 𝖙𝖋𝖈 on July 03, 2016, 03:22:35 PM
Post by: 𝖙𝖋𝖈 on July 03, 2016, 03:22:35 PM
Oh I figured it lol, my textures were .png not .tga so they now work..
Well, I say work. Only one of my texture maps shows up and it's applied to the whole bike, not the two files.. Any ideas?
Well, I say work. Only one of my texture maps shows up and it's applied to the whole bike, not the two files.. Any ideas?
Title: Re: 2001 - 2008 RM 250 (WIP)
Post by: pacopastor34 on July 03, 2016, 03:25:16 PM
Post by: pacopastor34 on July 03, 2016, 03:25:16 PM
Quote from: TheFatController on July 03, 2016, 03:22:35 PM
Oh I figured it lol, my textures were .png not .tga so they now work..
Well, I say work. Only one of my texture maps shows up and it's applied to the whole bike, not the two files.. Any ideas?
You have to put main tga to the pieces you want, another tga to the other pieces but before that you have to link your normals and your spec mac with the main texture by .shd
I don't know if it helps.
Title: Re: 2001 - 2008 RM 250 (WIP)
Post by: 𝖙𝖋𝖈 on July 03, 2016, 03:55:43 PM
Post by: 𝖙𝖋𝖈 on July 03, 2016, 03:55:43 PM
OK I am experimenting, but I'd really love to know from PiBoSo / Snappe on this one..
Using Blender, how do you have two UV layouts, and two textures working in game? It seems to be picking up the 2nd texture and the first UV map only..
Thanks :)
Using Blender, how do you have two UV layouts, and two textures working in game? It seems to be picking up the 2nd texture and the first UV map only..
Thanks :)
Title: Re: 2001 - 2008 RM 250 (WIP)
Post by: Snappe on July 04, 2016, 02:54:19 PM
Post by: Snappe on July 04, 2016, 02:54:19 PM
Quote from: TheFatController on July 03, 2016, 01:15:18 PM
How do I move say in this case 'gear_lever', without moving 'gear_lever_pivot'?
Object > Snap > Cursor to Selected and then Object > Transform > Origin to 3d Cursor can be quite helpful. Except, there doesn't seem to be a way to easily align rotations.
Quote from: TheFatController on July 03, 2016, 03:55:43 PM
Using Blender, how do you have two UV layouts, and two textures working in game?
Why do you need 2 UV layouts? What are you trying to do?
Title: Re: 2001 - 2008 RM 250 (WIP)
Post by: 𝖙𝖋𝖈 on July 04, 2016, 03:07:45 PM
Post by: 𝖙𝖋𝖈 on July 04, 2016, 03:07:45 PM
Thanks Snappe, wouldn't have thought of checking the snap tool, saw it mentioned a few times in threads for a similar problem and dismissed it!
I think the main problem is that I don't fully understand UV maps. My guess is that I don't have two UV maps, they are just unwrapped within the same space but using different textures.
I have two textures, and my mesh is split accordingly so each object I have is designated one UV map so nothing is mixed. I've then applied each UV map to a material and selected my texture of which I'm using two, but only one texture shows up in game..
Title: Re: 2001 - 2008 RM 250 (WIP)
Post by: 𝖙𝖋𝖈 on July 04, 2016, 06:47:53 PM
Post by: 𝖙𝖋𝖈 on July 04, 2016, 06:47:53 PM
Unbelievable! We're in with two textures!! ;D
Massive thanks is in order from h106frp over on the GPB forum!
Massive thanks is in order from h106frp over on the GPB forum!
Title: Re: 2001 - 2008 RM 250 (WIP)
Post by: GDUBMX on July 04, 2016, 07:13:20 PM
Post by: GDUBMX on July 04, 2016, 07:13:20 PM
Wow just wow. Amazing fats, well done mate
Title: Re: 2001 - 2008 RM 250 (WIP)
Post by: BadStar on July 04, 2016, 09:04:33 PM
Post by: BadStar on July 04, 2016, 09:04:33 PM
Awesome! This will most likely be one of my favs.. the frame/style of this is what I(im sure all of us) fell in love with. With that being said, when Alum fat frames came out they were dreamy.
And your right, if this had a 4 stroke motor, it would be a great DRZsm model.
Does this mean you are riding it in-game already?!
And your right, if this had a 4 stroke motor, it would be a great DRZsm model.
Does this mean you are riding it in-game already?!
Title: Re: 2001 - 2008 RM 250 (WIP)
Post by: 𝖙𝖋𝖈 on July 04, 2016, 09:24:28 PM
Post by: 𝖙𝖋𝖈 on July 04, 2016, 09:24:28 PM
Yeah I have it in game, there's a lot left to do though :(
Title: Re: 2001 - 2008 RM 250 (WIP)
Post by: 𝖙𝖋𝖈 on July 04, 2016, 10:40:52 PM
Post by: 𝖙𝖋𝖈 on July 04, 2016, 10:40:52 PM
Yeah, so far bikeed is proving tougher than learning Blender lol..
Can anyone explain why the slightest touch of a pivot point sends the swingarm 180*, and the rear swingarm travels from neutral up through the seat when testing?
Can anyone explain why the slightest touch of a pivot point sends the swingarm 180*, and the rear swingarm travels from neutral up through the seat when testing?
Title: Re: 2001 - 2008 RM 250 (WIP)
Post by: 𝖙𝖋𝖈 on July 05, 2016, 09:51:55 AM
Post by: 𝖙𝖋𝖈 on July 05, 2016, 09:51:55 AM
Quote from: geofanatec on July 04, 2016, 11:11:11 PMQuote from: TheFatController on July 04, 2016, 10:40:52 PM
Can anyone explain why the slightest touch of a pivot point sends the swingarm 180*, and the rear swingarm travels from neutral up through the seat when testing?
Welcome to MXB :) (A TRUE MAN's SIM) Enough said
Haha.. Well I fixed it, not sure how, but I know I'll never recover from the trauma :o
Title: Re: 2001 - 2008 RM 250 (WIP)
Post by: pacopastor34 on July 05, 2016, 11:59:29 AM
Post by: pacopastor34 on July 05, 2016, 11:59:29 AM
I'm happy to know you fixed it. Looking at the picture I can see how clean is it. Amazing work mate.
Title: Re: 2001 - 2008 RM 250 (WIP)
Post by: teeds on July 05, 2016, 01:02:19 PM
Post by: teeds on July 05, 2016, 01:02:19 PM
Yea, nice work fats
Title: Re: 2001 - 2008 RM 250 (WIP)
Post by: 𝖙𝖋𝖈 on July 06, 2016, 09:17:48 AM
Post by: 𝖙𝖋𝖈 on July 06, 2016, 09:17:48 AM
Thanks! So far the list of people to thank is growing, RC helped me with the geometry last night and it now rides close to the msm250x, with it's own characteristics.
Next step is cleaning up, the model needs a few tweaks here and there then possibly a new normal..
Next step is cleaning up, the model needs a few tweaks here and there then possibly a new normal..
Title: Re: 2001 - 2008 RM 250 (WIP)
Post by: 𝖙𝖋𝖈 on July 06, 2016, 12:29:50 PM
Post by: 𝖙𝖋𝖈 on July 06, 2016, 12:29:50 PM
In fact, I'm having real issues with shading.. Everyone who's seen the model says it looks great but it has shading issues on the tank and the shrouds, look fine in high poly but when baking those shading issues are exaggerated big time. I've tried all settings in blender, xnormal, manually touching up the normal map, nothing seems to fix.
Anyone got any suggestions?
Anyone got any suggestions?
Title: Re: 2001 - 2008 RM 250 (WIP)
Post by: pacopastor34 on July 06, 2016, 12:50:09 PM
Post by: pacopastor34 on July 06, 2016, 12:50:09 PM
Quote from: TheFatController on July 06, 2016, 12:29:50 PMDid you used an alpha map in the livery_n with the specular map?
In fact, I'm having real issues with shading.. Everyone who's seen the model says it looks great but it has shading issues on the tank and the shrouds, look fine in high poly but when baking those shading issues are exaggerated big time. I've tried all settings in blender, xnormal, manually touching up the normal map, nothing seems to fix.
Anyone got any suggestions?
Title: Re: 2001 - 2008 RM 250 (WIP)
Post by: Snappe on July 06, 2016, 02:28:34 PM
Post by: Snappe on July 06, 2016, 02:28:34 PM
Quote from: TheFatController on July 06, 2016, 12:29:50 PM
it has shading issues on the tank and the shrouds
Can you post a screenshot?
Title: Re: 2001 - 2008 RM 250 (WIP)
Post by: 𝖙𝖋𝖈 on July 06, 2016, 05:46:18 PM
Post by: 𝖙𝖋𝖈 on July 06, 2016, 05:46:18 PM
Sure.. In Blender with normals,
In game with same normals..
And lastly, the horrible in Blender with no normals..
Screenshot at the top here was taken with no normals, but it was taken in a custom menu environment with full on lighting..
In game with same normals..
And lastly, the horrible in Blender with no normals..
Screenshot at the top here was taken with no normals, but it was taken in a custom menu environment with full on lighting..
Title: Re: 2001 - 2008 RM 250 (WIP)
Post by: 𝖙𝖋𝖈 on July 06, 2016, 10:41:38 PM
Post by: 𝖙𝖋𝖈 on July 06, 2016, 10:41:38 PM
... So... How about them screenshots ;D
Title: Re: 2001 - 2008 RM 250 (WIP)
Post by: 𝖙𝖋𝖈 on July 07, 2016, 08:45:09 AM
Post by: 𝖙𝖋𝖈 on July 07, 2016, 08:45:09 AM
Nope, well, the normal I'm bringing into mxb using an shd file and have no problems doing that..
My normal also has spec in the alpha, the same as I would do for track textures.
As far as I can tell blender bakes normal artifacts to compensate for the low polys bad shading. Subsequently in blender my model looks great.
In mxb however, all that compensated shading really stands out.
I've also tried flipping the red, green, and both in the normal colour channels.
Title: Re: 2001 - 2008 RM 250 (WIP)
Post by: 𝖙𝖋𝖈 on July 07, 2016, 11:57:46 AM
Post by: 𝖙𝖋𝖈 on July 07, 2016, 11:57:46 AM
Latest progress and it's looking better.. Realised using 'auto smooth' you can set the angle. So I found the angle of 37 to work well for all plastics (roughly) and did a new bake. Then set the angle in FBX2EDF to 37 and it definitely looks like this is what I was missing.
I'd tried setting the angle before but was using default Blender angle (90, or 180 can't remember) and had no luck setting this angle in FBX2EDF. Maybe my normal just had too much work to do compensating for the bad shading.
So this is with normal map, spec map and reflection map. Not perfect but much much better. 8)
Title: Re: 2001 - 2008 RM 250 (WIP)
Post by: StoneRider on July 07, 2016, 12:14:29 PM
Post by: StoneRider on July 07, 2016, 12:14:29 PM

Title: Re: 2001 - 2008 RM 250 (WIP)
Post by: pacopastor34 on July 08, 2016, 02:31:52 PM
Post by: pacopastor34 on July 08, 2016, 02:31:52 PM
I get holidays today, 2 weeks free, please finish it!!!! I want to skin that beauty!!!! Nice work as always champion!!
Title: Re: 2001 - 2008 RM 250 (WIP)
Post by: 𝖙𝖋𝖈 on July 08, 2016, 04:19:09 PM
Post by: 𝖙𝖋𝖈 on July 08, 2016, 04:19:09 PM
I'd love to.. But!
I either figure out a way of importing it without all these shading errors, or I completely remake all the plastics.
Number 1 I'm not sure is possible, number 2 is going to take some real time, although I could always refer back to my high poly plastics to see if I could reduce them more sensibly..
I either figure out a way of importing it without all these shading errors, or I completely remake all the plastics.
Number 1 I'm not sure is possible, number 2 is going to take some real time, although I could always refer back to my high poly plastics to see if I could reduce them more sensibly..
Title: Re: 2001 - 2008 RM 250 (WIP)
Post by: m121c on July 09, 2016, 01:12:28 AM
Post by: m121c on July 09, 2016, 01:12:28 AM
There a few factors that can result in weird shading errors.
1. Base poly flow (both on the low poly model + highpoly model). If the polyflow is odd it will provide weird results all around. A clean and flowing mesh will provide good bakes and unwrapping, so if its off it can cause a huge headache.
2. When you bake to a low poly model, you want to ensure the low poly is already triangulated. Sometimes if you bake it to a quadrified mesh, and you import it into a game engine, the game will auto triangulate the model. Now it could retriangulate it differently then what you baked it too (although it displays a quad, 3D programs still form meshes in triangles even you can't see it). Now, normals are specific to a mesh face, so if the triangles are different it can look weird.
3. The bake cage. Not sure how blender works, but in 3DS Max you have a cage that contains your 2 meshes. (Low poly + High poly) The cage is like the "out of bounds" for the baking rays. It's tough to describe, but basically the tighter the cage is around the models the more accurate the bake. If part of the mesh passes through it, it will just not have normal information there which is no good. So you gotta find that happy medium of getting it as close as possible but not to close. In max you can manually adjust this cage.
4. So if the model is good, no probs, and the bake is setup correctly then it could be channels. Oh snd another thing, you cant not rotate a baked normal map. Thats a no no as well.
Normal maps are awesome, they can do amazing things. Take it from aguy who baked every single part on his bike, man its a headache if something is not looking right.
Title: Re: 2001 - 2008 RM 250 (WIP)
Post by: 𝖙𝖋𝖈 on July 09, 2016, 01:28:31 AM
Post by: 𝖙𝖋𝖈 on July 09, 2016, 01:28:31 AM
Thanks for the tips!
Poly flow is good on the whole, but a few areas that are giving me problems are now being adjusted. Fingers crossed I'll get away with not having to adjust the high poly but if I have to then so be it :(
No Blender doesn't use cages in default mode, I think you can use them in cycles render but I haven't got that far yet. I read up on it and although I can't put it into words I know why.. roughly lol..
I did try xNormal which uses cages but ended up with the same weird shading. My take on this is that I did the cage right, but my low poly plastics are just not good enough. Bit of a delay on things but shouldn't hold it up too much.
Title: Re: 2001 - 2008 RM 250 (WIP)
Post by: 𝖙𝖋𝖈 on July 09, 2016, 01:58:15 AM
Post by: 𝖙𝖋𝖈 on July 09, 2016, 01:58:15 AM
It definitely required a quick tutorial lol..
Did it without a cage and got the same result as xNormal with a cage so didn't bother, xNormal is so easy compared!
Did it without a cage and got the same result as xNormal with a cage so didn't bother, xNormal is so easy compared!
Title: Re: 2001 - 2008 RM 250 (WIP)
Post by: 𝖙𝖋𝖈 on July 09, 2016, 06:28:15 PM
Post by: 𝖙𝖋𝖈 on July 09, 2016, 06:28:15 PM
New low poly shroud, now I'm tired and need to sleep a little bit :-\
Title: Re: 2001 - 2008 RM 250 (WIP)
Post by: 𝖙𝖋𝖈 on July 10, 2016, 12:00:23 AM
Post by: 𝖙𝖋𝖈 on July 10, 2016, 12:00:23 AM
Bring it on Blender low poly shading errors ;D
Title: Re: 2001 - 2008 RM 250 (WIP)
Post by: 𝖙𝖋𝖈 on July 11, 2016, 09:00:15 PM
Post by: 𝖙𝖋𝖈 on July 11, 2016, 09:00:15 PM
So happy ;D
Title: Re: 2001 - 2008 RM 250 (WIP)
Post by: 𝖙𝖋𝖈 on July 12, 2016, 06:05:51 PM
Post by: 𝖙𝖋𝖈 on July 12, 2016, 06:05:51 PM
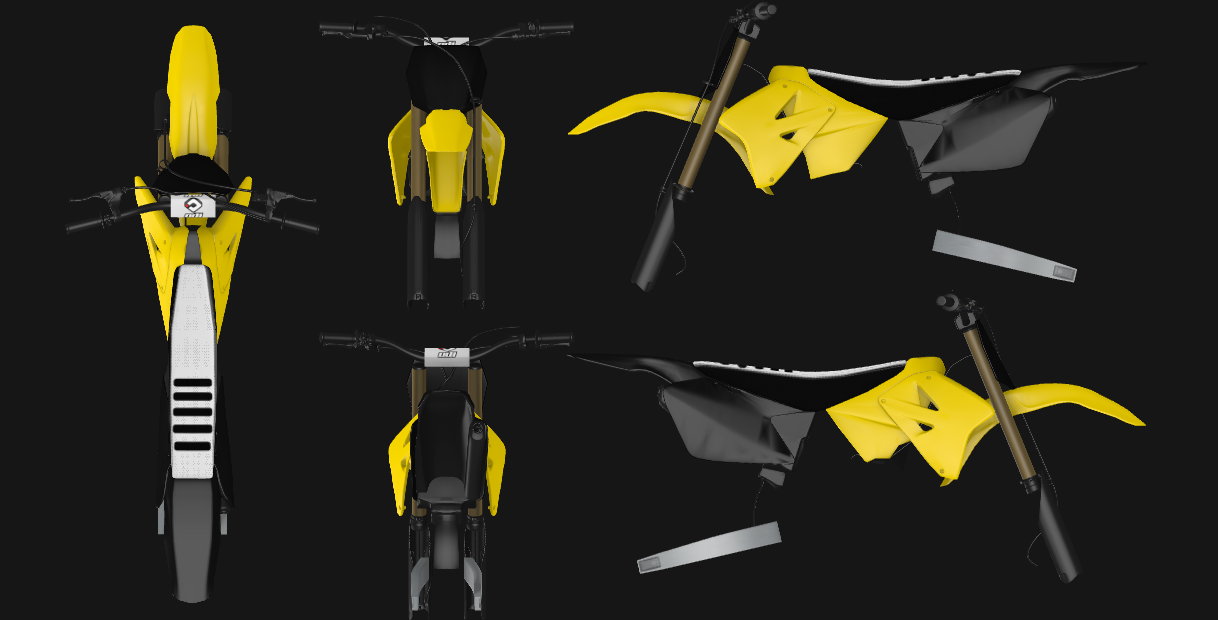
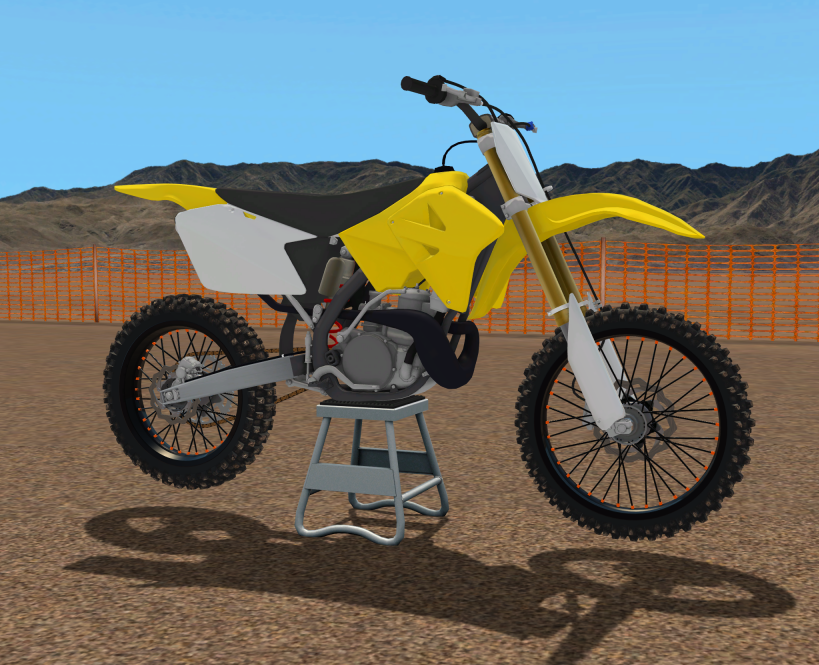
OK, all textures straightened so texturing is possible, all normals done, no shading issues, I'd say she's looking close to done ;D
Title: Re: 2001 - 2008 RM 250 (WIP)
Post by: Snappe on July 12, 2016, 06:07:53 PM
Post by: Snappe on July 12, 2016, 06:07:53 PM
Beaut!
Shader on the engine parts?
Shader on the engine parts?
Title: Re: 2001 - 2008 RM 250 (WIP)
Post by: 𝖙𝖋𝖈 on July 12, 2016, 06:11:49 PM
Post by: 𝖙𝖋𝖈 on July 12, 2016, 06:11:49 PM
Thanks :).. Not yet, have to redo the whole damn template as I accidentally forgot to save the xcf!
Title: Re: 2001 - 2008 RM 250 (WIP)
Post by: Asdrael on July 12, 2016, 06:20:03 PM
Post by: Asdrael on July 12, 2016, 06:20:03 PM
Don't forget to change the color of the hex screws on the rims holding the spikes ;)
Looking good, loving the 2 strokes. Are you doing your own engine too?
Looking good, loving the 2 strokes. Are you doing your own engine too?
Title: Re: 2001 - 2008 RM 250 (WIP)
Post by: 𝖙𝖋𝖈 on July 12, 2016, 06:31:53 PM
Post by: 𝖙𝖋𝖈 on July 12, 2016, 06:31:53 PM
They are just stock msm rims but will reskin. Currently have the 250x engine, although tempted with having a go at a custom one I want it to be competitive with all other 2 strokes such as the msm.
Title: Re: 2001 - 2008 RM 250 (WIP)
Post by: 𝖙𝖋𝖈 on July 12, 2016, 09:27:22 PM
Post by: 𝖙𝖋𝖈 on July 12, 2016, 09:27:22 PM
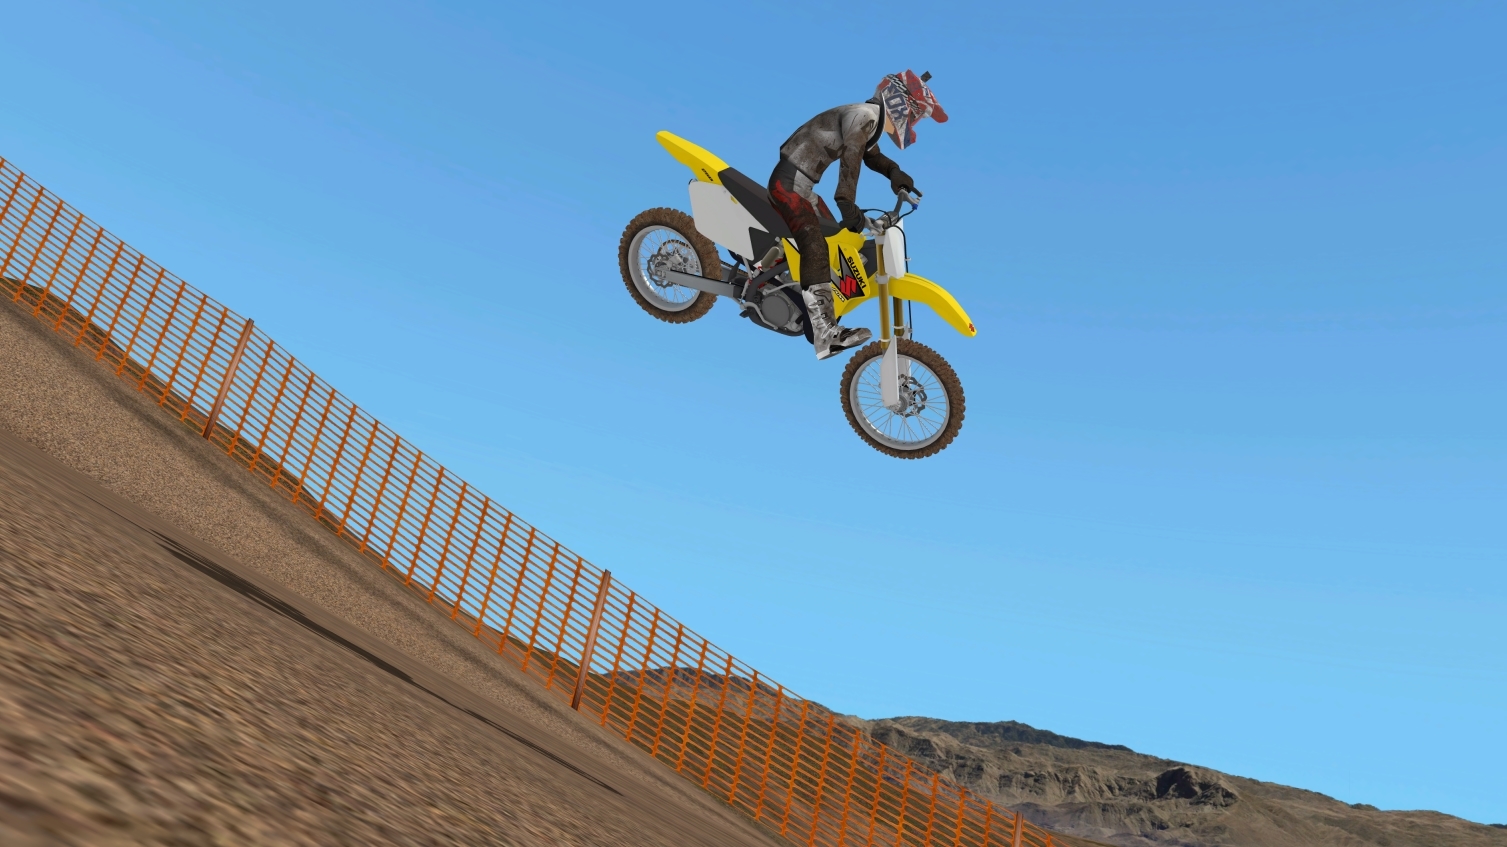
Title: Re: 2001 - 2008 RM 250 (WIP)
Post by: Asdrael on July 12, 2016, 09:30:10 PM
Post by: Asdrael on July 12, 2016, 09:30:10 PM
Looks ace.
You should try making the engine too. It's not too difficult copying the dyno, as well as finding the gearbox ratios. As far as I could see it, on a 125 2 stroke, copying 1:1 works well enough.
You should try making the engine too. It's not too difficult copying the dyno, as well as finding the gearbox ratios. As far as I could see it, on a 125 2 stroke, copying 1:1 works well enough.
Title: Re: 2001 - 2008 RM 250 (WIP)
Post by: 𝖙𝖋𝖈 on July 13, 2016, 05:44:10 PM
Post by: 𝖙𝖋𝖈 on July 13, 2016, 05:44:10 PM
I'll think about it ;)
Meanwhile, the above is the stock skin this bike will come with, and here is another:

Meanwhile, the above is the stock skin this bike will come with, and here is another:
Title: Re: 2001 - 2008 RM 250 (WIP)
Post by: GDUBMX on July 13, 2016, 08:36:14 PM
Post by: GDUBMX on July 13, 2016, 08:36:14 PM
Man this is insanely awesome. You've really done this bike justice mate!
Title: Re: 2001 - 2008 RM 250 (WIP)
Post by: pacopastor34 on July 13, 2016, 11:37:54 PM
Post by: pacopastor34 on July 13, 2016, 11:37:54 PM
Quote from: TheFatController on July 13, 2016, 05:44:10 PM
I'll think about it ;)
Meanwhile, the above is the stock skin this bike will come with, and here is another:
:o :o
Title: Re: 2001 - 2008 RM 250 (WIP)
Post by: ZATOX02 [FR] on July 14, 2016, 04:09:21 AM
Post by: ZATOX02 [FR] on July 14, 2016, 04:09:21 AM
what work for a first creation It's amazing :o
Title: Re: 2001 - 2008 RM 250 (WIP)
Post by: 𝖙𝖋𝖈 on July 15, 2016, 12:17:44 PM
Post by: 𝖙𝖋𝖈 on July 15, 2016, 12:17:44 PM
Anyone know if the mud layers can have their own normal map and SHD?
Title: Re: 2001 - 2008 RM 250 (WIP)
Post by: pacopastor34 on July 15, 2016, 01:20:07 PM
Post by: pacopastor34 on July 15, 2016, 01:20:07 PM
Quote from: TheFatController on July 15, 2016, 12:17:44 PM
Anyone know if the mud layers can have their own normal map and SHD?
Good question.i haven't seen it before in a Bike. I didn't test it.
Just test and tell us!! haha :P
Title: Re: 2001 - 2008 RM 250 (WIP)
Post by: 𝖙𝖋𝖈 on July 15, 2016, 09:44:42 PM
Post by: 𝖙𝖋𝖈 on July 15, 2016, 09:44:42 PM
Bit confused on this one. Pivot seems perfectly lined up in Blender (this is main fsusp pivot, not meshes pivot) and slides up and down perfectly in line with the upper suspension, but in Bikeed it comes out the front of the top fork at a weird angle..
Is the location of the lower suspension dictated by the steer pivot angle?
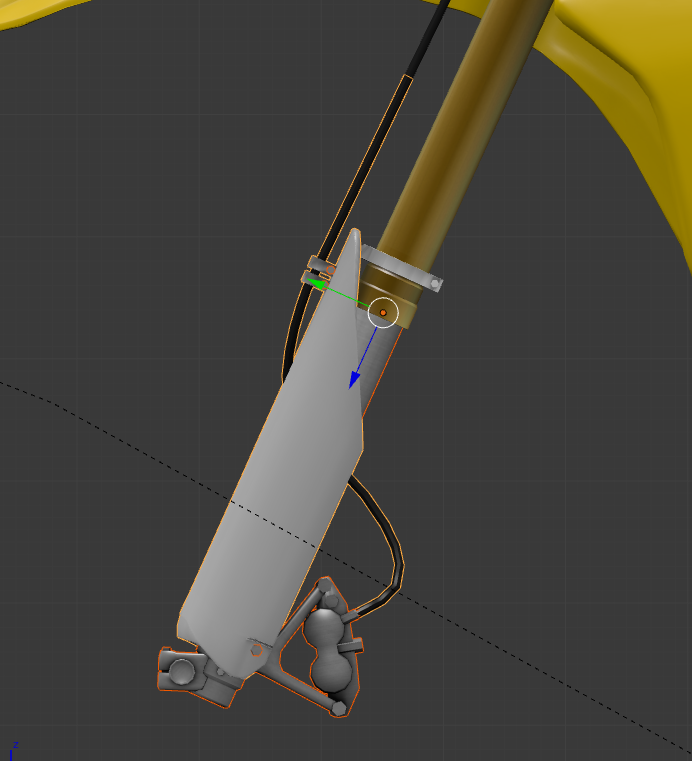

Is the location of the lower suspension dictated by the steer pivot angle?
Title: Re: 2001 - 2008 RM 250 (WIP)
Post by: 𝖙𝖋𝖈 on July 16, 2016, 08:49:56 AM
Post by: 𝖙𝖋𝖈 on July 16, 2016, 08:49:56 AM
Never mind... All fixed ;)
Title: Re: 2001 - 2008 RM 250 (WIP)
Post by: BadStar on July 16, 2016, 05:59:32 PM
Post by: BadStar on July 16, 2016, 05:59:32 PM
This is already my favorite model to hit this game, hope it rides well!!
I appreciate that you like to keep it competitive to the MSM's, which is what the simulation is based around. I do think a little tweak to the power gain could be in order so you feel it engage more like the 125? If it makes it OP or something silly then nvm.
I appreciate that you like to keep it competitive to the MSM's, which is what the simulation is based around. I do think a little tweak to the power gain could be in order so you feel it engage more like the 125? If it makes it OP or something silly then nvm.
Title: Re: 2001 - 2008 RM 250 (WIP)
Post by: 𝖙𝖋𝖈 on July 16, 2016, 07:33:48 PM
Post by: 𝖙𝖋𝖈 on July 16, 2016, 07:33:48 PM
Thanks! It could do with a few tweaks to the engine I suppose, I just don't want it to go the same way as the other custom bikes where it's disproportionate. As the geometry plays a big part in the handling.. I dunno, I may see if someone wants to have a go at making an engine for it to see how it goes, but I don't have much interest in doing that myself..
Title: Re: 2001 - 2008 RM 250 (WIP)
Post by: 𝖙𝖋𝖈 on July 16, 2016, 09:36:14 PM
Post by: 𝖙𝖋𝖈 on July 16, 2016, 09:36:14 PM
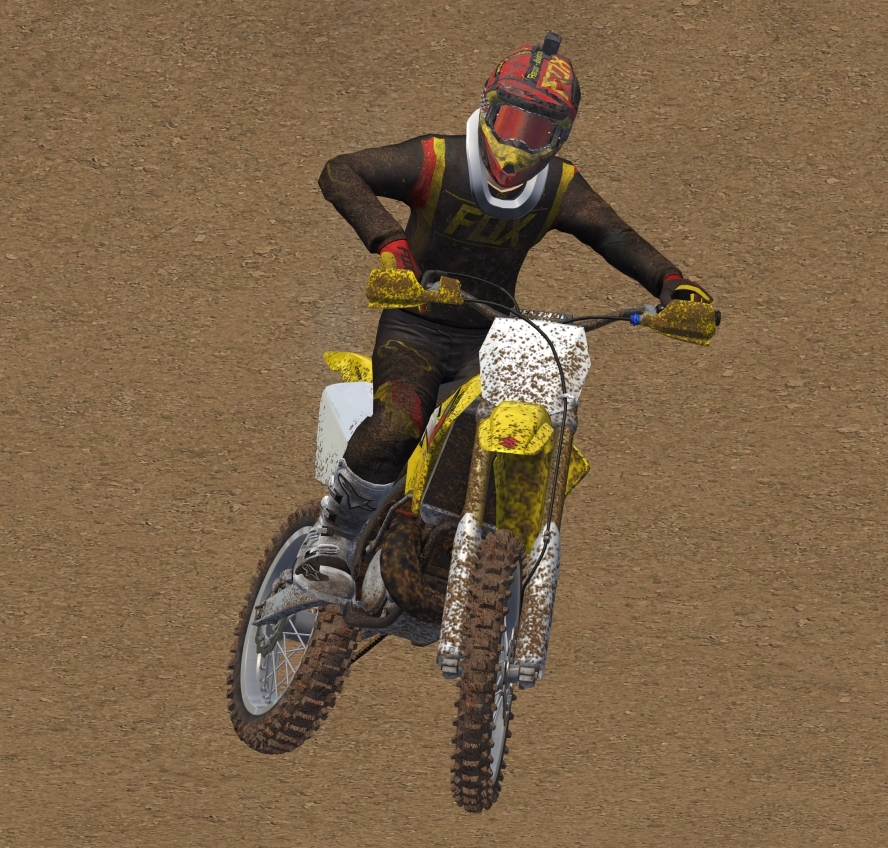
Title: Re: 2001 - 2008 RM 250 (WIP)
Post by: StoneRider on July 16, 2016, 09:44:17 PM
Post by: StoneRider on July 16, 2016, 09:44:17 PM
DAMN i'm jealous.
Title: Re: 2001 - 2008 RM 250 (WIP)
Post by: StoneRider on July 16, 2016, 09:44:59 PM
Post by: StoneRider on July 16, 2016, 09:44:59 PM
why is it blurry under the front fender ??
Title: Re: 2001 - 2008 RM 250 (WIP)
Post by: 𝖙𝖋𝖈 on July 16, 2016, 09:49:55 PM
Post by: 𝖙𝖋𝖈 on July 16, 2016, 09:49:55 PM
I genuinely have no idea.. The texture really isn't that much smaller there, in fact some other parts are a bit smaller and the texture appears clearer. Not too bothered by it but would be nice to fix.
Title: Re: 2001 - 2008 RM 250 (WIP)
Post by: StoneRider on July 17, 2016, 12:29:09 AM
Post by: StoneRider on July 17, 2016, 12:29:09 AM
well... if you want to match the rider and helmet.. it works for me
Title: Re: 2001 - 2008 RM 250 (WIP)
Post by: 𝖙𝖋𝖈 on July 17, 2016, 12:36:12 AM
Post by: 𝖙𝖋𝖈 on July 17, 2016, 12:36:12 AM
No I think you're right geo.. Maybe the rate of buildup could be based on the conditions.. I didn't notice any difference between riding on a wet and dry track (riding wet hoping to increase the rate of mud buildup).. Asked the question but haven't had a reply about how it works.
I also don't think a bike gets that muddy on the front number plate unless getting roosted but guess for now it has to account for all circumstances.
The above picture is full mud btw.. many many laps in ;)
I also don't think a bike gets that muddy on the front number plate unless getting roosted but guess for now it has to account for all circumstances.
The above picture is full mud btw.. many many laps in ;)
Title: Re: 2001 - 2008 RM 250 (WIP)
Post by: 𝖙𝖋𝖈 on July 17, 2016, 01:28:14 AM
Post by: 𝖙𝖋𝖈 on July 17, 2016, 01:28:14 AM
At the very minimum you'd need a layer for:
dry solo, wet solo, dry following, wet following.
On a similar note I'd also still love the 'being roosted' sound I requested ages ago. Sounds simple to me but maybe not so easy to implement.. If you ride through particles of another bike you hear the sound of roost hitting plastic, would be so immersive! Would make following another bike more intense.
Title: Re: 2001 - 2008 RM 250 (WIP)
Post by: 𝖙𝖋𝖈 on July 17, 2016, 12:09:49 PM
Post by: 𝖙𝖋𝖈 on July 17, 2016, 12:09:49 PM
One neat thing, found a sneaky way of having with or without handguards on the same model, so will be adding a few accessories that people can pick and choose from and skin, handguards, disc cover, toying with the idea of twinwalls and fatbar but will have to see how that one goes!
.. Edit.. Never mind, scratch that. It works but has a few pitfalls that aren't good enough :(
.. Edit.. Again.. Maybe it will work after all :o
.. Edit.. Never mind, scratch that. It works but has a few pitfalls that aren't good enough :(
.. Edit.. Again.. Maybe it will work after all :o
Title: Re: 2001 - 2008 RM 250 (WIP)
Post by: 𝖙𝖋𝖈 on July 18, 2016, 08:01:18 PM
Post by: 𝖙𝖋𝖈 on July 18, 2016, 08:01:18 PM
Does anyone know how blender and alpha works? Just using a texture with an alpha layer when exporting makes the transparent parts appear black in game.. Setting proper alpha in blender works ok but makes the textured parts of the object look like glass where the back edges / faces are see through..
Title: Re: 2001 - 2008 RM 250 (WIP)
Post by: 𝖙𝖋𝖈 on August 05, 2016, 09:38:54 AM
Post by: 𝖙𝖋𝖈 on August 05, 2016, 09:38:54 AM
For anyone who's interested, feedbacks been good from the few who have tried it out so will aim to get a v1 out sometime next week ;)
Would you guys prefer v1 with or without handguards?
Would you guys prefer v1 with or without handguards?
Title: Re: 2001 - 2008 RM 250 (WIP)
Post by: GDUBMX on August 05, 2016, 04:59:25 PM
Post by: GDUBMX on August 05, 2016, 04:59:25 PM
Without :)
Title: Re: 2001 - 2008 RM 250 (WIP)
Post by: Vilas on August 05, 2016, 06:33:31 PM
Post by: Vilas on August 05, 2016, 06:33:31 PM
With ;)
Title: Re: 2001 - 2008 RM 250 (WIP)
Post by: Ruubs on August 05, 2016, 06:48:31 PM
Post by: Ruubs on August 05, 2016, 06:48:31 PM
Without :)
Title: Re: 2001 - 2008 RM 250 (WIP)
Post by: Asdrael on August 05, 2016, 08:12:08 PM
Post by: Asdrael on August 05, 2016, 08:12:08 PM
Only the left one.
Title: Re: 2001 - 2008 RM 250 (WIP)
Post by: 𝖙𝖋𝖈 on August 05, 2016, 10:47:46 PM
Post by: 𝖙𝖋𝖈 on August 05, 2016, 10:47:46 PM
3 for without..
1 for with..
1 for only one lol..
any more takers?
1 for with..
1 for only one lol..
any more takers?
Title: Re: 2001 - 2008 RM 250 (WIP)
Post by: Brock1198 on August 06, 2016, 12:29:27 AM
Post by: Brock1198 on August 06, 2016, 12:29:27 AM
i vote for only the left one too
Title: Re: 2001 - 2008 RM 250 (WIP)
Post by: ZATOX02 [FR] on August 06, 2016, 12:09:47 PM
Post by: ZATOX02 [FR] on August 06, 2016, 12:09:47 PM
I vote without ;D
Title: Re: 2001 - 2008 RM 250 (WIP)
Post by: Asdrael on August 07, 2016, 03:27:12 PM
Post by: Asdrael on August 07, 2016, 03:27:12 PM
Can you do the "normal" bike without - stock style, and a skin with? Or do you require 2 actual bikes and can't add 3D parts inside of a skin?
Title: Re: 2001 - 2008 RM 250 (WIP)
Post by: 𝖙𝖋𝖈 on August 07, 2016, 04:19:43 PM
Post by: 𝖙𝖋𝖈 on August 07, 2016, 04:19:43 PM
Well I was working on a way to have 2 paints, with and without handguards. And although I have it working, they are semi transparent when you use the 'with' texture.. Sandy just may have helped out on that one though with a potential alpha fix so we shall see..
Title: Re: 2001 - 2008 RM 250 (WIP)
Post by: grimm on August 07, 2016, 09:33:22 PM
Post by: grimm on August 07, 2016, 09:33:22 PM
Being a woods rider I prefer it with (been watching this thread forever) but even if they end up there as an option in the long run it would be cool with me just to see this bike in game. :D
Title: Re: 2001 - 2008 RM 250 (WIP)
Post by: 2tfanatic on August 08, 2016, 12:27:56 PM
Post by: 2tfanatic on August 08, 2016, 12:27:56 PM
Are you going to release this bad boy?
Nice bike man!
Nice bike man!
Title: Re: 2001 - 2008 RM 250 (WIP)
Post by: 𝖙𝖋𝖈 on October 11, 2016, 12:05:31 AM
Post by: 𝖙𝖋𝖈 on October 11, 2016, 12:05:31 AM
Can anyone give me a pointer on how to get bike shadows working? I've so far:
Removed all materials from both the materials window and each individual UV mapped part (leaving the mapping in tact) for my model, it's completely white in Blender.
Updated export script to point to model_shadow.edf
Exported my bike as model_shadow.fbx
Run through FBX2EDF using both the mesh and shadow options, saving as model_shadow.edf and using the export script.
So far, I'm getting no shadows in game :(
Title: Re: 2001 - 2008 RM 250 (WIP)
Post by: 𝖙𝖋𝖈 on October 11, 2016, 01:17:46 PM
Post by: 𝖙𝖋𝖈 on October 11, 2016, 01:17:46 PM
Any hints, tips on the above? This is my job for this afternoon then I'm pretty much ready to release the first version of this bike..
Title: Re: 2001 - 2008 RM 250 (WIP)
Post by: Vortex_Damien on October 11, 2016, 01:20:29 PM
Post by: Vortex_Damien on October 11, 2016, 01:20:29 PM
Do just the shadow option 8)
Title: Re: 2001 - 2008 RM 250 (WIP)
Post by: 𝖙𝖋𝖈 on October 11, 2016, 01:23:01 PM
Post by: 𝖙𝖋𝖈 on October 11, 2016, 01:23:01 PM
You can only select one option, by that I meant I've tried both individually ;)
Title: Re: 2001 - 2008 RM 250 (WIP)
Post by: loganwren245 on January 03, 2020, 02:41:51 AM
Post by: loganwren245 on January 03, 2020, 02:41:51 AM
Any interest in bringing back the handguards for that bike?
Title: Re: 2001 - 2008 RM 250 (WIP)
Post by: Retro_Steam on September 13, 2021, 04:14:39 AM
Post by: Retro_Steam on September 13, 2021, 04:14:39 AM
Is this discountinued?