Title: Asdrael's SX track creation kit.
Post by: Asdrael on January 06, 2017, 07:48:57 PM
Post by: Asdrael on January 06, 2017, 07:48:57 PM
Here goes: the kit I used to make the series of SX tracks. I'm typing this rather fast as I'm leaving for two weeks of holidays tomorrow and have stuff to do. I just wanted to let you guys experiment for two weeks. This will most likely get revisited at some point, end of the month most likely. You have 24h to ask questions ;)
By no way do I consider this the ultimate track creation kit, even for SX. It was convenient for me and gave results I was satisfied with. There are tons of ways to do things differently, and probably all of them are better than mine. But if it can get more people into building, I think it's good enough!
Wall of text incoming.
This is the latest version that I used both for JS7-SXN and JS7-SXS, my hardest and my easiest track. That should tell you it's flexible enough, and it's all in the placement of obstacles (scaling was changed by less than... 3% on average between the 2 tracks.)
This folder contains:
I will only explain how to use the PSD the way I did to make an SX track. This is not a tutorial on how to make a track, what is map.bat for etc. Other topics cover that. A complete overview of my workflow can be found in the topic Building a Replica SX – A2 2016 (http://forum.mx-bikes.com/index.php?topic=1194.0) with extensive details. This post also implies you are decent at photoshop or at least make an effort.
Disclaimer: my 100% official Photoshop is stuck in French. I'm translating to English from memory of an old PS I used years ago, sorry if it's not on point.
How to use the PSD?
All of this will come from the principle that you will be using my scaling. Which is the following (copy/paste in your THT/HMF file):
Scaling for THT and HMF files:
This, in combination with the PSD, will give you a 1.05 scaling (more or less). I strongly recommend building the whole, complete track this way. Should you want to change the feel slightly, do it at the end by adjusting the X/Y/Z scales. At this stage, do it in 2 or 3% increments as the effect is huge already (with 5% change you'll turn an easy section into a pro-only rythm of doom).
Before Obstacles
You need a track. With my scaling, ago for around 80-90px width on the main track. Don't forget to have around 20-25px between lines for obstacle dirt falloff + blocks.
Obstacles in the PSD
The PSD contains several layers, each of them having a standard version of an obstacle as per their name. Those obstacles have several properties:
Combining obstacles and scaling them
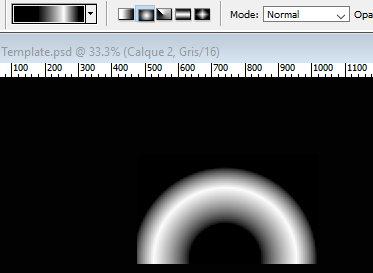
1. Golden rule: start by making a copy of the layer containing the obstacle you want to use. Each obstacle should be one layer at least at the building stage. Always rotate the obstacles BEFORE smoothing them. Also, do not use "Normal" in the layer dropdown menu. Use "Overlay", otherwise joining obstacles will produce wierd glitches. Place your obstacle in X/Y this way, and rotate them.
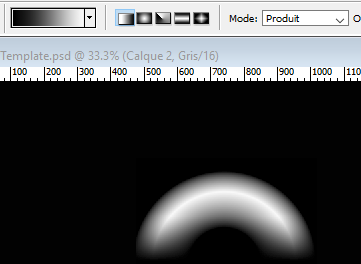
2. Smooth the obstacles. Select the WHOLE LAYER and apply a Gaussian filter. Between 7 and 10 pixel seems to be good at that scale. (I personnaly used 8 90% of the time).
3. Scale the obstacle vertically. If you stick with my technique and scaling, hover your mouse cursor AFTER SMOOTHING on the whitest part of the obstacle. You will get, in the information panel, a "black" % value. Once again, with my scaling: 10% = 1 feet. So a 5' jump should be 50% at it's highest point. A 3' should be 70% (it's a black scale and we are making white, remember?). Adjust that by changing the opacity of the layer. I advise being conservative at first – do your 3' at 73% and your 5' at 57% or so. Careful: your opacity per cent does not translate directly in blackness % , it is NOT linear.
4. Get in game, test your line. At that stage, move obstacles in the PSD layer per layer. Select the obstacle, keyboard move it by 1 or 2 steps, change height by 1 or 2%, etc.
Whoops
I did those depending on how I wanted them each time. In the gradient file, there is are 2 "Whoops" template. What I did was apply the gradient to a box in a new layer, then apply a Curve to it to round up the mounds (a 75% 50% for example). Then apply some Gaussian Filter on it (don't hesitate to do a double 5+5 instead of a single 8 for example, you can get some pretty interesting results). Then set their height. Don't be over optimistic, 15% is tall enough atm.
Do not forget to make a single entry whoops that is 2/3 of the height of your whoops section, otherwise you will jump when approaching the section. You need something to lift the wheels smoothly to put you on top of the whoops.
Berms
I also did those on the spot. However, I used Gradients present in my gradient file. This is the most complicated section to get right.
Tables and other obstacles.
In the gradients again you will find different table types. You'll have to experiment depending if the table is a landing, a take-off, how wide you want the flat section, etc. Sometimes, you can add a little bump to help jumping out. I have found "Table Flat" to be the best, possibly giving it a bump at the end. Remember: tables are often 4' high with a 2 or 3' kick for on/off.
For dragonsback: Just use the 2' template, and then add a SkyJump gradient in a layer that you will place underneath 3 or 4 of those. Tip: leave the first "jump" clean, and just place the SkyJump gradient after. You will need to work on the SkyJump gradient Curve and Smoothing and Size a bit, depending on what you want your obstacle to be in the end (a jump? A landing? A staircase?).
For "artificial" ruts, just use a Gaussian filter on the pen tool.
General Tips and Tricks
Adjusting the X/Y dimension can do more than adjusting the height, but you must smooth with the Gaussian filter only as a last step. Otherwise, you will get a stair effect.
It's generally a good idea to have the first jump of a rythm section slightly overscaled.
To conclude in a pedantic way: have fun with this, but be aware: it's a lot of effort to come up with a ridable track that has several lines. The only thing I ask in return is that people do not half-arse the job and actually make an effort to release proper tracks with this kit. We don't need another pile of betas and unfinished tracks.
is this actually the link? Why yes it is! (https://mega.nz/#!QFhniS4Z!YRNgiY2u2tDdz05e9PZb8IcVaeUt7p8LdoLG2JxnStQ)
By no way do I consider this the ultimate track creation kit, even for SX. It was convenient for me and gave results I was satisfied with. There are tons of ways to do things differently, and probably all of them are better than mine. But if it can get more people into building, I think it's good enough!
Wall of text incoming.
This is the latest version that I used both for JS7-SXN and JS7-SXS, my hardest and my easiest track. That should tell you it's flexible enough, and it's all in the placement of obstacles (scaling was changed by less than... 3% on average between the 2 tracks.)
This folder contains:
- A PSD file with my standard obstacles.
- A SX.grd gradient file for photoshop.
- My params.ini file for the map.bat and an .amb file. (it gives "good" single point stadium lighting that helps see obstacles). Remember to turn the shadows back on in the params.ini, I just usually don't compile them to save time in the track building stage!
- A sketchup file with textured tough blocks and finish line / starting gate scaffold, and the night skybox.
- Two sketchup file with the Annaheim stadium and the San Diego stadium, adapted from Sketchup workshop data with power of 2 textures.
I will only explain how to use the PSD the way I did to make an SX track. This is not a tutorial on how to make a track, what is map.bat for etc. Other topics cover that. A complete overview of my workflow can be found in the topic Building a Replica SX – A2 2016 (http://forum.mx-bikes.com/index.php?topic=1194.0) with extensive details. This post also implies you are decent at photoshop or at least make an effort.
Disclaimer: my 100% official Photoshop is stuck in French. I'm translating to English from memory of an old PS I used years ago, sorry if it's not on point.
How to use the PSD?
All of this will come from the principle that you will be using my scaling. Which is the following (copy/paste in your THT/HMF file):
Scaling for THT and HMF files:
Code Select
 samples_x = 2049
samples_z = 2049

data = heightmap.raw

size_x = 210
size_z = 210
scale = 3.7
This, in combination with the PSD, will give you a 1.05 scaling (more or less). I strongly recommend building the whole, complete track this way. Should you want to change the feel slightly, do it at the end by adjusting the X/Y/Z scales. At this stage, do it in 2 or 3% increments as the effect is huge already (with 5% change you'll turn an easy section into a pro-only rythm of doom).
Before Obstacles
You need a track. With my scaling, ago for around 80-90px width on the main track. Don't forget to have around 20-25px between lines for obstacle dirt falloff + blocks.
Obstacles in the PSD
The PSD contains several layers, each of them having a standard version of an obstacle as per their name. Those obstacles have several properties:
- They are directional: the way they are placed on the PSD is meant to be ridden from TOP to BOTTOM.
- Their XY size is correct for the scaling I use.
- They are already "curved" but not "smoothened". More on that later.
- They are NOT scaled in height. This is down at the end using a trick due to my scaling. More on that later.
- "Trip Ramp Std" is the take off for the SX triple as well as the Finish line. The middle jump of an SX triple is the 5' scaled down (approx 145px long). The landing is the take off, turned around, scaled longer (approx 180px).
Combining obstacles and scaling them
1. Golden rule: start by making a copy of the layer containing the obstacle you want to use. Each obstacle should be one layer at least at the building stage. Always rotate the obstacles BEFORE smoothing them. Also, do not use "Normal" in the layer dropdown menu. Use "Overlay", otherwise joining obstacles will produce wierd glitches. Place your obstacle in X/Y this way, and rotate them.
2. Smooth the obstacles. Select the WHOLE LAYER and apply a Gaussian filter. Between 7 and 10 pixel seems to be good at that scale. (I personnaly used 8 90% of the time).
3. Scale the obstacle vertically. If you stick with my technique and scaling, hover your mouse cursor AFTER SMOOTHING on the whitest part of the obstacle. You will get, in the information panel, a "black" % value. Once again, with my scaling: 10% = 1 feet. So a 5' jump should be 50% at it's highest point. A 3' should be 70% (it's a black scale and we are making white, remember?). Adjust that by changing the opacity of the layer. I advise being conservative at first – do your 3' at 73% and your 5' at 57% or so. Careful: your opacity per cent does not translate directly in blackness % , it is NOT linear.
4. Get in game, test your line. At that stage, move obstacles in the PSD layer per layer. Select the obstacle, keyboard move it by 1 or 2 steps, change height by 1 or 2%, etc.
Whoops
I did those depending on how I wanted them each time. In the gradient file, there is are 2 "Whoops" template. What I did was apply the gradient to a box in a new layer, then apply a Curve to it to round up the mounds (a 75% 50% for example). Then apply some Gaussian Filter on it (don't hesitate to do a double 5+5 instead of a single 8 for example, you can get some pretty interesting results). Then set their height. Don't be over optimistic, 15% is tall enough atm.
Do not forget to make a single entry whoops that is 2/3 of the height of your whoops section, otherwise you will jump when approaching the section. You need something to lift the wheels smoothly to put you on top of the whoops.
Berms
I also did those on the spot. However, I used Gradients present in my gradient file. This is the most complicated section to get right.
- Make a new layer.
- Select a box as wide as your turn with some extra room.
- Apply the Berm gradient in a round shape in Normal mode.
Then, select the Berm smooth gradient, and multiply it onto of your already present gradient, in the direction of the track, from ALMOST one end of the box to ALMOST the middle of the box.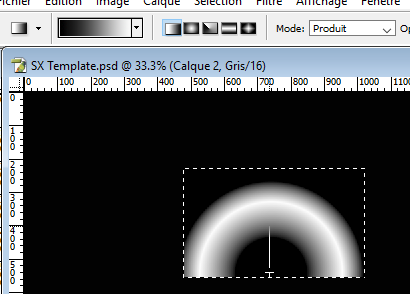
Then, apply a curve to it to sharpen it (like 50% 75%).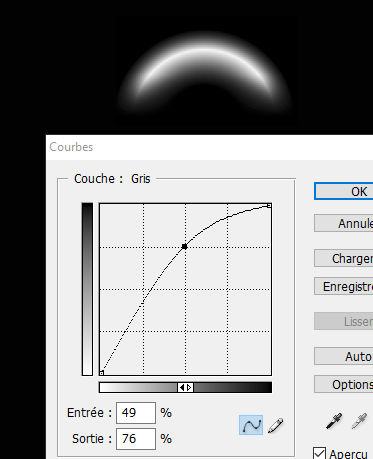
- Finalize by rotating if needed (hint: turn it a bit more toward the end of the turn to give more grip getting out), and smoothen (Gaussian Filter friend to the rescue, 7 or so), and finally set its height using the opacity %.
Tables and other obstacles.
In the gradients again you will find different table types. You'll have to experiment depending if the table is a landing, a take-off, how wide you want the flat section, etc. Sometimes, you can add a little bump to help jumping out. I have found "Table Flat" to be the best, possibly giving it a bump at the end. Remember: tables are often 4' high with a 2 or 3' kick for on/off.
For dragonsback: Just use the 2' template, and then add a SkyJump gradient in a layer that you will place underneath 3 or 4 of those. Tip: leave the first "jump" clean, and just place the SkyJump gradient after. You will need to work on the SkyJump gradient Curve and Smoothing and Size a bit, depending on what you want your obstacle to be in the end (a jump? A landing? A staircase?).
For "artificial" ruts, just use a Gaussian filter on the pen tool.
General Tips and Tricks
Adjusting the X/Y dimension can do more than adjusting the height, but you must smooth with the Gaussian filter only as a last step. Otherwise, you will get a stair effect.
It's generally a good idea to have the first jump of a rythm section slightly overscaled.
To conclude in a pedantic way: have fun with this, but be aware: it's a lot of effort to come up with a ridable track that has several lines. The only thing I ask in return is that people do not half-arse the job and actually make an effort to release proper tracks with this kit. We don't need another pile of betas and unfinished tracks.
is this actually the link? Why yes it is! (https://mega.nz/#!QFhniS4Z!YRNgiY2u2tDdz05e9PZb8IcVaeUt7p8LdoLG2JxnStQ)
Title: Re: Asdrael's SX track creation kit.
Post by: BadStar on January 06, 2017, 08:34:54 PM
Post by: BadStar on January 06, 2017, 08:34:54 PM
Very nice of you to do this!!
Title: Re: Asdrael's SX track creation kit.
Post by: GDUBMX on January 06, 2017, 08:45:41 PM
Post by: GDUBMX on January 06, 2017, 08:45:41 PM
Sandy you gotta get on this, and matthh you wanted to start track building mate hahahah great place to start my friend!
Title: Re: Asdrael's SX track creation kit.
Post by: Ruubs on January 06, 2017, 10:45:31 PM
Post by: Ruubs on January 06, 2017, 10:45:31 PM
Awesome Asdrael! Really appriciate this.
Quote from: gdubmx on January 06, 2017, 08:45:41 PMWill do! Should I just start with A1?
Sandy you gotta get on this.
Title: Re: Asdrael's SX track creation kit.
Post by: GDUBMX on January 06, 2017, 10:51:19 PM
Post by: GDUBMX on January 06, 2017, 10:51:19 PM
yeah go for it mate :DD::D ill donate
Title: Re: Asdrael's SX track creation kit.
Post by: Asdrael on January 06, 2017, 10:52:07 PM
Post by: Asdrael on January 06, 2017, 10:52:07 PM
Quote from: Sandbiter on January 06, 2017, 10:45:31 PMWelcome, enjoy.
Awesome Asdrael! Really appriciate this.
QuoteShould I just start with A1?Well I'm not doing it, so feel free. You have the stadium in the pack as well.
Quote from: gdubmx on January 06, 2017, 10:51:19 PMOmg I'm the unemployed one :p
yeah go for it mate :DD::D ill donate
Title: Re: Asdrael's SX track creation kit.
Post by: Ruubs on January 06, 2017, 10:58:57 PM
Post by: Ruubs on January 06, 2017, 10:58:57 PM
Quote from: Asdrael on January 06, 2017, 10:52:07 PMAwesome! I'll start soon. May I ask where you got the stadium from? Any other stadiums I could get? If not i'll have a great idea for my tracks :)
Well I'm not doing it, so feel free. You have the stadium in the pack as well.
Quote from: Asdrael on January 06, 2017, 10:52:07 PMI'm unemployed as well mate so shh. I'm a poor student.Quote from: gdubmx on January 06, 2017, 10:51:19 PMOmg I'm the unemployed one :p
yeah go for it mate :DD::D ill donate
Title: Re: Asdrael's SX track creation kit.
Post by: GDUBMX on January 06, 2017, 11:01:35 PM
Post by: GDUBMX on January 06, 2017, 11:01:35 PM
Hhaha shit.. ok, collab and donate simple :D full 2017 ama sx series
http://motocross.transworld.net/news/2017-monster-energy-supercross-track-layouts/
http://motocross.transworld.net/news/2017-monster-energy-supercross-track-layouts/
Title: Re: Asdrael's SX track creation kit.
Post by: Asdrael on January 06, 2017, 11:02:32 PM
Post by: Asdrael on January 06, 2017, 11:02:32 PM
Stadiums come in the SketchUp "Workhouse" or whatever it's called. I took the models and fixed up / replaced /created textures to have them at a correct resolution and power of 2. There is the Anaheim and the SanDiego stadium in the zip.
Quote from: gdubmx on January 06, 2017, 11:01:35 PMAFAIK there are only 3D maps, no blueprints, which is a bit shitty.
Hhaha shit.. ok, collab and donate simple :D full 2017 ama sx series
http://motocross.transworld.net/news/2017-monster-energy-supercross-track-layouts/
Title: Re: Asdrael's SX track creation kit.
Post by: Ruubs on January 06, 2017, 11:11:03 PM
Post by: Ruubs on January 06, 2017, 11:11:03 PM
Thanks guys. Will check it out.
Title: Re: Asdrael's SX track creation kit.
Post by: pacopastor34 on January 08, 2017, 08:01:10 PM
Post by: pacopastor34 on January 08, 2017, 08:01:10 PM
I have to say I'm impressed how fast is to make an SX or AX heightmap with your kit. Thank you man.
Title: Re: Asdrael's SX track creation kit.
Post by: pacopastor34 on January 09, 2017, 10:45:15 AM
Post by: pacopastor34 on January 09, 2017, 10:45:15 AM
Quote from: pacopastor34 on January 08, 2017, 08:01:10 PM
I have to say I'm impressed how fast is to make an SX or AX heightmap with your kit. Thank you man.
I sent you a PM Ads, anyway I post here a screenshot with the issue that I'm having... I remember that it happened before but honestly i don't know if i could fixed it or no.

Those kind of pyramids and weird shapes are appearing from the ground
Title: Re: Asdrael's SX track creation kit.
Post by: 𝖙𝖋𝖈 on January 09, 2017, 10:53:43 AM
Post by: 𝖙𝖋𝖈 on January 09, 2017, 10:53:43 AM
I've had that before.. Nothing to do with Asdraels kit, not sure what caused it though sorry. I just copied my heightmap and pasted into a new image and started again, rebuilt project folder and it worked from there.
Title: Re: Asdrael's SX track creation kit.
Post by: pacopastor34 on January 09, 2017, 10:55:46 AM
Post by: pacopastor34 on January 09, 2017, 10:55:46 AM
Quote from: TFC on January 09, 2017, 10:53:43 AM
I've had that before.. Nothing to do with Asdraels kit, not sure what caused it though sorry. I just copied my heightmap and pasted into a new image and started again, rebuilt project folder and it worked from there.
I had it before but shit Don't know what is causing them. Thank you TFC!!!
Title: Re: Asdrael's SX track creation kit.
Post by: Asdrael on January 09, 2017, 11:06:35 AM
Post by: Asdrael on January 09, 2017, 11:06:35 AM
Possibilities:
Deformation not reseted after a heightmap change and a track reload.
Gaussian filter used on a too small selection and not a whole layer.
Deformation not reseted after a heightmap change and a track reload.
Gaussian filter used on a too small selection and not a whole layer.
Title: Re: Asdrael's SX track creation kit.
Post by: pacopastor34 on January 09, 2017, 11:14:46 AM
Post by: pacopastor34 on January 09, 2017, 11:14:46 AM
Quote from: Asdrael on January 09, 2017, 11:06:35 AM
Possibilities:
Deformation not reseted after a heightmap change and a track reload.
Gaussian filter used on a too small selection and not a whole layer.
Thank you man. I must check that. Do u use Gaussian before save the raw to the whole map? I applied the blur to each element once it's placed and after Gaussian I used your height measurement.
Edit: And the winner is: Adsrael for Deformation, the film!! Congratulations!! Thank you mate!
And that's what you can do in minutes with Adsrael SX Kit...Again and I think it won't be the last...THANK YOU.

Title: Re: Asdrael's SX track creation kit.
Post by: 𝖙𝖋𝖈 on January 09, 2017, 01:22:41 PM
Post by: 𝖙𝖋𝖈 on January 09, 2017, 01:22:41 PM
Awesome! I was thinking of making some older sx tracks as a means to make a stadium pack for others to use. The aim is to make high quality stadium objects with animated textures. I was thinking day practice with minimal people in the stands and no big screen, night race with full stadium, cam flashes, big screen etc.. Just thoughts at the moment.
Title: Re: Asdrael's SX track creation kit.
Post by: GDUBMX on January 09, 2017, 04:49:03 PM
Post by: GDUBMX on January 09, 2017, 04:49:03 PM
Wow, is that ready for download Paco? Haha
Great Idea Fats, look forward to seeing mate.
Great Idea Fats, look forward to seeing mate.
Title: Re: Asdrael's SX track creation kit.
Post by: pacopastor34 on January 09, 2017, 05:37:07 PM
Post by: pacopastor34 on January 09, 2017, 05:37:07 PM
Quote from: gdubmx on January 09, 2017, 04:49:03 PM
Wow, is that ready for download Paco? Haha
Great Idea Fats, look forward to seeing mate.
Not yet but i will glad to send it to you to test. Add me to steam GDUB. User: fatselektor
Quote from: TFC on January 09, 2017, 01:22:41 PM
Awesome! I was thinking of making some older sx tracks as a means to make a stadium pack for others to use. The aim is to make high quality stadium objects with animated textures. I was thinking day practice with minimal people in the stands and no big screen, night race with full stadium, cam flashes, big screen etc.. Just thoughts at the moment.
This would be awesome. That's the point. Make a standard object pack to maintain a good quality. I will do some arenacross. I used for that track 2013 Liverpool arenacross layout. I can make all the UK arenacross tracks from 2013, 2014 or maybe 2017.
Title: Re: Asdrael's SX track creation kit.
Post by: BadStar on January 09, 2017, 05:45:05 PM
Post by: BadStar on January 09, 2017, 05:45:05 PM
Wow... that's fast Paco.. Thanks Asdrael!!
This + WC2 and we will be over-run with content!!
This + WC2 and we will be over-run with content!!
Title: Re: Asdrael's SX track creation kit.
Post by: StoneRider on January 12, 2017, 10:59:17 PM
Post by: StoneRider on January 12, 2017, 10:59:17 PM
Quote from: TFC on January 09, 2017, 01:22:41 PM
Awesome! I was thinking of making some older sx tracks as a means to make a stadium pack for others to use. The aim is to make high quality stadium objects with animated textures. I was thinking day practice with minimal people in the stands and no big screen, night race with full stadium, cam flashes, big screen etc.. Just thoughts at the moment.
DUDE !! that would be awesome
Thank you for the pack asdrael !
Title: Re: Asdrael's SX track creation kit.
Post by: 𝖙𝖋𝖈 on January 12, 2017, 11:20:01 PM
Post by: 𝖙𝖋𝖈 on January 12, 2017, 11:20:01 PM
Even better now self emission lighting is possible using the shd. What will be interesting to see is if animated textures can make use of the lighting. If so, camera flashes will look amazing ;D
Title: Re: Asdrael's SX track creation kit.
Post by: BadStar on January 26, 2017, 12:46:16 AM
Post by: BadStar on January 26, 2017, 12:46:16 AM
Bump..
bc I appreciate all tutorials
bc I appreciate all tutorials
Title: Re: Asdrael's SX track creation kit.
Post by: philiaN on March 28, 2017, 10:37:02 PM
Post by: philiaN on March 28, 2017, 10:37:02 PM
push