Title: Project OEM: BikeEd, EngnEd and .cfg for accurate factory specs.
Post by: Asdrael on February 06, 2017, 12:13:11 PM
Post by: Asdrael on February 06, 2017, 12:13:11 PM
OEM is short for original equipment manufacturer and is often used in the spare parts market to indicate parts made by the manufacturer at the original specifications.
Since we have what is probably the most accuracy moddable game engine for dirt bikes in MXBikes, the opportunity to import in game new models using as much of the manufacturer's data as possible is there.
After spending a long time gathering the data on Yamaha dirtbikes, messing around in BikEd, fiddling with EngnEd and generally throwing stuff into the .cfg files, I think I figured out a decent way to import in MXB all the real relevant values. Here is a lengthy tutorial to do the same, made using the 1.22 BikEd and 1.0 EngnEd at the time of MXB Beta5. It is lenghty. 33 pages in word. But, imo, very well worth it when you have the end results - you will be positively surprised if you follow this.
-now updated for Beta8 release-
What this is not is a guide on how to import a 3D model. I can't do it properly so other people will be miles better than me for that.
We'll be touching (each section is a post, click for direct link):
Chapter I : Chassis and geometry
1. Geometry data and general frame adjustement (http://forum.mx-bikes.com/index.php?topic=1546.msg22599#msg22599)
a. Gathering data
b. Frame adjustements
2. Fork setup (http://forum.mx-bikes.com/index.php?topic=1546.msg22600#msg22600)
a. Your BikeEd, Test and Params windows
b. Your Fork Geometry points and moving them around
3. The Rear Shock (http://forum.mx-bikes.com/index.php?topic=1546.msg22601#msg22601)
a. Textbook
b. Real data and Photoshop
c. Fine tuning the shock
4. The wheelbase (http://forum.mx-bikes.com/index.php?topic=1546.msg22602#msg22602)
5. Finishing touches (http://forum.mx-bikes.com/index.php?topic=1546.msg22603#msg22603)
a. Checklist
b. damping, rebound and springs: the .cfg file
6. Troubleshooting - Geometry
(http://forum.mx-bikes.com/index.php?topic=1546.msg22604#msg22604)
Chapter II : Engine modifications
1. Gathering data (http://forum.mx-bikes.com/index.php?topic=1546.msg22605#msg22605)
2. yourbike.cfg and sfx.cfg (http://forum.mx-bikes.com/index.php?topic=1546.msg22606#msg22606)
3. Making yourbike.engn and my toolkit (http://forum.mx-bikes.com/index.php?topic=1546.msg22607#msg22607)
a. Engine and .engn file
b. Checklist
4. Troubleshooting - Engine (http://forum.mx-bikes.com/index.php?topic=1546.msg22608#msg22608)
Chapter III : Polishing yourbike.cfg (http://forum.mx-bikes.com/index.php?topic=1546.msg22609#msg22609)
a. Lock angle
b. Weight and fuel
c. Brakes
d. The .ini file
General tips and tricks and FAQ (http://forum.mx-bikes.com/index.php?topic=1546.msg22610#msg22610)
Update list. (http://forum.mx-bikes.com/index.php?topic=1546.msg22611#msg22611)
Title: Re: Project OEM: BikeEd, EngnEd and .cfg for accurate factory specs.
Post by: Asdrael on February 06, 2017, 12:13:29 PM
Post by: Asdrael on February 06, 2017, 12:13:29 PM
Chapter I : Chassis and geometry
There are 4 golden rules:
From there, I proceed in several steps.
1. Geometry data and general frame adjustement
a. Gathering data
Load up the manufacturer's webpage. Go to the model. Navigate to the spec(ification) list/sheet. You should end up with those values:
b. Frame adjustments. ~ 2min
Adjust the light blue Stand and Stand 2 to set up how the bike will rest on the in game stand. Keep it more or less horizontal.
Clearance in light blue should be in the middle of those 2 Stands cursors.
Do not touch the Aerodynamic Centers.
Adjust the light blue Seat Height soi it touches the seat around the middle of its surface.
There are 4 golden rules:
- Start from the geometry of the standard model PiBoSo has made.
- If it is on the manufacturer spec list, it should be in your BikeEd specs.
- If you have no idea what does what, set it at one extreme, try it in game, rince and repeat.
- YOU CANNOT UNDO IN BIKE ED SO SAVE OFTEN!
From there, I proceed in several steps.
1. Geometry data and general frame adjustement
a. Gathering data
Load up the manufacturer's webpage. Go to the model. Navigate to the spec(ification) list/sheet. You should end up with those values:
- [Rake angle (26 to 29deg)
- Fork Offset (if you find it, otherwise 25mm is true most of the time)
- Suspension travel (around 315mm)
- Trail (100-130 mm)
- Rear shock travel (around 315mm)
- Swing arm length (good luck finding it, if you don't, 590-600mm is what PiBoSo uses and fits 1:1 models normally)
- Wheelbase (usually between 1400 and 1600mm)
b. Frame adjustments. ~ 2min
Adjust the light blue Stand and Stand 2 to set up how the bike will rest on the in game stand. Keep it more or less horizontal.
Clearance in light blue should be in the middle of those 2 Stands cursors.
Do not touch the Aerodynamic Centers.
Adjust the light blue Seat Height soi it touches the seat around the middle of its surface.
Title: Re: Project OEM: BikeEd, EngnEd and .cfg for accurate factory specs.
Post by: Asdrael on February 06, 2017, 12:13:44 PM
Post by: Asdrael on February 06, 2017, 12:13:44 PM
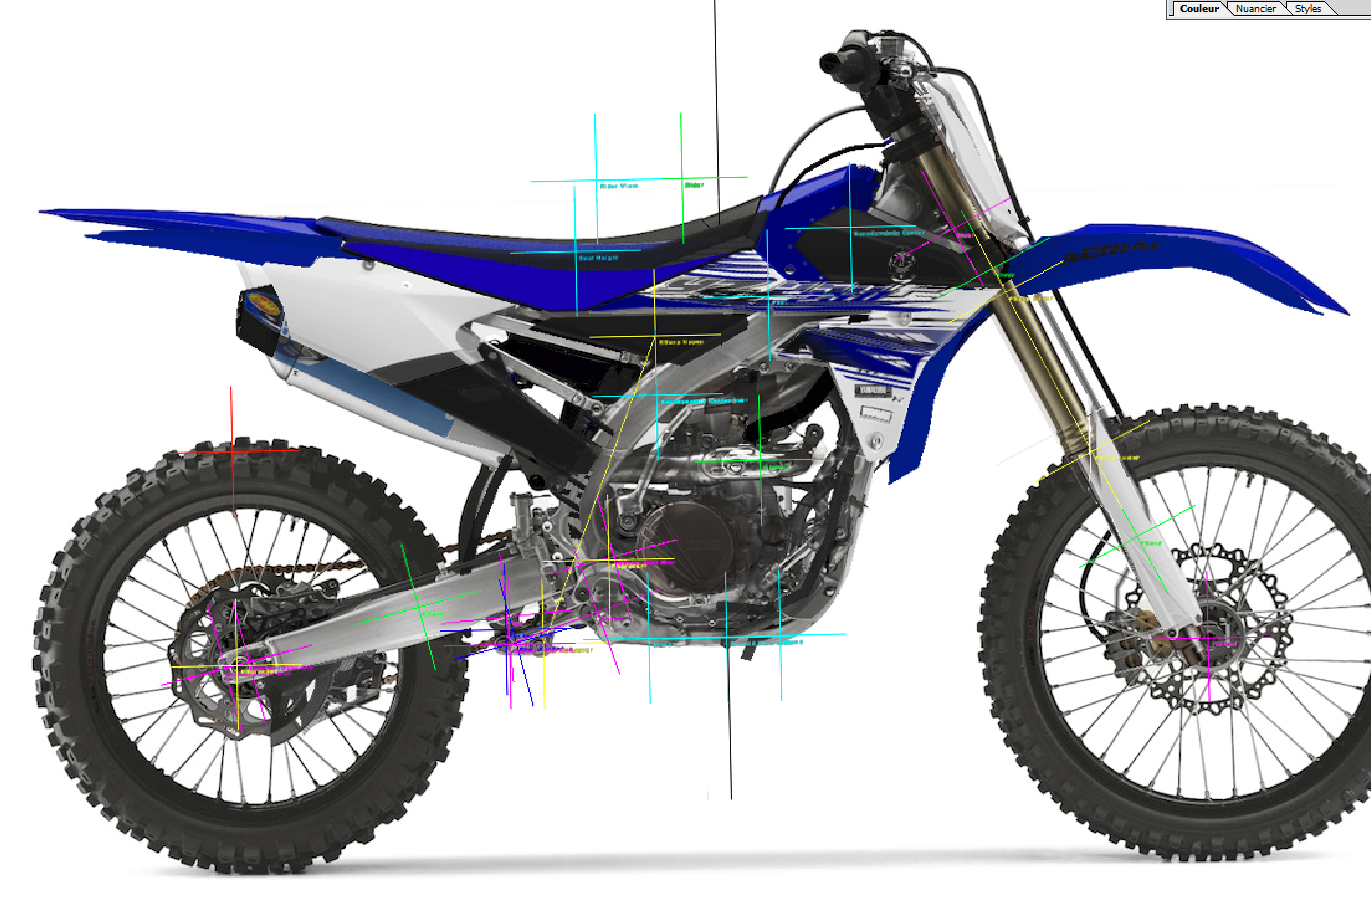
2. Fork setup ~ 15min
a. Your BikeEd, Test and Params windows.
Time to fire up BikeEd and load your .geom.
Start by clicking on Draw and remove the collision bubbles.
Pretty much self explanatory there.
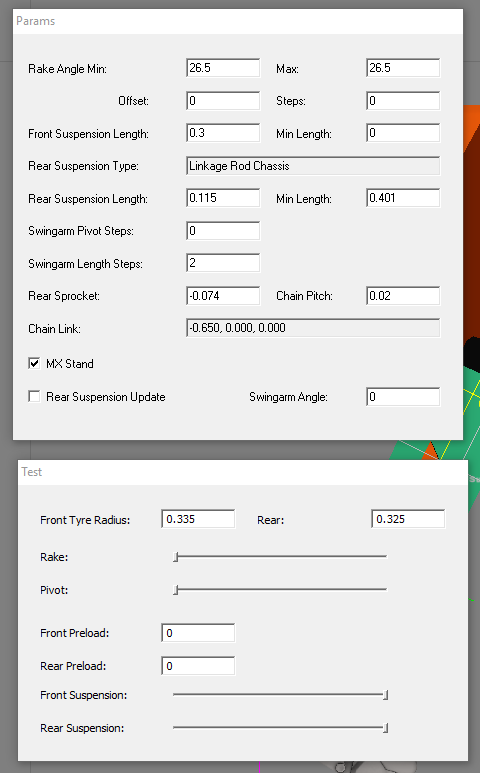
Start by setting the Front Tyre Radius to 0.335, rear to 0.325. This will help getting accurate values later on and represents the diameter of the wheel+tyre.
Rake Angle Min AND Max should be OEM spec. Both values are equal with MX Bikes. This is the angle at which the fork is set.
Rake Offset is set to 0 on most MX bikes.
Front Suspension Length: This is, in meter, the fork travel range. Set to OEM specs.
Now that the values are set, on to understanding and moving the .geom points. You will need to keep an eye on your lower right and watch those values:
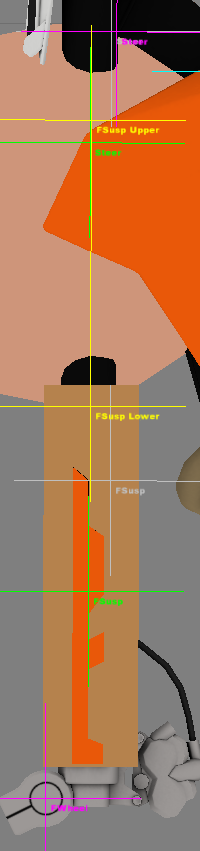
b. Your Fork Geometry points and moving them around.
I proceed like this, in this order. You will notice some items are linked, hence why you should do it like this.
1. Steer pink: moves the whole front geometry and define the position on the rotation axis of the direction column.
-> Position it around the middle of the frame direction column.
2. Steer grey: moves the whole front 3D model.
-> Adjust this so the upper fork model fits around its intended frame location.
3. FSusp Upper Yellow: this is the position of the fork for the physics engine.
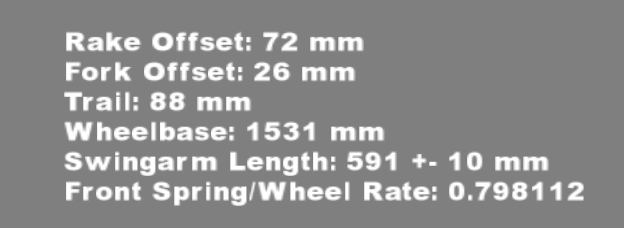
-> It appears its vertical position is of no importance. I move this around to bring FSusp Lower at the lower end of the top section of the fork to give me an indication of the total travel, as the length of the yellow bit is your complete fork travel. Move if from left to right to change your Fork Offset and put it at the correct value (usually 25mm).
4. FSusp grey: this is the lower fork model.
-> move this so the lower fork model starts sinking into the upper fork model.
5. FWheel pink: this is the axle of the Wheel model. Put it where it belongs on your model.
You should now have the correct Fork Offset measurement, and when moving the Front Suspension cursor in the test window, you should check that your models don't collide. Put your front tyre radius at -0.335 (MINUS) and move the cursor again. The red cross, symbolizing the top of the tyre, should not pop above the fender, but just graze it.
If your model was perfectly made, your Trail measurement should be correct. If not, you shouldn't be too far off. If you are, well, your Wheel axle clamps are most likely the wrong size.
To adjust trail once the fork offset is correct, you have two options:
- moving the FWheel forward or backward into its axle slot within tolerance limits.
- moving the FSusp model forward, backward, up or down within tolerance limits. This will change the offset as well and you'll need to adjust the pink and grey cursors afterwards.
Both will achieve what you want, but induce a small "wierdness" in the model. I'd recommend moving each by a few mm if you need a total of 10mm correction. More than that, your model isn't good enough for OEM specs.
6. FSusp green. This is the center of mass for the lower part of the fork.
-> move this so it's around halfway on the lower fork model, but it should be in the axis of the yellow fork travel indicator!
7. Steer green. This is the center of mass for the upper part of the fork, presumably including fender, commands and handlebar.
-> move this so it's in the axis of the yellow fork travel indicator, and up to around the lower part of the lower fork clamp.
For those green mass cursor, it's gut feeling. The Steer mass has a significant impact on front end stability. If it is not in the axis of the yellow fork travel, your handling will be shit!
a. Your BikeEd, Test and Params windows.
Time to fire up BikeEd and load your .geom.
Start by clicking on Draw and remove the collision bubbles.
Pretty much self explanatory there.
Start by setting the Front Tyre Radius to 0.335, rear to 0.325. This will help getting accurate values later on and represents the diameter of the wheel+tyre.
Rake Angle Min AND Max should be OEM spec. Both values are equal with MX Bikes. This is the angle at which the fork is set.
Rake Offset is set to 0 on most MX bikes.
Front Suspension Length: This is, in meter, the fork travel range. Set to OEM specs.
Now that the values are set, on to understanding and moving the .geom points. You will need to keep an eye on your lower right and watch those values:
b. Your Fork Geometry points and moving them around.
I proceed like this, in this order. You will notice some items are linked, hence why you should do it like this.
1. Steer pink: moves the whole front geometry and define the position on the rotation axis of the direction column.
-> Position it around the middle of the frame direction column.
2. Steer grey: moves the whole front 3D model.
-> Adjust this so the upper fork model fits around its intended frame location.
3. FSusp Upper Yellow: this is the position of the fork for the physics engine.
-> It appears its vertical position is of no importance. I move this around to bring FSusp Lower at the lower end of the top section of the fork to give me an indication of the total travel, as the length of the yellow bit is your complete fork travel. Move if from left to right to change your Fork Offset and put it at the correct value (usually 25mm).
4. FSusp grey: this is the lower fork model.
-> move this so the lower fork model starts sinking into the upper fork model.
5. FWheel pink: this is the axle of the Wheel model. Put it where it belongs on your model.
You should now have the correct Fork Offset measurement, and when moving the Front Suspension cursor in the test window, you should check that your models don't collide. Put your front tyre radius at -0.335 (MINUS) and move the cursor again. The red cross, symbolizing the top of the tyre, should not pop above the fender, but just graze it.
If your model was perfectly made, your Trail measurement should be correct. If not, you shouldn't be too far off. If you are, well, your Wheel axle clamps are most likely the wrong size.
To adjust trail once the fork offset is correct, you have two options:
- moving the FWheel forward or backward into its axle slot within tolerance limits.
- moving the FSusp model forward, backward, up or down within tolerance limits. This will change the offset as well and you'll need to adjust the pink and grey cursors afterwards.
Both will achieve what you want, but induce a small "wierdness" in the model. I'd recommend moving each by a few mm if you need a total of 10mm correction. More than that, your model isn't good enough for OEM specs.
6. FSusp green. This is the center of mass for the lower part of the fork.
-> move this so it's around halfway on the lower fork model, but it should be in the axis of the yellow fork travel indicator!
7. Steer green. This is the center of mass for the upper part of the fork, presumably including fender, commands and handlebar.
-> move this so it's in the axis of the yellow fork travel indicator, and up to around the lower part of the lower fork clamp.
For those green mass cursor, it's gut feeling. The Steer mass has a significant impact on front end stability. If it is not in the axis of the yellow fork travel, your handling will be shit!
Title: Re: Project OEM: BikeEd, EngnEd and .cfg for accurate factory specs.
Post by: Asdrael on February 06, 2017, 12:13:55 PM
Post by: Asdrael on February 06, 2017, 12:13:55 PM
SAVE YOUR GEOM NOW!!
Also known as "the destroyer of Worlds", it makes or break a model, it makes or break a soul.
Start off by enabling Rear Suspension update in the Params window. You will see a graph appear:
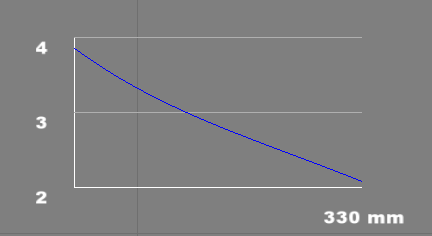
You will be staring at this for the next hour or two.
This is the displacement graph. Long story short: it tells you how your suspension will behave.
- The number (here 330mm) is your shock travel. You cannot set this up directly, it is a result of all the other parameters. Evidently, your goal is to set it at the OEM spec.
- The graph is how much the movement of the swing arm is translated to the spring. What you want is something as shown: more or less linear from ~4 to ~2. It will vary depending on your geometry but should be in that ballpark (let's say 3.5-4 to 1.5-2).
Everytime you move a piece of the rear shock, those values will change. All of them. All the time.
So there are two different ways to go at it.
a. Textbook.
Spend an eternity looking for all the suspensions linkage dimension, if possible angle and joint location with frame and swingarm. Keep those fixed, hope for the best, fiddle around for correct values.
Hoh, and good luck with that.
b. Real data and Photoshop. ~ 1h
The important bits are as follow:
Rear Suspension Length: around 0.11. No idea where to find the OEM spec, so use something around the stock one. It will dictate the length of the yellow RSusp Upper - Lower bit.
Min Length: This value can be found in the users manual of the bike usually. If not, 0.4 is a good value to start with.
Rocker length: measured from the pink Rocker to Rocker-Rod Link cursor (presumably). Around 140mm, depending on the manufacturer. Most data can be found here: http://motocrossactionmag.com/news/this-much-we-know-mxas-guide-to-shock-linkage-lengths . Trick: move the suspension so this link is horizontal. Measure distance. Set it by moving Rocker back and forth along the horizontal axis.
Now, for the geometry cursors.
1. put the pink RWheel Joints around the rear wheel axle location. (min is tower the frame, max away from the frame). It defines the location of the wheel and is important further down in the Wheelbase changes.
2. pink RSusp Joint Min and Max: this is where the physics will have the swingarm rotate.
-> put this more or less where it's supposed to be on your frame. They should be at the same position.
3. Grey RSusp: the position of the model.
-> I start off with something that "looks ok" and gives me around 590mm swingarm length. Still looking for the OEM specs.
At that stage your swing arm and suspension will have moved. Do not fret, we'll fix that. You can move the cursor Rear Suspension in the Test window to check that your model rotates correctly. Your graph and travel values are completly off now though.
4. yellow RSusp Upper: where the top of the rear suspension connects to the chassis.
-> set it according to model. It's for the physics engine and has no incidence on the 3D model (but a decent one on your suspension settings). This will can be used, once you have a matching graph and travel value, to set the maximum angle your swingarm will take by moving it left or right.
Now the fun part begins. We'll be moving all of this and try to get something very close to the correct graph. Try moving the following piece while staying in the ballpark of the travel value and graph goal. I'm guessing we could dig purely the OEM specs for all of this but, F that.
You will also notice that the angle of the swingarm is changing. Our secondary goal here is to have a max of around 20 degrees and a min of around -11 deg. It is however relatively easy to set without other interférences using the pink top part of the suspension in yellow.
- RSusp lower in yellow: massive influence on graph shape, moderate on travel.
- pink Rocker and blue Rocker-Rod: massive influence on the slope of the graph, moderate on its shape, limited on travel.Remember the factory size so always move Rocker and Rocker-Rod together. I'd advise against moving that once it's set.
- pink Rod: Massive influence on angle, graph slope, moderate on length. At maximum extension of the rear suspension, it should be close to vertical.
- Good trick: Move both yellow RSusp lower and upper to move around the angles without changing too much the graph min/max values and travel distance.
Now there is a trick. When you move this around (SAVE BEFORE YOU DOOOOO), you will change all the parameters. But it you change the Min Length in the Params window, you impact graph min/max and travel values. Increasing the Min Length typically "pushes the graph up" and increases travel and angles.
You will need to spend some time fiddling around until you manage to find a spot that checks all those boxes, in order of imprtance:
- A suitable graph, somewhat linear from 4 to 2.
- Correct OEM spec travel value and Rocker Rod link length.
- Correct Rear Suspension Length and Min Length, +- 5%
- Correct max and min Swingarm Angle (+18 to +20 ; -9 to -12 ; ).
Once you have the correct shock profile, you can move the green Rear cursor to around the middle of the Swingarm. This is the center of mass for the rear geometry.
I tend to overlook this whole part those days. I use the photoshop technique directly, I developped a good eye for it and it goes much faster if you don't need to export/import 50 times.
c. Fine tuning the shock~ 1h
You can try out the bike in game, and see how it behaves. It will probably be pretty good at that stage. An important part for the rear feel is to put the two blue link supports (Rocker and Rocker Rod) in a similar position as for the 250xf. When you move the suspension cursor in the Test window, one cross will move. Both should roughly overlap around the middle of the travel of the shock for ok behaviour. Rince and repeat until you get a proper behaviour in game.
Now, there is the photoshop loop. What you need to do is start from a decent modelisation of your geometry first - or the MXM geometry which is a decent start, then find a picture of the bike you are modeling (the stock picture from the manufacturer website is great for that), showing the side with the apprent linkage rod. Proceed like this:
- Put the picture in photoshop.
- Measure the swingarm angle of the picture (it can usually be anywhere between 18 and 14°).
- Use the same angle on your BikeEd using the Rear Suspension cursor in the Test window. Deactivate Rear Suspension Update!
- Screenshot your BikeEd window.
- Remove the grey in PS.
- Overlap the picture and the BikeEd screenie, using the rear shock geometry as a reference.
- Rescale as needed.
- Note where everything should be.
- Back in BikeEd, readjust the pieces following the new info you got.
- Reactivate Rear Suspension Update
- Double check the Rod Linkage length
- adjust the RSusp cursor to get back a proper travel first, angle second. OR put the RSusp upper cursor more or less around where it's supposed to be. Play around with Rear Suspension Length and Min Length MODERATLY (-+5% around 0.115 and 0.4 respectively if you don't have those OEM specs). Get around a good graph and travel. Fine tune by moving RSusp Upper a tad and changing Shock Length a tad <-- my method of choice.
- Rince and repeat until you get a good match. Like this (click to enlarge):
- Try out the model ingame, should ride well enough. Hopefully. If not, try moving the Blue cursors without changing the rest of the geometry for a massive impact.
It will never be 100%. In my example, my swingarm is a tad long and the shock itself is too long. I couldn't make it work with a shorter one with the information I had at hand. Mssing data, and too much interaction for it. Set your tolerance treshold and don't spend 5h for 2% accuracy more. I did it (several times) and you won't feel the difference.
Now, you'll see that your wheelbase is off. And might be by a rather big margin. It's however rather easy to correct once everything else is perfect.
[/list]
Title: Re: Project OEM: BikeEd, EngnEd and .cfg for accurate factory specs.
Post by: Asdrael on February 06, 2017, 12:14:02 PM
Post by: Asdrael on February 06, 2017, 12:14:02 PM
Now that both your fork and suspensions are tuned, you need to set the distance between your wheels. If you started from the MSM .geom files you shouldn't be that far off (give or take 10 cm max). At least if you model is decently scaled - if not, you might want to resize it one way or the other (a good way to check the scaling is ding the photoshop method on the linkage rod, since it's an easily accessible exact measurement - if you scale your BikeEd screen cap according to the linkage rod and the bike appears too big/small, re-export it after rescaling it.)
Wheelbase is important for stability, handling, traction and overall behaviour of the bike.
There are several ways to fix it.
- Moving the pink Wheels cursor - careful that you will need to very slightly readjust the suspension you are touching the wheel of (check the Trail for front and travel + angle for back, correct accordingly). Also check your swing arm length.
Difficulty: easy. Adjustement range: +- 10mm each without model misalignment
- Moving the whole fork. Simply drag the 2 pink cursors in any direction (yes up and down too). This will however change the behaviour of the bike, so be conservative or be prepared to adjust the steering mass position (the green Steering).
Difficulty: easy. Adjustement range until it's noticeable in behaviour : 10mm. If you are prepared to work on the behaviour, 30mm. - Moving the lower part of the fork. Just grab the grey cursor of the lower part of the fork and move it - any direction will do. Check the trail and model obvious misalignment!
Difficulty: medium. Adjustement range: 5mm and it's too obvious. - Moving the whole rear shock. A pain in the ass as some components are linked, some are not. You'll need note what moves when, deactivate rear suspension update, move the model (grey cursor) and then the components not linked to the model. And then, recheck your shock travel, graph and angles. Same comment on behaviour as for fork applies - this time, rather move the chassis weight to correct.
Difficulty: hard. Adjustment range: Adjustement range until it's noticeable in behaviour : 10mm. If you are prepared to work on the behaviour, 30mm.
Title: Re: Project OEM: BikeEd, EngnEd and .cfg for accurate factory specs.
Post by: Asdrael on February 06, 2017, 12:14:09 PM
Post by: Asdrael on February 06, 2017, 12:14:09 PM
5. Finishing touches ~ 30min
Once I'm done I overlay my geometry on a real picture just to make sure. I also run this:
a.Checklist
Use the stock values from stock bikes.
Since the geometry has an influence on suspension behaviour it might not be 100% perfect, but shouldn't be too bad. You will want to look up the standard settings for Spring Rate front and rear and rear preload. Punch those in.
c.Weight Distribution
Now that your suspension geometry is immaculate, you need to think about distributing mass on your bike. As a general rule, dirt bikes have 50 to 53% rear weight bias. This means more than half the weight is toward the back. This is important to give a "dirt bike feel" to the model, and helps with correcting sag values. Also, its height is important for stability, maniabilty and overall behaviour during center of inertia movement (think SX).
As for Rider weight, it is best to locate it more or less above the bikes own center of mass. This helps balance and rider strenght when riding. It has the downfall however of messing up slightly with Sag measurement during testing (a sag measurement position is slightly more at the back than a neutral riding position). Compromises...
I have made and excel sheet to help you position both Chassis weight and Rider weight (green cursors). This is to use once everything is on point for the rest of the geometry in BikeEd. Remember - once you change the actual chassis weight in the yourbike.cfg, you have to reallocate both Rider and Chassis weight!

Weight distribution excel: https://mega.nz/#!ZRQEyATI!umhU7vGahZFoydVY92e7V0Yn7Yp5BMp51rzGojQT_Ck
Load up your bike in game, check if front or rear isn't way too high. If so, might want to slightly move the fork / change rear suspension angle. Once done, go in game, in the pits, Test mode. Your dry/rider sag values should hopefully be decent enough!
Aaaaaannnnddd that's it. I'll populate this with a "troubleshooting" and update the posts as questions arise. Good luck! (and release finished content, I had to type this guide as I was constantly updating the YZF and I think I shouldn't have released it so soon. Still learning).
Once I'm done I overlay my geometry on a real picture just to make sure. I also run this:
a.Checklist
- Check all my OEM specs. Are they here?
- Does the model balance look ok? In game, in the test mode, the dry sag should be between 30 and 40mm if you use every setting on medium. The rear fender should be slightly higher than the front fender.
- Does the rider sag look ok? 100+-15mm rear, 65+-10 front with default settings. If not, check your rider weight position, then your shock geometry and values.
- How does the bike run? Time to check if you need to move the masses. Chassis mass if the bike is obviously front or back heavy. Steering mass if the bike is too stable / not stable enough (move up and down).
Use the stock values from stock bikes.
Since the geometry has an influence on suspension behaviour it might not be 100% perfect, but shouldn't be too bad. You will want to look up the standard settings for Spring Rate front and rear and rear preload. Punch those in.
c.Weight Distribution
Now that your suspension geometry is immaculate, you need to think about distributing mass on your bike. As a general rule, dirt bikes have 50 to 53% rear weight bias. This means more than half the weight is toward the back. This is important to give a "dirt bike feel" to the model, and helps with correcting sag values. Also, its height is important for stability, maniabilty and overall behaviour during center of inertia movement (think SX).
As for Rider weight, it is best to locate it more or less above the bikes own center of mass. This helps balance and rider strenght when riding. It has the downfall however of messing up slightly with Sag measurement during testing (a sag measurement position is slightly more at the back than a neutral riding position). Compromises...
I have made and excel sheet to help you position both Chassis weight and Rider weight (green cursors). This is to use once everything is on point for the rest of the geometry in BikeEd. Remember - once you change the actual chassis weight in the yourbike.cfg, you have to reallocate both Rider and Chassis weight!
Weight distribution excel: https://mega.nz/#!ZRQEyATI!umhU7vGahZFoydVY92e7V0Yn7Yp5BMp51rzGojQT_Ck
Load up your bike in game, check if front or rear isn't way too high. If so, might want to slightly move the fork / change rear suspension angle. Once done, go in game, in the pits, Test mode. Your dry/rider sag values should hopefully be decent enough!
Aaaaaannnnddd that's it. I'll populate this with a "troubleshooting" and update the posts as questions arise. Good luck! (and release finished content, I had to type this guide as I was constantly updating the YZF and I think I shouldn't have released it so soon. Still learning).
Title: Re: Project OEM: BikeEd, EngnEd and .cfg for accurate factory specs.
Post by: Asdrael on February 06, 2017, 12:14:16 PM
Post by: Asdrael on February 06, 2017, 12:14:16 PM
My shock geometry is correct but I can't land a good angle?
- check your shock values. If you haven't found the OEM ones, you should be around Rear Suspension Length ~1.1-1.2 and Min Length ~0.4 +-5%.
- small increments (valid for 1 to 2° MAX): move the RSusp Upper left and right. Slightly.
- bigger increments: move the blue Rocker-Rod and Rod-Rocker (bring them closer together or apart) while being careful about keeping the geometry. It will change you travel value, which you'll have to correct with RSusp Upper.
All the shock geometry is fine, but my graph dips significantly at the end (toward the "2")?
Your rear suspension length is too high for your geometry. Bring it down by 5%, increase Min Length to correct travel.[/list]
In game, my rear wheel has no grip?
- Double check your rear shock angle at full extension. Anything above 20° tends to do that. Try to bring it down to 19.5°.
- You actually somehow set the shock properly right? No typos in the geom file? Decent sag values?
In game, the front slides all the time.
- Triple check rake angle, fork offset, Trail. Try as hard as you can to get manufacturer values for those, they go hand in hand.
- Your fork has a wrong position. Move it around, being careful to keep your wheelbase.
- Your fork/chassis weight is wrongly positioned.
Title: Re: Project OEM: BikeEd, EngnEd and .cfg for accurate factory specs.
Post by: Asdrael on February 06, 2017, 12:14:22 PM
Post by: Asdrael on February 06, 2017, 12:14:22 PM
Chapter II : Engine Modifications
All of this will be using the standard MSM files as bases to modify, except for the 125 engine which will have its own values. So go ahead and extract the different .engn right away from the bikes.pkz.
Start by making a copy of the complete folder bike you want to modify. Rename it properly so you don't lose the original files and can compare the two at any time.
We will be touching 3 to 4 files:
1. Gathering data ~ 10min
To proceed properly, you need all of the important engine data. Start off by downloading the User's Manual, which can be found on google pretty easily. Correct model, correct year. Other good sources to trust are VitalMX and MotoUSA.com. There you will find those important values (bold for mandatory data), usually in the specification section:

All of this will be using the standard MSM files as bases to modify, except for the 125 engine which will have its own values. So go ahead and extract the different .engn right away from the bikes.pkz.
Start by making a copy of the complete folder bike you want to modify. Rename it properly so you don't lose the original files and can compare the two at any time.
We will be touching 3 to 4 files:
- yourbike.cfg
- sfx.cfg
- yourbike.engn
- yourbike.ini
1. Gathering data ~ 10min
To proceed properly, you need all of the important engine data. Start off by downloading the User's Manual, which can be found on google pretty easily. Correct model, correct year. Other good sources to trust are VitalMX and MotoUSA.com. There you will find those important values (bold for mandatory data), usually in the specification section:
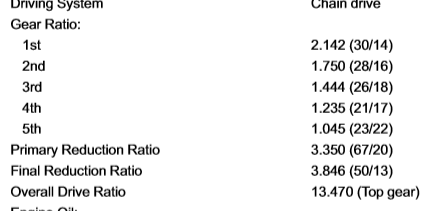
- Your primary and secondary drive ratios. Also called primary and secondary reduction ratios.
- Your gear ratios. Also called Gearing whatever.
- Your rev limiter RPM value. Obviously only for 4 strokes. Harder to find, not usually in the manual, sometimes in the online tests. If the engine you are trying to model hasn't changed in the past few years, try looking at previous years. If out of luck: 14000rpm for a 250F, 11500rpm for a 450F.
- Your Torque/HP curve, or dyno. I favour the ones found in the VitalMX shootouts in the usable RPM range, and pick info from the MotoUSA ones outside of it. More on that later, but get and download those two at least. For 4 strokes, Torque or HP. For 2 strokes, you'll generally only find HP curves.
- Idle rpm.
- Stall rpm.
Title: Re: Project OEM: BikeEd, EngnEd and .cfg for accurate factory specs.
Post by: Asdrael on February 06, 2017, 12:14:30 PM
Post by: Asdrael on February 06, 2017, 12:14:30 PM
2. yourbike.cfg and sfx.cfg
You just want to punch in the numbers you have found in yourbike.cfg, first of all:
Primary drive ratio. Put the values there:
Secondary drive ratio: Select the correct size there. Remember: counting starts at zero, so if you want to select gear2, put “2”.
Gear ratios: Be careful, manufacturer often write it the other way as PiBoSo. Change the number of gear as needed. Gear0 is the first gear. Gear0 = 0 means the first gear will use ratio0.
Rev limiter value: to be added here
I now add 300rpm for 250f and 500rpm to 450f rev limiter OEM values. This is because of how I found the limiter in game to work compared to IRL (in game it's like hitting a wall, IRL it's more of a soft cut).
Clutch torque value:
To avoid clutch slippage, you need to consider the torque it receives with your engine. If you have a value too low, you will hit the limiter randomly due to the clutch freaking out when you hit your sweet engine spot.
I use the following formula: Max engine torque x Primary drive ratio x 1.3. You should get around 130 for a 250f and 180 for a 450f.
For the 450F this is still experimental but I strongly suggest changing your engine inertia to 0.006 instead of the stock 0.005. This is because the inertia goes like this for the MSN engines: 250f 0.004 , 350f 0.005, 450f 0.005 - which seems a typo. Experimenting, 0.006 feels MUCH better.
You just want to punch in the numbers you have found in yourbike.cfg, first of all:
Primary drive ratio. Put the values there:
Code Select
Ratio0 = 24, 73Secondary drive ratio: Select the correct size there. Remember: counting starts at zero, so if you want to select gear2, put “2”.
Code Select
 driveline
{
	FirstAxisInertia = 0.0025
	SecondAxisInertia = 0.00075
	Efficiency = 0.92

	FSprocket
	{
		gear0 = 11
		gear1 = 12
		gear2 = 13
		gear3 = 14
		gear4 = 15
		gear5 = 16
	}
	FSprocketSetting = 2

	RSprocket
	{
		gear0 = 38
		gear1 = 40
		gear2 = 42
		gear3 = 45
		gear4 = 48
		gear5 = 49
		gear6 = 50
		gear7 = 51
		gear8 = 52
	}
	RSprocketSetting = 6
Gear ratios: Be careful, manufacturer often write it the other way as PiBoSo. Change the number of gear as needed. Gear0 is the first gear. Gear0 = 0 means the first gear will use ratio0.
Code Select
 gearbox
{
	gearing
	{
		ratio0 = 14, 30
		ratio1 = 16, 28
		ratio2 = 18, 26
		ratio3 = 17, 21
		ratio4 = 22, 23
	}

	NumGears = 5
	Gear0 = 0
	Gear1 = 1
	Gear2 = 2
	Gear3 = 3
	Gear4 = 4
Rev limiter value: to be added here
Code Select
 	NumLimiter = 1
	Limiter0 = 14000
I now add 300rpm for 250f and 500rpm to 450f rev limiter OEM values. This is because of how I found the limiter in game to work compared to IRL (in game it's like hitting a wall, IRL it's more of a soft cut).
Clutch torque value:
To avoid clutch slippage, you need to consider the torque it receives with your engine. If you have a value too low, you will hit the limiter randomly due to the clutch freaking out when you hit your sweet engine spot.
I use the following formula: Max engine torque x Primary drive ratio x 1.3. You should get around 130 for a 250f and 180 for a 450f.
Code Select
	Clutch
	{
		MaxTorque = 130
		Mapping = 2
		DeadZone = 0.25
}.For the 450F this is still experimental but I strongly suggest changing your engine inertia to 0.006 instead of the stock 0.005. This is because the inertia goes like this for the MSN engines: 250f 0.004 , 350f 0.005, 450f 0.005 - which seems a typo. Experimenting, 0.006 feels MUCH better.
Title: Re: Project OEM: BikeEd, EngnEd and .cfg for accurate factory specs.
Post by: Asdrael on February 06, 2017, 12:14:45 PM
Post by: Asdrael on February 06, 2017, 12:14:45 PM
3. Making yourbike.engn and my toolkit
a. Engine and .engn file.
Before rushing into EngnEd, take a step back. You actually don’t need it. The .engn file is just a text file with an easy format.
Start by changing the bike id to yours. The Torque values are throttle open, brake throttle closed. As a general rule – don’t mess with the brake values at all (unless on 2 strokes, details further down).
Before you go ahead guessing, a quick bit of explanations.
PiBoSo using the international metric system. The first value colum is “RPS” or revolution per second. RPS = RPM/60. The second colum is Torque in Nm. Now, most American websites use the heathen imperial system and display Torque in lbs.ft. So you need to turn a Torque (lbs.ft)/RPM curve in Torque(Nm)/RPS. Or if you have the HP/RPM, turn it into a Torque(lbs.ft)/RPS. Then divide by your engine efficiency (0.92 here), because the .engn file is at the crankshaft, while dynos at the rear wheel. Calculators... out!
Nah, just kidding. I made a toolkit.
Download this: https://mega.nz/#!5NRCGY6B!bsxJ_ddmHudSAG8YvdEtypggu6YAnJOkivDrTjSX2dw
It contains 2 files.
Now just go – read the values in your graph. Put them in the excel. Take the red stuff, put it in the .engn file. Important notes in bold (those are like, important).
With the KXF250 2017 I could only find the HP.curves. No worries. I’ll start with putting my curves in my .psd:

Detouring, resizing and general alignment:
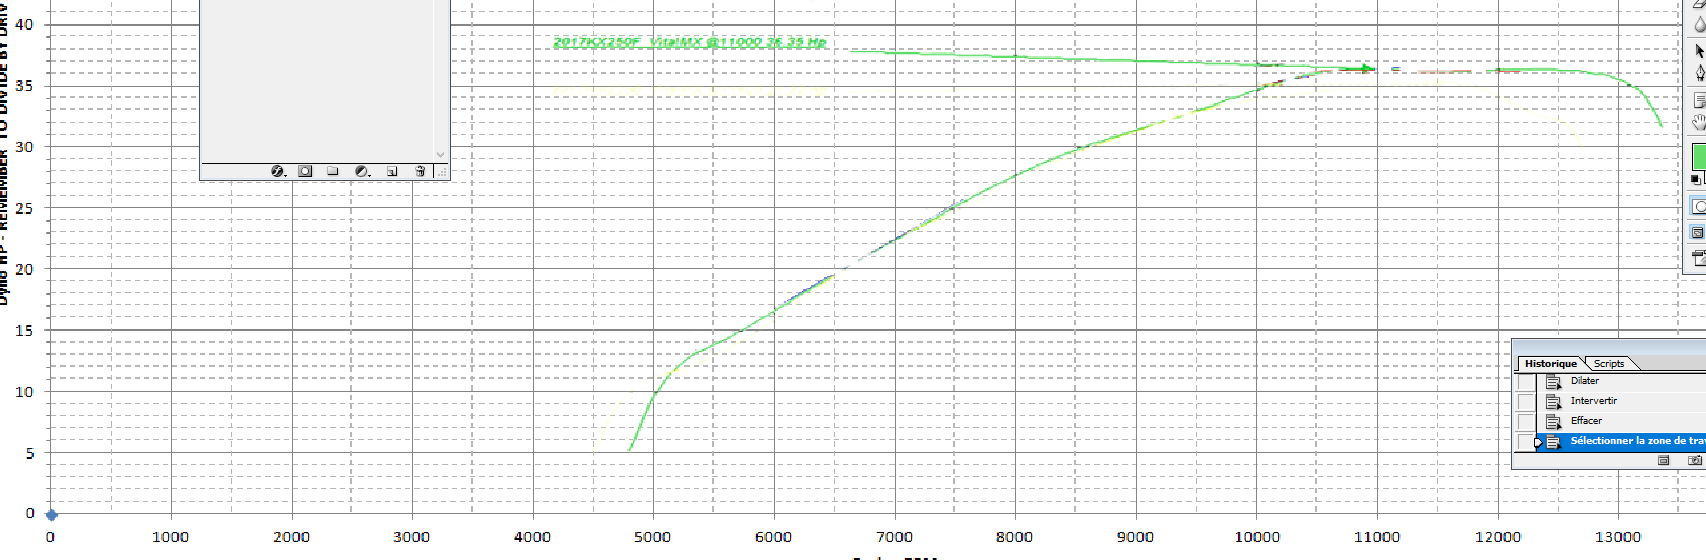
Punching values in the excel: Disregard abrupt changes in the 4 strokes graph, they come from the dyno technique. Here, below 5k rpm and above 12k rpm are NOT how a 4 stroke behaves. They come from triggering the equipement, and then rolling off the throttle after the peak. I let my formulas do the work for the values outside of these bounds. Try to be precise down to 0.1hp/torque but we might slightly adjust afterwards.
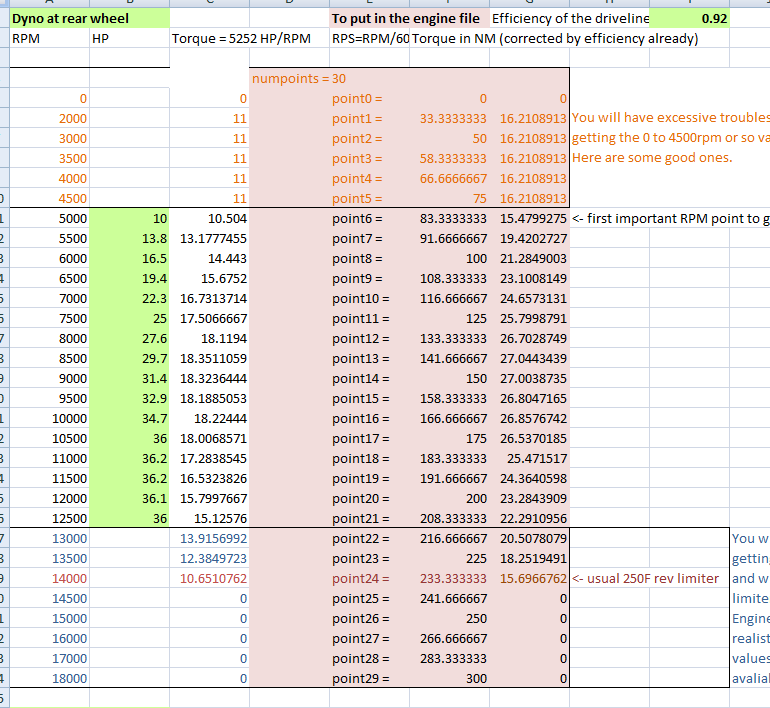
Copy paste into the engine file and run Engn.exe to open your file. format is pointX[space]=[space]numberwithpointfordecimals[coma][space]numberwithpointfordecimals so trim it down as needed – excel exports with tabs to separate cells.
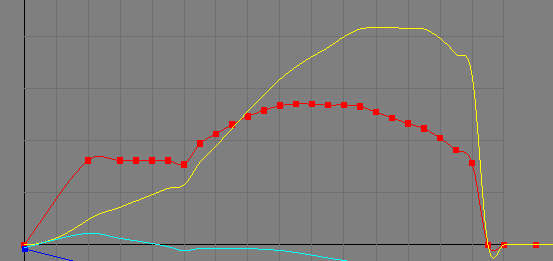
Not bad. I’m getting 40 hp there. The real one is at 36.35. Remember the efficiency of the drive train, set at 0.92 – so we actually have 0.92*39.5 = 36.34 at the rear wheel! Not bad. But the graph has some rough edges between 13 and 14k and a dip at 5k. Do not drag and move points in Engn.exe you will do more harm than good. Go back to your excel, adjust by 0.1 to 0.3 increments and reimport the value (the one you modified only) until it gets better. Also the post 14000 stuff was due to me badly formatting my paste. Check twice! Last advice: do not disregard post-limiter curve.
All done:
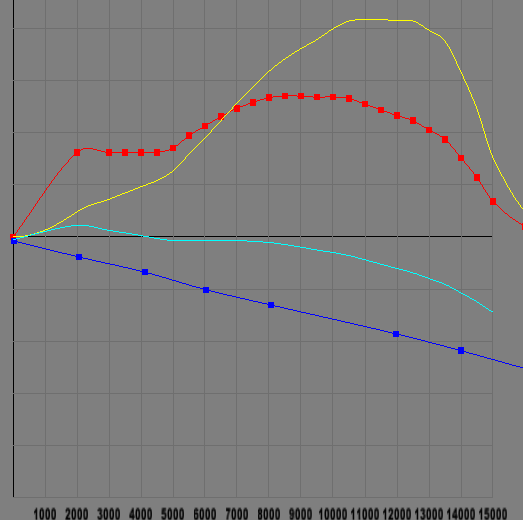
Overlaying with the initial data to make sure (checking 5k to 12k rpm):
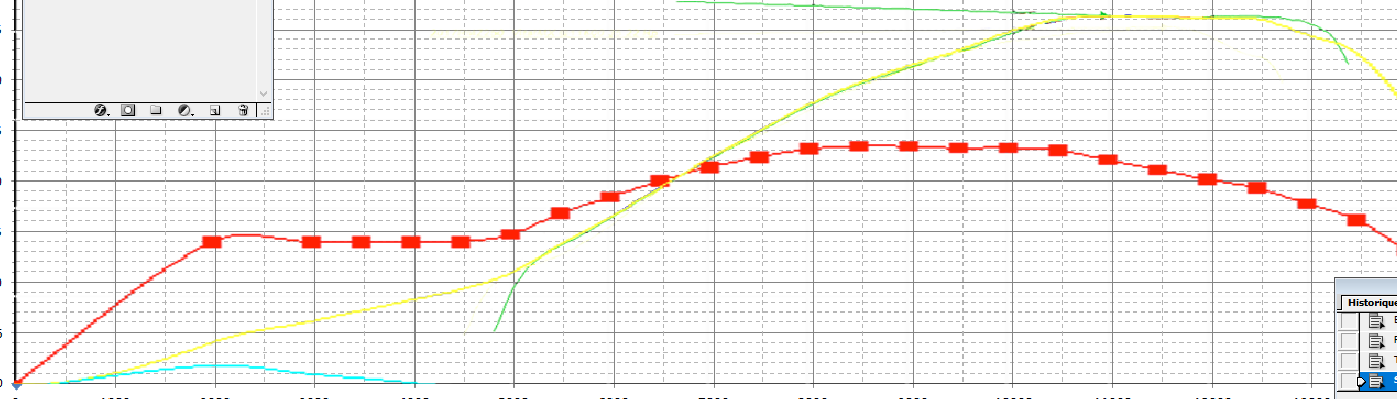
Dipping a tad much at 13k. Fixing that, and moving on! Note that the brake torque is standard and works well enough.
b. Checklist
What this does in game is add breaking torque and engine inertia - obviously. The throttle response is more linear, it "feels" like more torque (even with the the engine hp curve!), and the front behaves much more predictably.
Congratulations, you have imported your engine! Don’t forget to load up the game, and check the values as well. First gear should get you to around 60km/h. Your gear graph should look cranted, with each step smaller as speed increases.
a. Engine and .engn file.
Before rushing into EngnEd, take a step back. You actually don’t need it. The .engn file is just a text file with an easy format.
Code Select
 id = msm 250xf
torque
{
	numpoints = 11
	point0 = 0.625000, 0.230062
	point1 = 33.750000, 14.378834
	point2 = 66.875000, 15.912578
	point3 = 99.375000, 18.788345
	point4 = 141.250000, 26.380367
	point5 = 166.875015, 25.115030
	point6 = 199.999985, 23.389570
	point7 = 233.125015, 19.938650
	point8 = 251.250000, 5.559817
	point9 = 266.875000, 2.108894
	point10 = 298.125000, 0.000000
}
brake
{
	numpoints = 8
	point0 = 0.625000, -0.766873
	point1 = 34.375000, -3.834359
	point2 = 68.750000, -6.748467
	point3 = 100.625000, -10.122699
	point4 = 134.375000, -13.036810
	point5 = 199.375000, -18.558281
	point6 = 233.125015, -21.779144
	point7 = 300.000000, -28.680981
}
Start by changing the bike id to yours. The Torque values are throttle open, brake throttle closed. As a general rule – don’t mess with the brake values at all (unless on 2 strokes, details further down).
Before you go ahead guessing, a quick bit of explanations.
PiBoSo using the international metric system. The first value colum is “RPS” or revolution per second. RPS = RPM/60. The second colum is Torque in Nm. Now, most American websites use the heathen imperial system and display Torque in lbs.ft. So you need to turn a Torque (lbs.ft)/RPM curve in Torque(Nm)/RPS. Or if you have the HP/RPM, turn it into a Torque(lbs.ft)/RPS. Then divide by your engine efficiency (0.92 here), because the .engn file is at the crankshaft, while dynos at the rear wheel. Calculators... out!
Nah, just kidding. I made a toolkit.
Download this: https://mega.nz/#!5NRCGY6B!bsxJ_ddmHudSAG8YvdEtypggu6YAnJOkivDrTjSX2dw
It contains 2 files.
- A .psd file with big axis for you to overlay your data on (after detouring it, matching the origin and resizing it of course). Will make it easier to read your values.
- An excel file. In GREEN is the stuff you need to punch in. In RED the stuff you copy paste to the .engn file (and then reformat by removing the useless tabs, putting a coma space between RPS and Torque values).
There are 250F, 450F, both Torque and HP based. Also, a 125 2 stroke with a custom Brake curve, and a 250 2 stroke (both HP based). Everything is heavily annotated.
Now just go – read the values in your graph. Put them in the excel. Take the red stuff, put it in the .engn file. Important notes in bold (those are like, important).
With the KXF250 2017 I could only find the HP.curves. No worries. I’ll start with putting my curves in my .psd:
Detouring, resizing and general alignment:
Punching values in the excel: Disregard abrupt changes in the 4 strokes graph, they come from the dyno technique. Here, below 5k rpm and above 12k rpm are NOT how a 4 stroke behaves. They come from triggering the equipement, and then rolling off the throttle after the peak. I let my formulas do the work for the values outside of these bounds. Try to be precise down to 0.1hp/torque but we might slightly adjust afterwards.
Copy paste into the engine file and run Engn.exe to open your file. format is pointX[space]=[space]numberwithpointfordecimals[coma][space]numberwithpointfordecimals so trim it down as needed – excel exports with tabs to separate cells.
Not bad. I’m getting 40 hp there. The real one is at 36.35. Remember the efficiency of the drive train, set at 0.92 – so we actually have 0.92*39.5 = 36.34 at the rear wheel! Not bad. But the graph has some rough edges between 13 and 14k and a dip at 5k. Do not drag and move points in Engn.exe you will do more harm than good. Go back to your excel, adjust by 0.1 to 0.3 increments and reimport the value (the one you modified only) until it gets better. Also the post 14000 stuff was due to me badly formatting my paste. Check twice! Last advice: do not disregard post-limiter curve.
All done:
Overlaying with the initial data to make sure (checking 5k to 12k rpm):
Dipping a tad much at 13k. Fixing that, and moving on! Note that the brake torque is standard and works well enough.
b. Checklist
- Primary and secondary drive ratios
- Gear ratios
- Limiter value
- Engine graph overlay keeping in mind the efficiency
What this does in game is add breaking torque and engine inertia - obviously. The throttle response is more linear, it "feels" like more torque (even with the the engine hp curve!), and the front behaves much more predictably.
Congratulations, you have imported your engine! Don’t forget to load up the game, and check the values as well. First gear should get you to around 60km/h. Your gear graph should look cranted, with each step smaller as speed increases.
Title: Re: Project OEM: BikeEd, EngnEd and .cfg for accurate factory specs.
Post by: Asdrael on February 06, 2017, 12:14:51 PM
Post by: Asdrael on February 06, 2017, 12:14:51 PM
4. Troubleshooting - Engine
Title: Re: Project OEM: BikeEd, EngnEd and .cfg for accurate factory specs.
Post by: Asdrael on February 06, 2017, 12:14:58 PM
Post by: Asdrael on February 06, 2017, 12:14:58 PM
Chapter III : Polishing yourbike.cfg
The last stretch to a complete OEM version of the bike you are making. This is important and should not be overlooked.
We will be fixing the weight, fuel, brakes, lock angle and every detail you can find (usually not much more).
Lock angle
For the lock angle, if you find it, put it in at this spot:
If you can't find it, 42 is always the answer to everything. Especially here.
Weight and fuel
Fuel tank
Find your fuel tank capacity in liters (usually 6.5-9 depending on bike, 2 strokes have a bigger tank). Punch this here:
Don't forget to adapt your capacity setting if you change your tank capacity.
Weight and inertia
PiBoSo uses kg.
1. Start by adding all the weight of your configuration file (every that is "mass") and add 17.5 (for the wheels). This is now M(ref dry), and represent the weight of the stock bike with no fuel.
2. Find your bike weight and note if it's "dry" or "wet", meaning with all oil and fuel level up. If you find the dry weight, great. Usually it's wet, especially in reviews and shootout. You'll need to calculate the dry weight from the wet weight, as follows:
0.74 being the density of regular fuel in average conditions.
3. Now you can either modify all the weights and their inertia slightly (lol good luck), or you can estimate most if not all of the weight difference will be on the chassis.
Find these lines:
Values will of course vary depending on model.
And adjust the mass as follows :
Then, adjust the inertia as follows:
So if your bike mass is lower than the stock one, you should have less inertia.
Brakes
There is a front and a rear brake. It's the same principle as the weight. Look for this (careful, front and rear):
Change the name to what you need it to be – the diameter is the important bit. Then, you need to change the Torque.
The bigger the diameter the higher the torque.
The .ini file
Last thing to do!
Go into your ini. Careful with your model name, correct the weight, power, number of gears.
If you have been through all this, successfully imported all values, you are deemed worth of changing the bike catergory by adding a space and OEM ;)
MX1 OEM
MX2 OEM
Let's rock real bikes now!
The last stretch to a complete OEM version of the bike you are making. This is important and should not be overlooked.
We will be fixing the weight, fuel, brakes, lock angle and every detail you can find (usually not much more).
Lock angle
For the lock angle, if you find it, put it in at this spot:
Code Select
 steer
{
	Mass = 10.5
	InertiaBox = 0.3, 0.8, 0.1

	offset
	{
		range = -0.005, 0.001, 0.005
		setting = 5
	}

	Lock = 42
If you can't find it, 42 is always the answer to everything. Especially here.
Weight and fuel
Fuel tank
Find your fuel tank capacity in liters (usually 6.5-9 depending on bike, 2 strokes have a bigger tank). Punch this here:
Code Select
 fueltank
{
	CapacityRange = 1, 0.5, 6.5
	CapacitySetting = 11
	Length = 0.3
	Width = 0.15
}
Don't forget to adapt your capacity setting if you change your tank capacity.
Weight and inertia
PiBoSo uses kg.
1. Start by adding all the weight of your configuration file (every that is "mass") and add 17.5 (for the wheels). This is now M(ref dry), and represent the weight of the stock bike with no fuel.
2. Find your bike weight and note if it's "dry" or "wet", meaning with all oil and fuel level up. If you find the dry weight, great. Usually it's wet, especially in reviews and shootout. You'll need to calculate the dry weight from the wet weight, as follows:
Code Select
M(bike dry) = M(bike wet) – [FuelCapacity * 0.74]0.74 being the density of regular fuel in average conditions.
3. Now you can either modify all the weights and their inertia slightly (lol good luck), or you can estimate most if not all of the weight difference will be on the chassis.
Find these lines:
Code Select
 chassis
{
	Mass = 61.01
	Inertia = 3.74, 2.07, 2.07
}
Values will of course vary depending on model.
And adjust the mass as follows :
Code Select
(new mass) = (old mass) –M(ref dry) + M(bike dry)Then, adjust the inertia as follows:
Code Select
(new inertia) = (old inertia) * (new mass) / (old mass)So if your bike mass is lower than the stock one, you should have less inertia.
Brakes
There is a front and a rear brake. It's the same principle as the weight. Look for this (careful, front and rear):
Code Select
 	Brake
	{
		RiderMaxForce = 25
		DeadZone = 0.01
		MasterCylinder0
		{
			name = default
			Diameter = 0.011
		}
		mastercylindersetting = 0
		Leverage0
		{
			Name = default
			ratio = 10
		}
		leveragesetting = 0
		disc0
		{
			name = Steel 220mm
			Mass = 0.54
			PressureToTorque = 0.132
			OptTemp = 500
			TempFactor = 1000
			Heating = 0.001
			CoolingBase = 0.5
			CoolingFactor = 0.28
		}
		discsetting = 0
	}
}
Change the name to what you need it to be – the diameter is the important bit. Then, you need to change the Torque.
Code Select
(new torque) = (old torque) * (new diameter) / (cold diameter)The bigger the diameter the higher the torque.
The .ini file
Last thing to do!
Go into your ini. Careful with your model name, correct the weight, power, number of gears.
If you have been through all this, successfully imported all values, you are deemed worth of changing the bike catergory by adding a space and OEM ;)
MX1 OEM
MX2 OEM
Let's rock real bikes now!
Title: Re: Project OEM: BikeEd, EngnEd and .cfg for accurate factory specs.
Post by: Asdrael on February 06, 2017, 12:15:06 PM
Post by: Asdrael on February 06, 2017, 12:15:06 PM
General tips and tricks and FAQ
Title: Re: Project OEM: BikeEd, EngnEd and .cfg for accurate factory specs.
Post by: Asdrael on February 06, 2017, 12:15:13 PM
Post by: Asdrael on February 06, 2017, 12:15:13 PM
Update list
Title: Re: Project OEM: BikeEd, EngnEd and .cfg for accurate factory specs.
Post by: Asdrael on February 06, 2017, 12:15:21 PM
Post by: Asdrael on February 06, 2017, 12:15:21 PM
Take your time reading, have fun.
I'm open to all questions, comment, etc. Please post it here and I'll try to fill up the sections with your input.
I'm open to all questions, comment, etc. Please post it here and I'll try to fill up the sections with your input.
Title: Re: Project OEM: BikeEd, EngnEd and .cfg for accurate factory specs.
Post by: StoneRider on February 06, 2017, 12:48:19 PM
Post by: StoneRider on February 06, 2017, 12:48:19 PM
Thank you so much man :)
Title: Re: Project OEM: BikeEd, EngnEd and .cfg for accurate factory specs.
Post by: teeds on February 06, 2017, 01:32:48 PM
Post by: teeds on February 06, 2017, 01:32:48 PM
Good work Asdrael
Title: Re: Project OEM: BikeEd, EngnEd and .cfg for accurate factory specs.
Post by: philiaN on February 06, 2017, 02:31:54 PM
Post by: philiaN on February 06, 2017, 02:31:54 PM
outstanding work, asdrael! thank you
Title: Re: Project OEM: BikeEd, EngnEd and .cfg for accurate factory specs.
Post by: 𝖙𝖋𝖈 on February 06, 2017, 02:48:57 PM
Post by: 𝖙𝖋𝖈 on February 06, 2017, 02:48:57 PM
Thanks for taking the time. When I finally get around to bringing the rm in I will have a proper read ;D
Title: Re: Project OEM: BikeEd, EngnEd and .cfg for accurate factory specs.
Post by: Mace-x on February 06, 2017, 03:53:43 PM
Post by: Mace-x on February 06, 2017, 03:53:43 PM
wow, so much work and usefull knowledge there, thanks a lot man! :)
Title: Re: Project OEM: BikeEd, EngnEd and .cfg for accurate factory specs.
Post by: pacopastor34 on February 06, 2017, 03:59:17 PM
Post by: pacopastor34 on February 06, 2017, 03:59:17 PM
Well, that's impressive! Something like that was so needed and thank you so much for take the time to do that. Very useful. Great work Asdrael, your work makes others work much better.
Title: Re: Project OEM: BikeEd, EngnEd and .cfg for accurate factory specs.
Post by: Asdrael on February 06, 2017, 04:10:50 PM
Post by: Asdrael on February 06, 2017, 04:10:50 PM
Thanks. Once you guys dive into it, don't hesitate posting questions or comments here rather than on discord so we can make this tutorial better and try to move this forward.
I'm willing to help and check geoms when stuff doesn't work out. I also added an "updates" section so we'll have a changelog there.
I'm willing to help and check geoms when stuff doesn't work out. I also added an "updates" section so we'll have a changelog there.
Title: Re: Project OEM: BikeEd, EngnEd and .cfg for accurate factory specs.
Post by: Asdrael on February 07, 2017, 07:21:07 PM
Post by: Asdrael on February 07, 2017, 07:21:07 PM
For the 450f I strongly recommend changing your breaking torque and engine inertia. This is because the scaling in the stock MSM engine appears to be off. It was scaled properly for a bigger engine from the 250f, but not for a less revving engine. I rescaled it and obtained pretty great results. In conjunction with an engine inertia of 0.006, you can use those values in your .engn file
Code Select
REMOVED
What this does in game is add breaking torque and engine inertia - obviously. The throttle response is more linear, it "feels" like more torque (even with the the engine hp curve!), and the front behaves much more predictably.
Updated 05.04.2017 - Only the inertia change is needed (engine inertia to 0.006 in the .cfg). Braking torque change end up being too much and give a wierd back Wheel behaviour.
Title: Re: Project OEM: BikeEd, EngnEd and .cfg for accurate factory specs.
Post by: Asdrael on February 15, 2017, 12:17:38 AM
Post by: Asdrael on February 15, 2017, 12:17:38 AM
Updating on 14.02.2017:
250 2 strokes engine
Found out that an engine inertia of 0.004 is much better. Putting this in.
Did a lot on the weight distribution.
The chassis weight was way too forward. Putting it more to the back (52% or so) and slightly lower improves stability, lowers rear wheel going all over the place when braking hard and gasing hard. Most dirt bike manufacturers have a rear bias of 52% so this is more accurate. As for the rider, putting it on top of the bike center of gravity makes rider movement have more of an impact on the handling. I am including a (hopfully) self explanatory excell sheet to calculate positions from BikeEd.
Weight distribution excel: https://mega.nz/#!BAIkHT6R!oz4LhYvHpffTejt0jsE_3zo4q1ycXdalor823Wn32Wg
Title: Re: Project OEM: BikeEd, EngnEd and .cfg for accurate factory specs.
Post by: LastFriday on May 16, 2017, 01:47:06 AM
Post by: LastFriday on May 16, 2017, 01:47:06 AM
is there a link to BikeEd? I have engned.exe but not bikeed.exe
Title: Re: Project OEM: BikeEd, EngnEd and .cfg for accurate factory specs.
Post by: Asdrael on May 16, 2017, 10:04:34 AM
Post by: Asdrael on May 16, 2017, 10:04:34 AM
Check this post: you need to DL the Bike Physics Editor.
http://forum.mx-bikes.com/index.php?topic=974.0
http://forum.mx-bikes.com/index.php?topic=974.0
Title: Re: Project OEM: BikeEd, EngnEd and .cfg for accurate factory specs.
Post by: 𝖙𝖋𝖈 on May 19, 2017, 08:08:13 PM
Post by: 𝖙𝖋𝖈 on May 19, 2017, 08:08:13 PM
Sorry if this has been asked before somewhere, but how come you haven't done an OEM KTM 250/450 using the MSM as a template?
Title: Re: Project OEM: BikeEd, EngnEd and .cfg for accurate factory specs.
Post by: StoneRider on May 19, 2017, 08:18:06 PM
Post by: StoneRider on May 19, 2017, 08:18:06 PM
a model is coming.... don't have the time for now sorry :/
Title: Re: Project OEM: BikeEd, EngnEd and .cfg for accurate factory specs.
Post by: Asdrael on May 19, 2017, 08:35:15 PM
Post by: Asdrael on May 19, 2017, 08:35:15 PM
Quote from: TFC on May 19, 2017, 08:08:13 PM
Sorry if this has been asked before somewhere, but how come you haven't done an OEM KTM 250/450 using the MSM as a template?
As far as I know, PiBoSo doesn't allow re-releases of his models.
Title: Re: Project OEM: BikeEd, EngnEd and .cfg for accurate factory specs.
Post by: 𝖙𝖋𝖈 on May 20, 2017, 03:00:45 PM
Post by: 𝖙𝖋𝖈 on May 20, 2017, 03:00:45 PM
Quote from: Asdrael on May 19, 2017, 08:35:15 PMQuote from: TFC on May 19, 2017, 08:08:13 PM
Sorry if this has been asked before somewhere, but how come you haven't done an OEM KTM 250/450 using the MSM as a template?
As far as I know, PiBoSo doesn't allow re-releases of his models.
Well, assuming the geom is already designed to OEM specs, it would just be a case of having new tyres right? Is that possible without re-releasing?
If not, would that be OK Pib?
Title: Re: Project OEM: BikeEd, EngnEd and .cfg for accurate factory specs.
Post by: poumpouny on May 26, 2017, 02:50:38 PM
Post by: poumpouny on May 26, 2017, 02:50:38 PM
Hello,
Awesome tutorial Asdrael :o i'm a newbie moder but for gpbikes i've followed your tutorial and i have some issue configuring my bike.
1 - For the rear suspension curve, does the linear 4 to 2 curve still valable for a road bike (roadster) ?
2 - My brake is not working at all, i've change the diameter and then change the torque according to your formulas but when i'm in game, my brake don't work at all, or it work but cannot stop my bike. also since a roadster 400 cc bike have 2 Disc in the front how do i deal with that ?
3 - i found my primary and secondary reduction ration in decimal, how does i convert it into fraction, does normal math (decimal to fraction) formulas work ?
Again, thank you for your fantastic tutorial :D
Title: Re: Project OEM: BikeEd, EngnEd and .cfg for accurate factory specs.
Post by: Asdrael on May 26, 2017, 06:26:04 PM
Post by: Asdrael on May 26, 2017, 06:26:04 PM
I have no idea how it works for roadster bikes. If it's using linkage systems, I'd say there are good chances it should be in the same ballpark. If not, maybe the rear geometry is similar to a bike made by PiBoSo and then you should try to mimick what has been done there (rule 1 of moding here: when you don't know any better, do what PiBoSo did :p ).
For the brakes, make sure there is no typo and that the brake choice numbering is correct. That might be it. For dual disks, not sure. Again, might want to look into what PiBoSo did in his released bike cfg.
For the ratio: the decimal values sometimes present on spec sheets are actually calculated from a fraction (coming from the number of teeth on the gearings). So yes, doing it the other way around works. (0.33333 = 1/3, both ways ;) )
Glad if the tutorial helped!
Title: Re: Project OEM: BikeEd, EngnEd and .cfg for accurate factory specs.
Post by: poumpouny on May 29, 2017, 11:18:24 AM
Post by: poumpouny on May 29, 2017, 11:18:24 AM
Hi, Asdrael, thanx for your reply.
For the brake issue, i think i found the problem, but i don't unterstand it. into Pib's bike template, it say that the bike use a 15mm disc and i think piboso use meter in diameter so it is 0.015. Me i'm using a 296mm disc on my bike and 2 of that so to do simple, i juste change my diameter to (if i'm not to bad at math) 296 mm = 0.296 m. but if i do that my brake don't work but if instead i write 0.029 wich is mathematicaly totaly wrong lol, my brake works lol .
For the rear susp, ok i'll check what piboso does with the stock bike, thanx.
Title: Re: Project OEM: BikeEd, EngnEd and .cfg for accurate factory specs.
Post by: Asdrael on May 29, 2017, 11:36:23 AM
Post by: Asdrael on May 29, 2017, 11:36:23 AM
You don't need to input the diameter. It's only a name and has no incidence on the game performance:
"name = XXX" is just going to be the display name in the garage. It's the PressureToTorque that is going to give you breaking power. That is what you calculate using your diameter: if the standard bike has a 200mm diam brake and a PressureToTorque of 0.1, but your bike has a 300mm diam brake, then your new Pressure to Torque is 300 * 0.1 / 200 = 0.15.
Code Select
disc0
		{
			name = Steel 270mm
			Mass = 0.75
			PressureToTorque = 0.162
			OptTemp = 500
			TempFactor = 1000
			Heating = 0.001
			CoolingBase = 0.5
			CoolingFactor = 0.28
		}
"name = XXX" is just going to be the display name in the garage. It's the PressureToTorque that is going to give you breaking power. That is what you calculate using your diameter: if the standard bike has a 200mm diam brake and a PressureToTorque of 0.1, but your bike has a 300mm diam brake, then your new Pressure to Torque is 300 * 0.1 / 200 = 0.15.
Title: Re: Project OEM: BikeEd, EngnEd and .cfg for accurate factory specs.
Post by: poumpouny on May 30, 2017, 04:27:09 PM
Post by: poumpouny on May 30, 2017, 04:27:09 PM
Thx Asdrael,
I confonded the Master Cylinder diameter and the disk diameter (not present in the cfg file itself, and don't need to be puted in, just need to calculate the pressure to torque). So i changed the Master Cylinder diameter, that's why it doesn't work.
Now, my physics and engine is perfectely working(i can compare because i ride the real bike in real life) just the tyre need to be created (now i'm using a moto 2 tyre model).
One thing you forget to put in your tutorial is the clutch max torque, and it was causing lot of trouble with my engine but i think work great for mx bike because the template bike is a mx bike model, i managed to solved it with the help of this page :
http://gpbikes-mods.wikia.com/wiki/GPBikes_mods_Wiki
hope it help, and again thanx for your tutorial :)
Title: Re: Project OEM: BikeEd, EngnEd and .cfg for accurate factory specs.
Post by: Asdrael on May 30, 2017, 04:55:09 PM
Post by: Asdrael on May 30, 2017, 04:55:09 PM
Hm, I did overlook that thanks a lot. From what I checked, the values I used are not too far off (+- 10%) but I'll run some tests and see if I can see a difference. Thanks for the feedback, and good luck on the tyres ;)
Title: Re: Project OEM: BikeEd, EngnEd and .cfg for accurate factory specs.
Post by: Asdrael on July 01, 2018, 02:09:53 PM
Post by: Asdrael on July 01, 2018, 02:09:53 PM
Updated for beta 8:
- No need for special tyres nor suspensions anymore, copy paste the values from the stock bikes
- Considerations on clutch values
- Hints on limiter values
Title: Re: Project OEM: BikeEd, EngnEd and .cfg for accurate factory specs.
Post by: pacopastor34 on July 01, 2018, 03:07:39 PM
Post by: pacopastor34 on July 01, 2018, 03:07:39 PM
Quote from: Asdrael on July 01, 2018, 02:09:53 PMThank you man.
Updated for beta 8:
- No need for special tyres nor suspensions anymore, copy paste the values from the stock bikes
- Considerations on clutch values
- Hints on limiter values
Title: Re: Project OEM: BikeEd, EngnEd and .cfg for accurate factory specs.
Post by: Asdrael on July 12, 2018, 11:06:55 AM
Post by: Asdrael on July 12, 2018, 11:06:55 AM
Found some new data for the weight calculation, in particular for the height of the center of gravity. The Excel for the weight distribution has been updated accordingly. Expect a slightly higher chassis mass for 450f, giving a slightly more solid feel in game (OEM pack will be updated soon). Also a general readability and usability update.
Long story short: I estimated the center of gravity to be mid height of the bike. which was more or less correct, but according to Honda, 47% of the way up is more accurate. Changed to that, made the calculation accurate. Also, the weight bias is currently drifing more toward the rear according to manufacturers so I changed the recommended values to reflect that.
Link: https://mega.nz/#!9RhjhK5A!lMKezwxRwUoYpD9QMO6PL22V-0_neav_wfYmFbpn0Uc
Title: Re: Project OEM: BikeEd, EngnEd and .cfg for accurate factory specs.
Post by: Asdrael on July 20, 2018, 11:16:25 AM
Post by: Asdrael on July 20, 2018, 11:16:25 AM
Weight distribution cheat sheet updated again - spent hours testing and trying to get data.
Long story short: modern 4 strokes dirt bikes are more of a 51.5 tot 52 % rear weight bias and 47% height weight bias. And the game handles better a 50/50 rider position (equal weighting of both wheels). For 2 strokes, it works as well, but you can put the rider more to the back if you wish.
https://mega.nz/#!ZRQEyATI!umhU7vGahZFoydVY92e7V0Yn7Yp5BMp51rzGojQT_Ck