*LINK TO APPLY THE CONFIG DIRECTLY THROUGH STEAM ADDED AT THE BOTTOM – READ THE POST FOR FEATURES OR MAKING CHANGES*
Hey guys, I wanted to find a way to use a controller to navigate the menus with no hassle and here's what I came up with using Steam's controller configuration. The result feels great and covers everything I could think of that you would use a keyboard and mouse for ingame (other than typing). Long post but I wanted it to be detailed as there is a lot of info
*You will need to sacrifice the START button on your controller for this workaround. Pressing START will toggle the virtual cursor configuration on and off. If you have something bound to START, either change or remove it. You can choose whichever button you want but I found either START or SELECT to be the only two buttons that wouldn't interfere with the average controller setup. This tutorial will always reference START as the toggle button*
SETUP
This workaround requires Steam and utilizes it's built-in controller configuration tool. If you have the standalone version of MX Bikes you can add it to Steam by going to the top bar and clicking
Games > Add a Non-Steam Game to My Library > Browse
and finding your mxbikes.exe , by default this is
C:/Program Files (x86)/MX Bikes
To enable controller support, go to the top bar and click
Steam > Settings > Controller > General Controller Settings
and tick the box to enable support for whichever controller you're using (Xbox, PlayStation, etc)
Close the configuration app and fully close out of Steam by going to the top bar and clicking
Steam > Exit
After 5-10 seconds reopen Steam, click MX Bikes in your games library, and click the 'Controller Configuration' button that has appeared at the end of the bar under the 'Play' button
CONTROLLER CONFIGURATION
This will be our final controller setup -
START - Toggle virtual cursor configuration
SELECT - F5 (toggle chat)
LEFT STICK - Move virtual cursor
RIGHT STICK - Scroll up/down
A - Left click (select)
B - Escape (open menu/back)
X - F2 (vote yes)
Y - F4 (vote no)
LEFT - 1
UP - 2
RIGHT - 3
DOWN - 4 (quick chats)
Pressing START will toggle between the virtual cursor configuration and the default game controls when pressed, allowing for more button options without interfering with any of your normal controls
1 - In the controller configuration app that opens up, click 'Add Action Set' at the top of the screen. Name this something like 'Menu' or whatever you want, leave the dropdown menu on 'None' and click OK. You will see a tab called 'Menu' appear next to the 'Default' tab at the top of the screen
2 - Make sure you are in the 'Default' tab and click the box connected to your controller's START button in the app. Above the mouse, keyboard and controller icons is a row of buttons, click the far left button that looks like a stack of three circles inside of box made of arrows. Leave 'Change Action Set' selected and click OK. Change the dropdown menu from 'None' to 'Menu' , untick both boxes, and click OK
3 - Go into the 'Menu' tab and repeat step 2, but this time change the dropdown menu from 'None' to 'Default' before you untick both boxes and click OK
4 - Staying in the 'Menu' tab, click the box connected to your controller's SELECT button and set it to F5 on the virtual keyboard
5 - Click the box connected to your controller's LEFT STICK and change the 'Style of Input' dropdown menu to 'Joystick Mouse'
6 - Click the box connected to your controller's RIGHT STICK and change the 'Style of Input' dropdown menu to 'Directional Pad'
Click the top button and set it to SCROLL UP on the virtual mouse
Click the top button again and click the 'show activators' button at the bottom of the screen. Change the 'Hold To Repeat (Turbo)' dropdown menu to ON, turn the 'Repeat Rate' all the way up, and click the 'back' button
Click the bottom button and set it to SCROLL DOWN on the virtual mouse
Click the bottom button again and click the 'show activators' button at the bottom of the screen. Change the 'Hold To Repeat (Turbo)' dropdown menu to ON, turn the 'Repeat Rate' all the way up, and click the 'back' button twice to return to the 'Menu' tab
7 - Click the box connected to your controller's FACE BUTTONS (A,B,X,Y)
Click the bottom button and set it to LEFT CLICK of the virtual mouse
Click the right button and set it to ESC on the virtual keyboard
Click the left button and set it to F2 on the virtual keyboard
Click the top button and set it to F4 on the virtual keyboard
8 - Click the box connected to your controller's DPAD (UP,DOWN,LEFT,RIGHT) and change the 'Style of Input' dropdown menu to 'Directional Pad'
Click the left button and set it to 1 on the virtual keyboard
Click the up button and set it to 2 on the virtual keyboard
Click the right button and set it to 3 on the virtual keyboard
Click the bottom button and set it to 4 on the virtual keyboard
Done! Launch the game through Steam and press START once to gain control of the mouse with your LEFT STICK. Use A to select and B to go back, and RIGHT STICK to scroll up and down. Once you're on the track just press START again to swap back to the default controls. START and then B is a quick way to open the menu
Some quality of life changes I would absolutely recommended doing (smooths out the cursor and prevents button double-presses) -
In the 'Controller Configuration' app, go to the 'Menu' tab, click the box connected to your controller's LEFT STICK and adjust the 'Mouse Sensitivity' to your preference (mine is 0.063)
In the same menu, click the 'additional settings' box. Change the 'Stick Response Curve' dropdown menu to 'Linear' , and bump up the 'Dead Zone Inner' until your cursor is snappy and comfortable to use but not drifting on its own at the slightest touch (mine is 0.187)
Click the box connected to your controller's START button (which should be called 'CHANGE TO Default') and click the 'show activators' button. Change the 'Activation Type' dropdown menu to 'Release Press' and click the 'back' button to return to the 'Menu' tab
Do the same thing for the following buttons -
SELECT (F5)
A (LEFT CLICK)
B (ESCAPE)
X (F2)
Y (F4)
LEFT (1)
UP (2)
RIGHT (3)
DOWN (4)
Finally, go back to the 'Default' tab and do the same thing for the START button (which should be called 'CHANGE TO Menu')
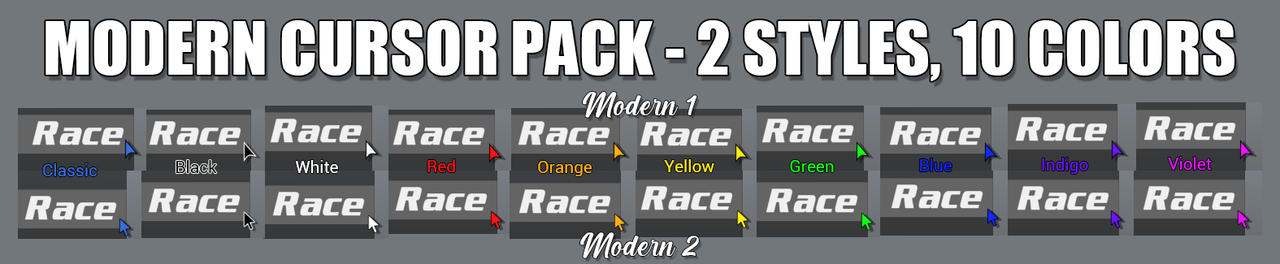
And the last and most essential improvement, installing a modern cursor from my pack - http://forum.mx-bikes.com/index.php?topic=5448
Everything should now be set up, feel free to make any tweaks and/or let me know any improvements you can think of
*COPY + PASTE THIS LINK IN YOUR WEB BROWSER TO DIRECTLY APPLY THE CONFIG THROUGH STEAM* – steam://controllerconfig/655500/2711455083
then click 'Apply Configuration' > 'Done'

Hey guys, I wanted to find a way to use a controller to navigate the menus with no hassle and here's what I came up with using Steam's controller configuration. The result feels great and covers everything I could think of that you would use a keyboard and mouse for ingame (other than typing). Long post but I wanted it to be detailed as there is a lot of info
*You will need to sacrifice the START button on your controller for this workaround. Pressing START will toggle the virtual cursor configuration on and off. If you have something bound to START, either change or remove it. You can choose whichever button you want but I found either START or SELECT to be the only two buttons that wouldn't interfere with the average controller setup. This tutorial will always reference START as the toggle button*
SETUP
This workaround requires Steam and utilizes it's built-in controller configuration tool. If you have the standalone version of MX Bikes you can add it to Steam by going to the top bar and clicking
Games > Add a Non-Steam Game to My Library > Browse
and finding your mxbikes.exe , by default this is
C:/Program Files (x86)/MX Bikes
To enable controller support, go to the top bar and click
Steam > Settings > Controller > General Controller Settings
and tick the box to enable support for whichever controller you're using (Xbox, PlayStation, etc)
Close the configuration app and fully close out of Steam by going to the top bar and clicking
Steam > Exit
After 5-10 seconds reopen Steam, click MX Bikes in your games library, and click the 'Controller Configuration' button that has appeared at the end of the bar under the 'Play' button
CONTROLLER CONFIGURATION
This will be our final controller setup -
START - Toggle virtual cursor configuration
SELECT - F5 (toggle chat)
LEFT STICK - Move virtual cursor
RIGHT STICK - Scroll up/down
A - Left click (select)
B - Escape (open menu/back)
X - F2 (vote yes)
Y - F4 (vote no)
LEFT - 1
UP - 2
RIGHT - 3
DOWN - 4 (quick chats)
Pressing START will toggle between the virtual cursor configuration and the default game controls when pressed, allowing for more button options without interfering with any of your normal controls
1 - In the controller configuration app that opens up, click 'Add Action Set' at the top of the screen. Name this something like 'Menu' or whatever you want, leave the dropdown menu on 'None' and click OK. You will see a tab called 'Menu' appear next to the 'Default' tab at the top of the screen
2 - Make sure you are in the 'Default' tab and click the box connected to your controller's START button in the app. Above the mouse, keyboard and controller icons is a row of buttons, click the far left button that looks like a stack of three circles inside of box made of arrows. Leave 'Change Action Set' selected and click OK. Change the dropdown menu from 'None' to 'Menu' , untick both boxes, and click OK
3 - Go into the 'Menu' tab and repeat step 2, but this time change the dropdown menu from 'None' to 'Default' before you untick both boxes and click OK
4 - Staying in the 'Menu' tab, click the box connected to your controller's SELECT button and set it to F5 on the virtual keyboard
5 - Click the box connected to your controller's LEFT STICK and change the 'Style of Input' dropdown menu to 'Joystick Mouse'
6 - Click the box connected to your controller's RIGHT STICK and change the 'Style of Input' dropdown menu to 'Directional Pad'
Click the top button and set it to SCROLL UP on the virtual mouse
Click the top button again and click the 'show activators' button at the bottom of the screen. Change the 'Hold To Repeat (Turbo)' dropdown menu to ON, turn the 'Repeat Rate' all the way up, and click the 'back' button
Click the bottom button and set it to SCROLL DOWN on the virtual mouse
Click the bottom button again and click the 'show activators' button at the bottom of the screen. Change the 'Hold To Repeat (Turbo)' dropdown menu to ON, turn the 'Repeat Rate' all the way up, and click the 'back' button twice to return to the 'Menu' tab
7 - Click the box connected to your controller's FACE BUTTONS (A,B,X,Y)
Click the bottom button and set it to LEFT CLICK of the virtual mouse
Click the right button and set it to ESC on the virtual keyboard
Click the left button and set it to F2 on the virtual keyboard
Click the top button and set it to F4 on the virtual keyboard
8 - Click the box connected to your controller's DPAD (UP,DOWN,LEFT,RIGHT) and change the 'Style of Input' dropdown menu to 'Directional Pad'
Click the left button and set it to 1 on the virtual keyboard
Click the up button and set it to 2 on the virtual keyboard
Click the right button and set it to 3 on the virtual keyboard
Click the bottom button and set it to 4 on the virtual keyboard
Done! Launch the game through Steam and press START once to gain control of the mouse with your LEFT STICK. Use A to select and B to go back, and RIGHT STICK to scroll up and down. Once you're on the track just press START again to swap back to the default controls. START and then B is a quick way to open the menu
Some quality of life changes I would absolutely recommended doing (smooths out the cursor and prevents button double-presses) -
In the 'Controller Configuration' app, go to the 'Menu' tab, click the box connected to your controller's LEFT STICK and adjust the 'Mouse Sensitivity' to your preference (mine is 0.063)
In the same menu, click the 'additional settings' box. Change the 'Stick Response Curve' dropdown menu to 'Linear' , and bump up the 'Dead Zone Inner' until your cursor is snappy and comfortable to use but not drifting on its own at the slightest touch (mine is 0.187)
Click the box connected to your controller's START button (which should be called 'CHANGE TO Default') and click the 'show activators' button. Change the 'Activation Type' dropdown menu to 'Release Press' and click the 'back' button to return to the 'Menu' tab
Do the same thing for the following buttons -
SELECT (F5)
A (LEFT CLICK)
B (ESCAPE)
X (F2)
Y (F4)
LEFT (1)
UP (2)
RIGHT (3)
DOWN (4)
Finally, go back to the 'Default' tab and do the same thing for the START button (which should be called 'CHANGE TO Menu')
And the last and most essential improvement, installing a modern cursor from my pack
- http://forum.mx-bikes.com/index.php?topic=5448Everything should now be set up, feel free to make any tweaks and/or let me know any improvements you can think of
*COPY + PASTE THIS LINK IN YOUR WEB BROWSER TO DIRECTLY APPLY THE CONFIG THROUGH STEAM* – steam://controllerconfig/655500/2711455083
then click 'Apply Configuration' > 'Done'