• Welcome to MX Bikes Official Forum. Please login or sign up.
 
April 19, 2024, 12:44:57 PM

News:

MX Bikes beta18j available! :)


Show posts

This section allows you to view all posts made by this member. Note that you can only see posts made in areas you currently have access to.

Topics - Ruubs

1
In this topic I will be releasing and storing all my future tracks. I'll be focussing on the AMA SX, AMA MX and MXGP series and maybe a custom track here and there.

If you enjoy my work, please consider making a donation:


Complete track list:
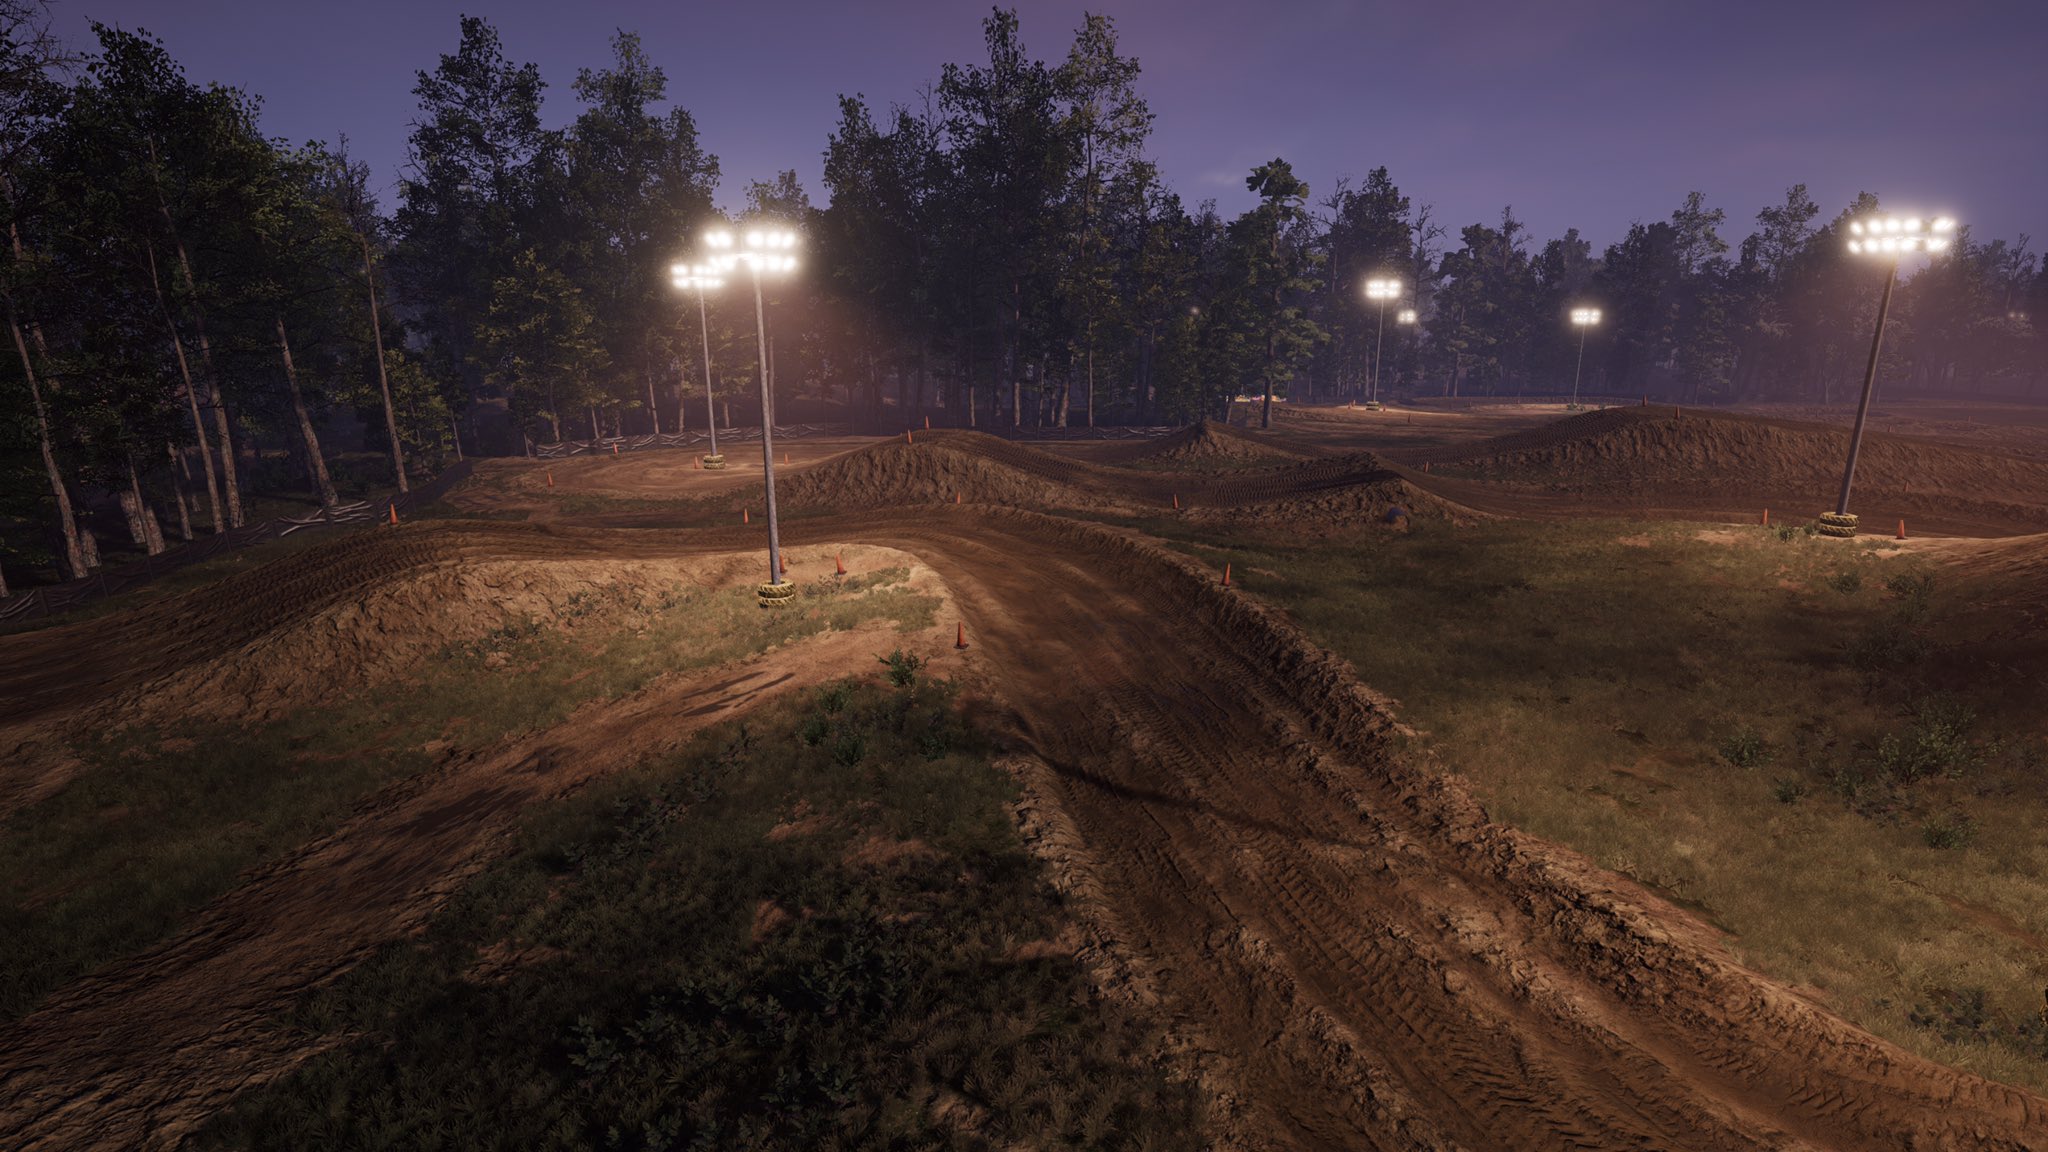
2020 Supercross Rd. 2 St. Louis - Forest edition - DOWNLOAD
        2020 Supercross Rd. 2 St. Louis - Forest edition - ALTERNATE DOWNLOAD (Thanks Docfumi)

2020 Supercross Rd. 2 St. Louis - Race edition - DOWNLOAD

2021 Supercross Rd. 1 Houston 1 - DOWNLOAD


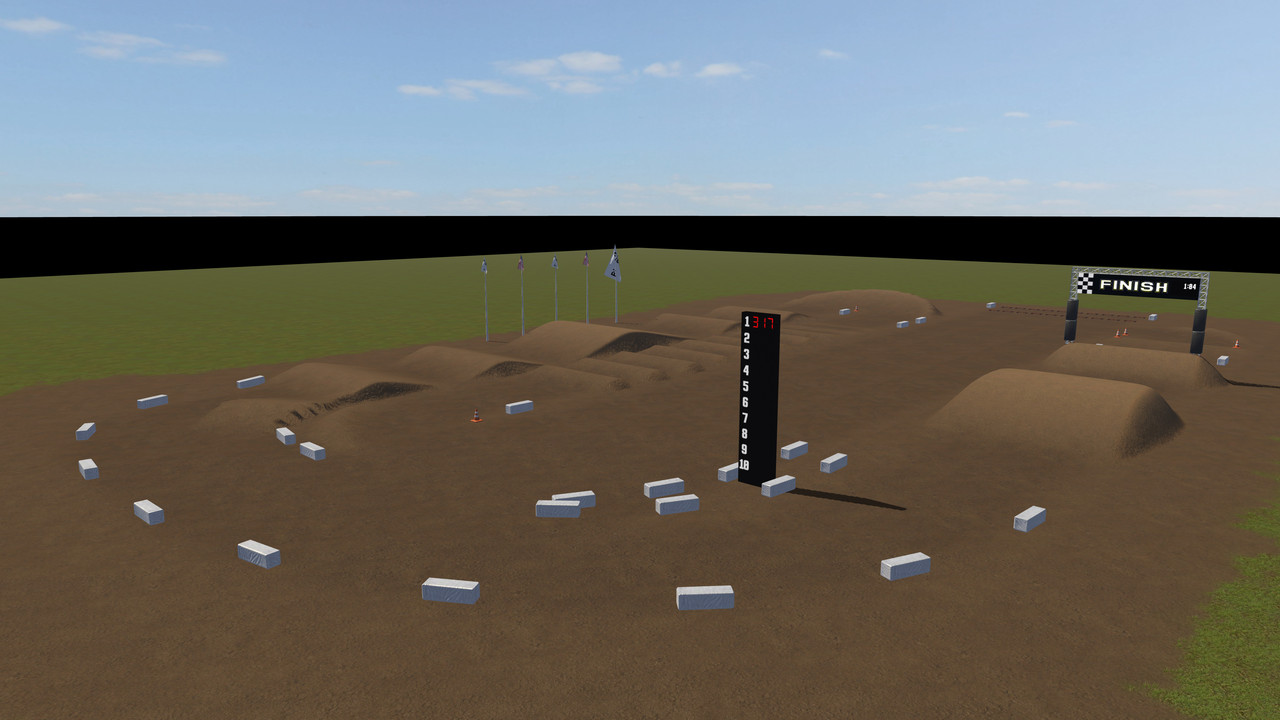
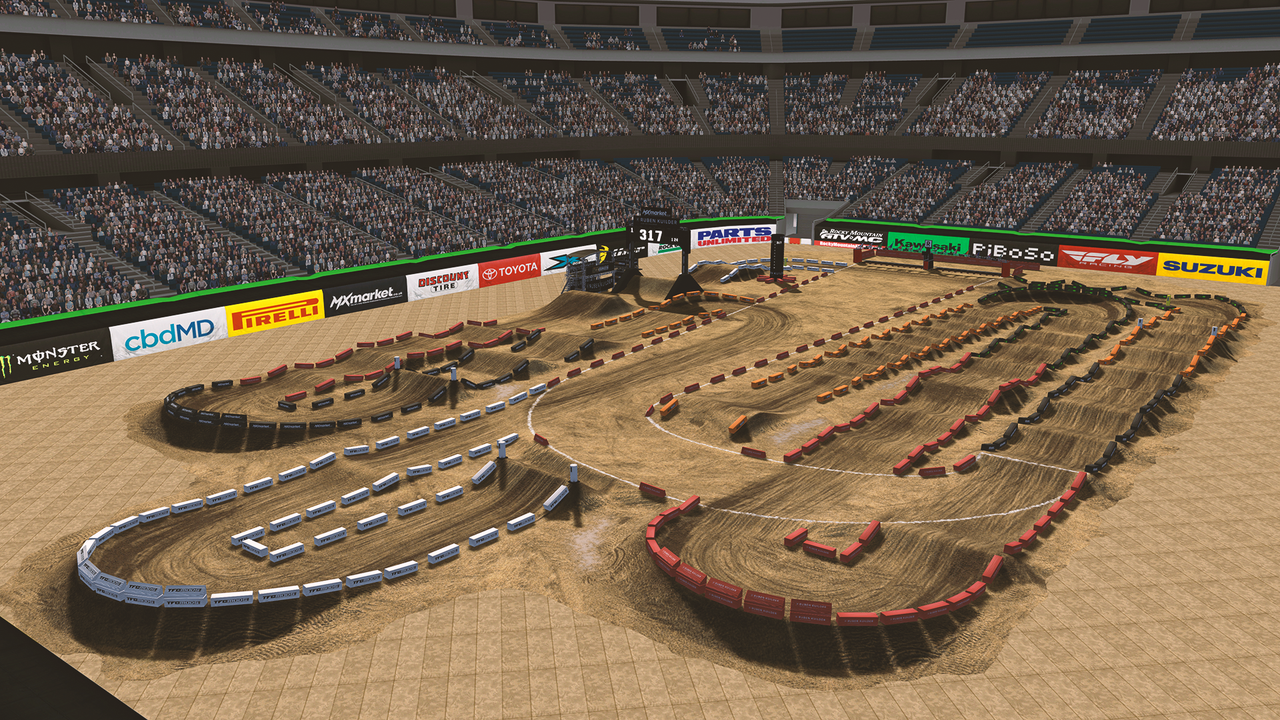
Latest release - 2021 Supercross Rd. 1 Houston 1:
2021 Supercross Rd. 1 Houston 1 - DOWNLOAD

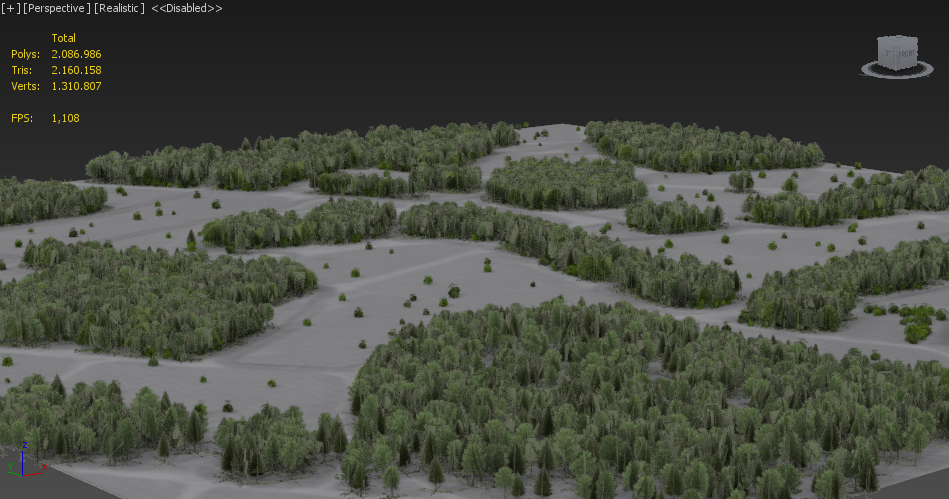
This might be a graphically demanding track but if we are not pushing the envelope of quality then what's the point right? If you have FPS issues, you can download this additional file and place it in your mods folder additionally to the full track. If you do not have any FPS issues, you do NOT need this file.
https://www.mediafire.com/file/xyt2himryrwifl3/rsk_houston_1_2021.zip/file

Thanks to TFC for his outstanding stadium.
Thanks to Beyer for the GDUBMX and TFCMODS skins for the bales.

2
Bikes / 125 2 stroke sound mod
December 09, 2019, 06:48:44 PM

Download:
http://www.mediafire.com/file/8p6u770pdb7n15x/Rubens_125_2stroke_mod.rar/file

Install guide:
Just copy all files within the .rar file into the bike folder of your choice (E.g. C:\Users\<yourName>\Documents\PiBoSo\MX Bikes\mods\bikes\MX2OEM_2017_Husqvarna_TC125).

Thanks to:
Jibbz for providing me with some loopable sound samples.
3
Races / MXB of Nations - OCT/12/2019
September 18, 2019, 05:02:03 PM

Track: Mantua (stock, no mods needed)
I've chosen for this track because it's an easy sand track which everyone has.

We're doing this a little different from real life. More information below.

Information:
Racing will begin on Saturday OCT/12/2019 at 10:00 A.M PST
Race 1 is MSM-MX1
Race 2 is MSM-MX2
Race 3 is MSM / OEM-Open
Each race will be 6 laps.
Overall results will be scored in the Olympic scoring format.
Every player, from every country will ride every race.
The best finish of your country will count. For example, when player 1 of USA finishes first and player 2 of USA finishes third, player 1's score will count toward the overall score. Player 2's score will be dismissed.

Additional information:
Deformation will be set on 1.5.
Server's location is based on where most players are located. If there's 10 players from USA and 5 from Europe, we'll go with an American server.

User registration:
Please sign up for this event. This'll enable me to figure out the overall score of each country.
If you have already signed up but can't attend the race, please let me know. This'll help me see the amount of riders attending the event.
URL: https://forms.gle/fn7CCK9iAD7RjW2q8

Mods needed:
OEM Bikes: http://forum.mx-bikes.com/index.php?topic=1979.0

4
Tracks / 2019 AMA Supercross - Glendale, Arizona
August 15, 2019, 11:16:19 PM


The Phoenix-area stop of supercross is especially unique because it is one of just two cities in the history of the sport, along with Los Angeles, to host its round of the championship in three different stadiums, which also includes Tempe's Sun Devil Stadium (5 races from '86-'98) and downtown Phoenix's Chase Field ('99-'15).
The start straight on the expansive floor of University of Phoenix Stadium this weekend will span approximately 384 feet, making it the longest in the championship. Riders will be able to push speeds nearing an incredible 60 miles per hour.
The one-of-a-kind shape of the stadium's exterior was built to resemble that of a barrel cactus, found in abundance in the Phoenix area, as well as a coiled snake, also abundant in the area's desert landscape.


How to install:
Simply put the .pkz file in your mods/tracks folder.

Thanks to:
TheFatController - stadium
Asdrael - general jump shape and scaling tips
Alex Aeffertz - start, manager and flagger structures
5
Track Editing / Ruben's track bundler
July 28, 2019, 11:06:31 AM
Ruben's track bundler


Getting your track in game has never been easier. Ruben's track bundler creates a batch file (bundleMe.bat) based on your input. A click on the batch file will create your track's .map, .trh with centerlines and copies your working folder to a location specified by you.

This is NOT a track editor. It does save you a lot of time bundling your track though.

Make sure:
You're not using any spaces in any of your file / folder names. I haven't made a proper check on it yet, but I doubt it works in MXB anyway.

How to use:
Extract RubensTrackBundler.exe in your track folder. Double click it and follow the steps. Once done a batch file called bundleMe.bat is created in the same folder as where you placed RubensTrackBundler.exe. Double click bundleMe.bat and wait until it is done (You might require to open it as admin by right clicking and choosing run as administrator). The time required to bundle the track will vary. On a track with a lot of objects and high quality textures it'll take longer than on a track without. The batch file will close automatically once it's done.


6
Races / Funrace - Mantua MSM open
July 14, 2019, 08:21:51 PM


Funrace tonight at 20.00 UTC.

Track: Mantua (stock, no mods needed)
Class: MSM Open (stock, no mods needed)

7
Races / Washougal Washington Race may 4 2019
May 04, 2019, 02:56:24 PM
After figuring out qualifying is hard coded at 70% of race length I think we should scrap it. 5 laps of qualifying is too long for a ~7 lap race IMO

I'm thinking of starting weekly races, but that all depends on you guys. The more people join, the more races I will host.
If this first race is a success I will make a calendar and keep track of the points.

Class:
Open

Today's race schedule:
Time 21:00 CET (20:00 GMT+1, 15:00 EST)
We'll do a quick qualification race and then two 15+2 motos.

Rules are simple:
Respect eachother
Ride clean

Server:
Race server can be found in game under the name "Race Server".
Thanks to Teeds for providing this server!

Further notice:
We'll ride with collisions off since they still cause major problems online due to not being accurate enough.
Max 16 players! First ones to join will be in. Please don't join the server if you don't intent to race.

NO mods needed except for the OEM bikes.
To make sure your OEM bikes work properly, you should go in game, choose all stock bike.
Go into your installation folder (c/programfiles(x86)/mxbikes) and delete the whole BIKES folder
Download the OEM pack from https://mega.nz/#!1YonQYqT!PdcGhe6Xp6Ci4iZszK7iE1Rj9RCBUdAyVF44RX6C3ts and place that inside your installation folder
8
Jumps and berms
Creating heightmap features in Photoshop

Setting up the heightmap
Using layers
Different types of layers
Create a jump
Create a berm


If you struggle to follow the tutorial, here is my heightmap.psd file which was used to make this tutorial.
https://www.mediafire.com/file/cjuc8dur1wp3wdn/heightmap_tutorial.psd/file


In this tutorial we will take a look at creating basic heightmap features such as jumps and berms. I won't go into detail on this one, I'll just show you the basic concept on how I make my heightmaps in Photoshop. I also won't show you how to get this in game. Geo has made a great tutorial on how to do that: http://forum.mx-bikes.com/index.php?topic=2560.0

You'll need basic knowledge of what how and why a heightmap works, and you need to know your way around photoshop.

This is what we'll be creating:


Setting up the heightmap
Open Photoshop and create a new document with a size of 2049x2049 pixels*, grayscale color mode with 16 bits and a resolution of 72 Pixels/Inch. A heightmap must be either 1025x1025, 2049x2049 or 4097x4097 to make it work.
Once you've created the document, fill the background layer with the hex code color #808080. This color is the absolute center of black and white. This way we can make a ditch and hill equally as 'tall'.


Jump creation
Create a new layer and rename it. In this case we're creating the lip of a double jump, so call it 'lip' and put it in a folder called 'double'. Select the layer and choose the Rectangular Marquee tool on the left hand panel. Select a portion of your document. Reset your foreground and background colors to black and white by pressing D and fill the rectangal with a linear gradient as shows below:


Now, hit ctrl+d on Windows or cmd+d on Mac to deselect everything.
With the layer still selected go into the layer modes dropdown and choose 'Screen'.


That looks promising already, doesn't it? Now the real magic begins.
Right click the layer and choose 'Convert to smart object'. Now double click the layer thumbnail. Photoshop will open a new document file. In this new document, click on the small 'Create new fill or adjustment layer' icon at the bottom of the layers tab on the right and choose 'curves...'. This will create a new adjustment layer in the layers tab. Select this layer.
With this layer selected, you'll see a propeties panel open. In my case this is above the layers tab. In here you'll see a basic curve editor. This is the place where we'll be creating our jump.


The following is all in the curve editor
The first thing you have to do is drag the top right anchor point to the bottom. This'll create a black rectangal on your screen. Now, click somewhere on the curve line. This'll create a new anchor point for you to use. Drag this anchor point up a bit. You should now see your jump reapear on your screen, though it will look different than before. I hope you can guess what is happening. If not, the curve editor is basically the side view of your jump. However you shape your jump in there, that's how it'll look in game from the side view.
Fiddle around with the curve until you've got the jump shape that you're happy with. This is what I've done:


Now to use the black and white values to the fullest, add a 'levels' adjustment layer on top of the curve layer. Select it and in the propeties panel and drag the right arrow close to the first white spike you see in the preview window.


Hit ctrl+s on Windows or cmd+s on mac to save the document and close it. Go back to your heightmap document and you'll see it has changed. You'll also see that the curve and level layers are gone in this document. Don't worry! It's a smart object. Once you double click the smart object layer ('lip') it's thumbnail again, it'll open the document with curve and level layers right back up for you to edit. This method keeps your initial heightmap document clean.
In the heightmap document right click the 'lip' layer and choose 'New smart object via copy'. Rename this layer to 'landing' and use the move tool to move this layer over in the document so it sits right behind the lip.


Double click the thumbnail to open the layer's document. First thing you want to do is delete the levels adjustment layer. Right click it and click 'Delete Layer'. We do this to prevent any clipping to happen. Click on the curve layer and change around the curve until you have a nice landing jump. Once you've created a nice shape, add a new levels adjustment layer and repeat the step we did earlier. Select it and in the propeties panel drag the right arrow close to the first white spike you see in the preview window.
Hit ctrl+s on Windows or cmd+s on Mac to save the document and return to your heightmap document.


Voila, there is your double jump. Save this as a 16bit RAW file and test it in game. If you don't like the jump, just open up the specific jump layer and edit the curve until you like it! (Don't forget the levels adjustment layer! It's easy to make the whites clip!).

Berm creation
We can make awesome jumps now, but what about berms!? Don't you worry pal! If you can make jumps, berms aren't hard for you.
Do the exact same steps as making a jump except for the layer mode. Keep the layer mode of the layer at normal, but change the layer mode of the folder the layer sits in, at screen. Even the curve editor has the same idea as the jump layer. The shape you make your curve line, will be the shape of your berm (in this case if you cut your berm right in the middle, if you don't get it, you will in a second!).
This is what you should have. I know it looks like a jump, we'll transform it into a second.


With this layer selected, go to Edit -> Transform -> Warp. Now a new propeties bar will appear on the top of your document and you'll see a box around your berm:


Click the Warp dropdown on the left, and choose Arc. In my case, the orientation is wrong. Change it by clicking on the button right next to the dropdown 'Change the warp orentation'. This is what we've got so far:


In my case, the berm is bend the wrong direction. You'll see a small square on the outside of the box around your berm. Click and drag this square the other direction to change the shape of the berm. Hit enter to conform the warp changes.


That looks good, doesn't it? To finish it, we need to smooth the ends. Copy the berm layer once by hitting ctrl+j on Windows or cmd+j on Mac. Select the copied layer and go to Edit -> Transform -> Warp again. Set the drop down to None and hit enter. Now press ctrl+t on Windows or cmd+t on Mac to open the free transform tool. Rotate the layer 90 degrees and place it next to the berm like in this picture:


Hit enter to finish the transform. Do the exact same step for the other end of the berm:


Now select the folder, which in my case is called 'Berms'. With this folder selected, hold alt and click on the 'Add layer mask' icon beneath the layers panel (left of the adjustment layer icon). This will create a black mask, and you won't be able to see your berm anymore. Right click on the mask thumbnail on your folder and click 'Disable mask'. Choose the gradient tool from the left toolbar and make sure your foreground and background colors are default by pressing D. Then press X to invert the foreground and background colors. Drag a linear gradient over the berm as shown in this picture and re-enable the layer mask the right clicking on it and choosing 'Enable layer mask'.


And there it is! A finished berm.

If you want to rotate or scale a jump or berm, just hit ctrl+t on Windows or cmd+t on Mac and you can transform it the way you want!

Some hints:
- To control jump or berm heights, use the opacity of the layer.
- Use a gausian blur on jumps or berms to smooth them out a bit.

*In mathematics, a power of two is a number of the form 2n where n is an integer, i.e. the result of exponentiation with number two as the base and integer n as the exponent.
In a context where only integers are considered, n is restricted to non-negative values, so we have 1, 2, and 2 multiplied by itself a certain number of times.
Because two is the base of the binary numeral system, powers of two are common in computer science. Written in binary, a power of two always has the form 100...000 or 0.00...001, just like a power of ten in the decimal system.
9
I'm currently working on a night track with spot lights. The whole track should be dark, except for the areas around the lights. Does anyone have an idea on how to get this effect?

My idea was to create a new texture layer which would be a plain black texture which'll then be the top layer. That'll make the dark spots dark, and I can mask out the areas around the lights. The thing is though, with deformation, that layer will be ridden off. Once a couple of laps are ridden, the whole track would look lit and wouldn't look the way it's supposed to look. Obviously the shadow of the rider won't be right either way. We really need to be able to place more lighting sources so we can make proper night tracks.

This is the idea (image from Mx vs Atv twitter):


Tell me your ideas, be creative.
10
Tracks / AX Tour - Barrie
September 18, 2018, 07:40:24 PM


Round 5/6 : Rockstar Energy Triple Crown
Not exactly like real life. I added a half single before the rythem section and a little bump before the finish line to make a track more fun.

Thanks to Piboso and Snappe for the example track folder + files.

Download:
http://www.mediafire.com/file/hpp122ogy1jhg6i/axTourBarrie.rar

If you enjoy my work, please consider making a donation:

11
Suggestions and wishlist / Lean and tear-off suggestions
September 05, 2018, 06:33:20 PM
I posted this in one of the threads in general discussion last week, but for some reason it didn't get posted. Anyway, here's my 0.02 on the lean and tear-off mechanics.

Lean:
As we all know, the lean angle is weird. I'm not asking for an increased lean angle since you already know about that. The way the lean works now, is that the lean angle seems to connect to the angle of the normal from the terrain. For example, you come into a turn while you lean in slightly before hitting the berm. Once you hit the berm, all of a sudden the bike will lean over a lot more. I THINK the way to fix this, is to make the lean angle connected to the global world axis, not the terrain normal. Though, before that'll actually work out better, the lean angle has to be increased. This method of leaning will most likely get rid of weird physics behaviors on uneven terrains. I'm pretty sure this'll also make the game more predictable and make it possible to have a lot rougher terrains.

Tear-off:
I really like this feature, though, I feel like it isn't enough. You could ride a whole race without pulling any tear-offs. IMO the dirt-on-screen effect should be more. Make it harder to see so you actually have to pull a tear-off.
I've seen that this is mod-able, though I haven't tried if that prevents players from joining online (I hope it does!!). Obviously I am not going to mod it to make it harder for me to see, while others can see everything clearer. The dirt-effect should be increased by default, and it should be impossible to mod this kind of stuff to prevent people from removing the effect altogether.
12
Other / Mohawk / GoPro Hero 4
June 28, 2018, 03:38:41 PM


GoPro Hero 4 made by P2STA (https://www.facebook.com/P2sta/)
Mohawk is just a stupid thing I made in 10 minutes when I was bored.

Download:
http://www.mediafire.com/file/rygwiyh5c68hhm5/helmetcams.rar

Installation guide:
Place in your rider folder:
C:\Program Files (x86)\MX Bikes\rider

Thanks again to P2STA for letting me release his GoPro Hero 4 (https://www.facebook.com/P2sta/).
13
Other / New bike font - Jersey M54 Regular
June 28, 2018, 03:25:50 PM


New bike font. Comes in black and white. The font used is Jersey M54 Regular.

Download:
http://www.mediafire.com/file/x1buv67esdd1d2m/bikeFonts.rar

Installation:
Drop the misc folder into your installation folder:
C:\Program Files (x86)\MX Bikes
14
Off Topic / [Dodge] - 2d addictive android game
August 29, 2017, 11:20:16 PM
Hi guys,

Since a couple of months I've been working on a simple addictive 2d android game. This is my first game ever finished and released and am happy with the overall result. The game is made in Unity and for now exclusively for android devices. I learned a lot in the process and am happy that I started it. I am currently trying to promote my game a bit and get feedback. Perhaps you guys have some promotion tips for me, and feedback on my game.

Dodge, a simple 2d addictive game inspired by old flash games. Dodge the falling blocks. It gets harder over time! Share your score on social media to let your friends know how good you are. Can your friends beat you?

Android store link:
https://play.google.com/store/apps/details?id=com.RukuStudios.Dodge

Itch.io link:
https://rukustudios.itch.io/dodge

Please don't see this post as some sort of spam. I'm a total beginner which is trying to get feedback on his first ever released game.
15
Tracks / Southwick Groomed | Deformation maps
July 08, 2017, 04:14:37 PM


https://www.mediafire.com/?4bacaeqw9xa5t8i

---
New version of Southwick 2016. Terrain is fully groomed, it has new textures and overall better optimized. The track also has deformation maps which Asdrael and I have played around with. The deformation should form ruts, braking bumps and waves.
---

The Wick! Motocross' most famous sandbox returns to greet racers with its classic ultra-rough terrain, a never-ending bump fest that just gets deeper and tougher as the day goes on. A sand track is an entirely different animal, and if the riders aren't prepared, it will eat them up.

The key to The Wick is adapting to its ever-shifting terrain. Fans should get there early to see how smooth the track looks before practice begins, and then track how quickly the bumps begin to form. By the end of practice, the place is totally whooped out, and they only get deeper during the motos. The smartest riders will keep searching for smoother lines, hitting the untouched spots until they get rough, then finding new ground again somewhere else.  Making these decisions while your heart, lungs, arms and legs are screaming is something only the toughest and fittest can do.

Southwick is so unique that it favors local riders more than any other track. They know where the good lines will develop, and they'll have The Wick faithful pushing them to dig deep late in the motos. Be sure to scan the hometown listings for each rider on the entry list—someone you've never heard of might be in contention for a podium.

For all of its gnarliness, Southwick is nestled right in the middle of a very quaint downtown. You'll be surprised to find a legendary motocross track nestled right up against baseball fields and an American Legion post, but all of that just adds to an experience unlike any other.

Credits:
Piboso and Snappe for the documentations.
Vortex_Damien for the bleacher model.
Most of the community for beta testing awhile back.
Asdrael for his sand textures / norms and testing out the deformation map idea.
promotocross.com for the track history.
16
Track Editing / Trees / shrubs object release
March 26, 2017, 09:31:19 PM


So here it is. The pack includes an .fbx file with 4 trees with trunk, 2 lowpoly trees and two shrubs (+ all the textures needed). Please be easy on them, don't use too much without knowing what you're doing.

https://www.mediafire.com/?pffm7k1qf119yqz
17
Setups / My setup!
March 25, 2017, 09:38:48 PM
Lately there've been a lot of people coming to Mx Bikes. They probably struggle setting up their bike, so here is my setup.

Thanks to StoneRider and Asdrael for their tutorials. They helped me out a lot!
http://forum.mx-bikes.com/index.php?topic=1463.0
http://forum.mx-bikes.com/index.php?topic=1644.0

Things to note:
This setup was created for the OEM Kawasaki KX250f 2017
I made this setup today. There might be things that'll change over time.
Maybe we'll see suspension updates in newer betas. So this might not work at all in coming betas.
This setup won't make you a pro, but it might help you crash less.
Sag is set correctly.
I tried to create good traction on the rear end.


18
Bug Reports / Changing from windowed to full screen
March 24, 2017, 10:24:01 PM
I've had this problem since beta 1 I think, but never posted about it if I'm not mistaken.

When changing from windowed to full screen mode, in the in game settings, my screen will go black until it goes back to windowed mode again. So basicly the whole 15 (is it 15?) seconds that I should have the time to click 'yes' or 'no' my screen is black and I can't do anything.
19
Suggestions and wishlist / Live timing
March 24, 2017, 02:56:59 PM
This isn't a priority of mine right now, and I know this isn't Piboso's either. But will you ever consider adding some sort of live timing? By this I mean the big pole which you see on supercross tracks and the finish line arch. On the big pole you see the top 5 on the track by their number. The finish line arch will show who's in first (and maybe some cool fireworks would come out once 1st place crosses the finish line at the end of the race).

Timing should update each lap.
20
Suggestions and wishlist / Faster rider lean
December 28, 2016, 04:11:40 PM
I have no idea how I just figured this out in beta 5, maybe because I've been using the chest cam in beta 4 and went back to the first person cam in beta 5. But the rider leans feels extremely slow to me.

In motocross the rider should lean way faster. All my settings are set so the lean is fastest, but it still feels very slow.

This might just be the animation though.