• Welcome to MX Bikes Official Forum. Please login or sign up.
 
April 26, 2024, 09:04:19 AM

News:

MX Bikes beta18j available! :)


Show posts

This section allows you to view all posts made by this member. Note that you can only see posts made in areas you currently have access to.

Messages - philiaN

931
So, maybe we can work together on this track?

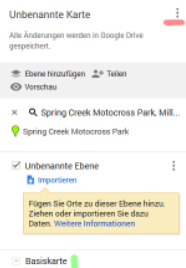
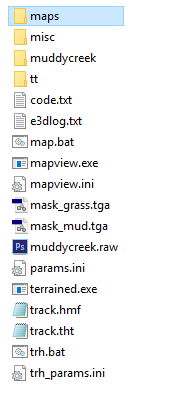
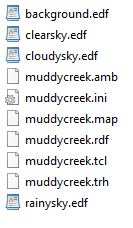
I've done the Base Heightmap, Folder Setup and a Trackpath. So you can copy the folder "Hangtown" in your track folder, to see how it looks.

If you are working on the track, let us know, just write it in the comments.

Download Link:

http://www.file-upload.net/download-11642919/HangtownMX_v05.zip.html
http://www.file-upload.net/download-11643278/HangtownMX_v06.zip.html
http://www.file-upload.net/download-11645273/HangtownMX_v07.zip.html  (new)
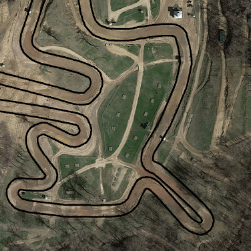
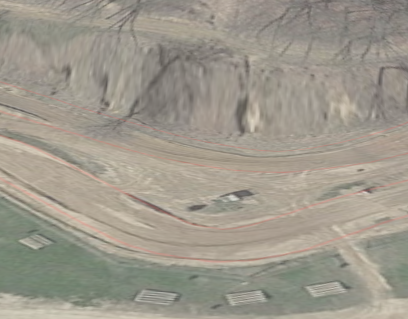
Reference Video

https://www.youtube.com/v/HW8rDbdCrD4

Programs you will need (free):

Gimp 2.8, Earthsculptor/L3dt
932
Hey, i saw you guys yesterday :) Do you have the bike models?

http://www.mxb-central.com/category/downloads/models/bike-models/

Download the MINIMUM SERVER REQUIREMENTS for GTX Server's

http://www.gtxonlineracing.com/#!downloads/c3k7z

and try these servers.
933
Bikes / Re: 2016 Honda 250/450
May 15, 2016, 01:37:37 AM
It would be nice if we can have both!? One Stock (Races) and one modified version.
934
Yeah, i think my biggest problem is that my base heightmap is a 8bit png - so i will start (again) from the beginning and will save as a 16bit png with gimp 2.9
935
Hey Fats,
i need your help again  ;D 
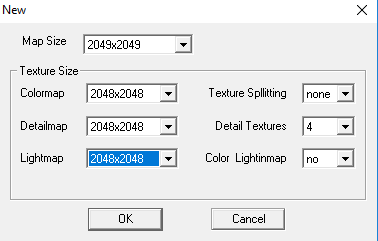
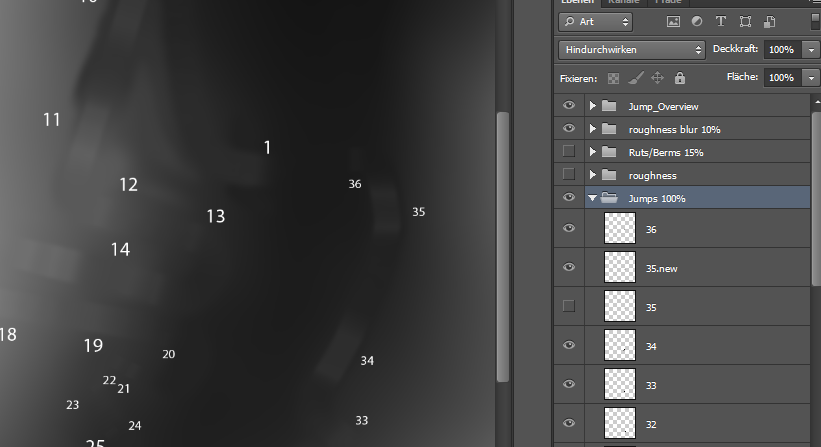
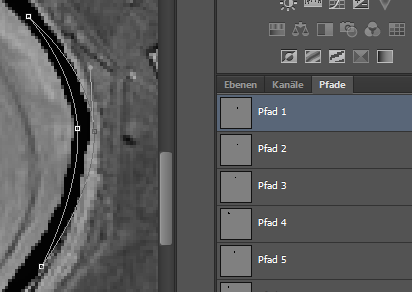
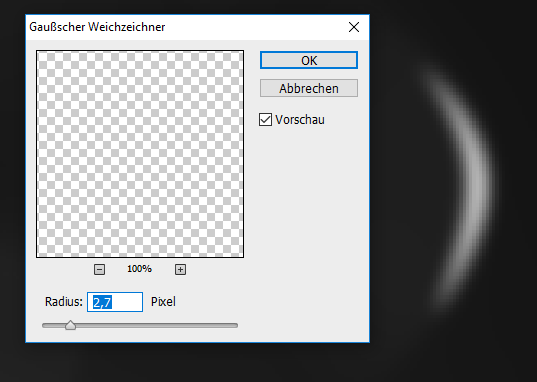
if you add jumps in psp/gimp do you have to smooth the complete track again in l3dt? its really annoying :( 
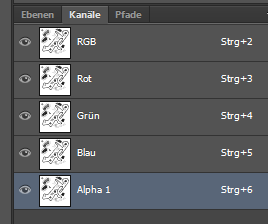
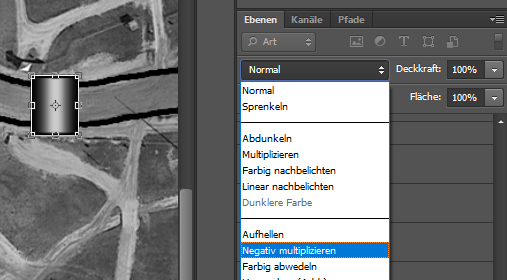
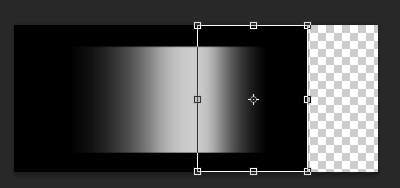
i think i learned so much in the last couple of weeks that i can finally make a replica track, but the workflow with gimp and l3dt is so frustrating. Do you have any tips? i tried to work with .raw in photoshop, but its protected.
936
Track Editing / Re: Track editing questions/help
May 01, 2016, 11:51:12 PM
I had the same problem, so a made a track.tga (1 layer). Have you already tried to change the thickness in track.tht? If you have useful values i can change these in the text guide.
937
Track Editing / Re: TFC's Track Creation Tutorials
April 30, 2016, 09:19:15 AM
Wrong word :) in a slope/hill ? that should be the word :)

80% of the track path should be flat, how i do this?
938
Track Editing / Re: TFC's Track Creation Tutorials
April 30, 2016, 08:55:27 AM
https://www.twitch.tv/philian89/v/63660408

Here you can see how it looks at the moment. That track is completly in a hang.  :( This is what i mean with terraforming
939
Track Editing / Re: TFC's Track Creation Tutorials
April 30, 2016, 08:14:22 AM
Hey Fats, i have to ask you again, sry  ::)

Can you explain or show me how you did the terraforming? this is actually the hardest one for me right now. I have some ideas how i could do it, but maybe you can share your experience with me :)

*is there something like a path tool in l3dt?
**and btw you and vortex online - same time? - release date?  ;D
940
Track Editing / Re: Text Guide - Geo's Tutorials 1-5
April 29, 2016, 11:32:47 PM
You did this Step? I cant tell you if you need to do all the Steps from TrackED, but you have to do the Centerline.

Important: You have to Start with a Straight and End with a Curve

Finish the Centerline

Centerline -> Save as track.tcl
Centerline -> Merge
File -> Save -> Overwrite track.trh

Reopen TrackED -> Load track.trh (It should have now a Red line)

and did you do this Step?

Important: If you change anything on the Heightmap etc., you have to update the .MAP and .TRH File, also you have to  merge the centerline again!!
So, Run map.bat -> Run trh.bat -> Open TrackED -> File -> Load the .trh File -> Centerline -> Merge  -> File -> Save -> Overwrite the .trh File


941
Track Editing / Re: Text Guide - Geo's Tutorials 1-5
April 29, 2016, 08:40:23 PM
Sorry, i forgot an important thing, go to *2, this should solve your problem :)
942
General Discussion / Re: Best Whip Contest?
April 29, 2016, 01:51:37 PM
sounds great!
943
Track Editing / Re: Text Guide - Geo's Tutorials 1-5
April 29, 2016, 04:46:12 AM
Start the mapview.exe once
944
Track Editing / Re: Text Guide - Geo's Tutorials 1-5
April 29, 2016, 02:38:42 AM
^Project Folder^

Download-Link: https://mega.nz/#!sc0mFZyA!eS_AkY8x3HzYQTm5UmSzSGLkqGC2MLOxb3hx1aiilMk

Important: Download and update the Track Tools

Now you can start to make the jumps, berms and that stuff.

945
IMPORTANT: Always use the latest Track Tools

You need Track Tools and Example Track Files
Download Link: http://forum.mx-bikes.com/index.php?topic=89.0
Wiki: http://docs.piboso.com/wiki/index.php/MXB_Track_Creation_Guide

Replica Track Building - Folder Setup

Create Main Folder "Trackname"
   Create Sub Folder "track" (this will be the final track folder)
   Create Sub Folder "misc"

Copy into Main Folder:

Copy from /mxb_track_example following files:

map.bat
params.ini
track.hmf
track.tht
trh.bat
trh_params.ini

Copy from /TrackTools/Terrained following files:

terrained.exe (map.bat is using this application)

Copy from /TrackTools/mapview following files:

mapview.exe
mapview.ini (you have to start the mapview.exe once to get the .ini)

*1
Edit the map.bat and change the following Code example/example.map to track/track.map
Edit the trh.bat and change the following Code example/example.trh to track/track.trh


Replica Track Building - Heightmap

There are many ways to do a heightmap. (Earthsculptor, L3DT, any Image Editor, etc.)

1. Create the "Terrain/Heightmap" Base Layer 

Geolocation of AMA and MXGP 2017 tracks: http://forum.mx-bikes.com/index.php?topic=1946.0

https://www.youtube.com/v/m91V9rCSrLo

credits to TFC

Remember: Scale your heightmap (and texture in this case) to 2049x2049px

2. Create a rideable Heightmap

Open your Base Layer with Photoshop or any other Image Editor

Use following Settings

1025x1025 or 2049x2049 or 4097x4097
Modus Greyscale 16bit

And add the Gaussian Blur Filter (i used a radius of 8 )


Save as

Save as Basic_Track.RAW (Select IBM PC)

Tip: Get high quality textures
https://www.google.com/maps/d/u/0/edit?mid=1ybnwqbU8eh4calticN85wK-3D2s&ll=50.87130771273404%2C10.4515265&z=6

Click green to change to satellite and red for printing the map.

Step 1: Zoom in Step 2: Map print Step 3: Select A3 / your format (it depands on your track) / and picture -> Print and save the image. Your track isnt fully on the image? You can zoom out or maybe it helps to move the map! Then overlay the new texture on top of your old one. (Scale/rotate until it fits)

3. Create a simple texture mask

Create the mask with the following Settings:

2048x2048
Modus RGB 8bit


Create 2 Layers

top layer = track path (use a hard brush / color black transparency 100%)
bottom layer = white
(third layer) = use your texture as reference for the track path (find the widest track section and use it for your brush size - forced width!)

white will use the dirt.tga and black the mud.tga


Tip: Hold Shift (straight lines) for making the track path

Create the Alpha Channel (Channels -> select Red (or Green or Blue doenst matter) duplicate and name it Alpha 1. Turn on the RGB channel.)


Now it should look like this:


Save as mask_mud.tga

Tip: You can also downscale your masks to 1024x1024 (maybe even 512x512 should be enough, not tested yet)

Copy the /maps folder from the example track

Now you have all Textures you'll need, of course it is possible to change them.

4. Edit the track.hmt and track.tht

Now you should have the "heightmap".raw and "mask".tga

Open the track.hmf - delete all the code and copy/paste the following Code as base - same for the track.tht

Make sure to use your size_x/z and scale (you got from the TFC's Geolocation Tutorial)

samples_x = 2049
samples_z = 2049

data = Basic_Track.raw

size_x =
size_z =
scale =


Copy/Paste the following Code into the track.hmf

num_layers = 4
layer0
{
map = maps/mud_treads.tga
frame1
{
map = maps/mud_treads_wet.tga
}
repetitions = 50
}

layer1
{
map = maps/mud.tga
frame1
{
map = maps/mud_wet.tga
}
repetitions = 50
thickness = 0.14
}

layer2
{
map = maps/dirt.tga
frame1
{
map = maps/dirt_wet.tga
}
repetitions = 60
mask = mask_mud.tga
thickness = 0.06
}

layer3
{
map = maps/grass.tga
repetitions = 40
mask = mask_grass.tga
thickness = 0.03

grass
{
max_density = 25
height = 0.2
height_diff = 0.1
width = 0.25
width_diff = 0.1
texture = maps/grassfx.tga
densitymap = mask_grass.tga
}
}

To Check if it worked: Run the map.bat (takes a few seconds) and open with mapview.exe - load the .map file

Open the track.tht

Copy/Paste the following Code

num_material_layers = 3

material_layer0
{
material = soft soil
}

material_layer1
{
material = soil
thickness = 0.01
}

material_layer2
{
material = compact soil
thickness = 0.005
}

Tip: You can also make a folder for your masks - only change the code to mask = masks/mask_mud.tga

Run the trh.bat (takes only a second)

5. Create the Track file

Open TrackED.exe

File -> Load the track.trh (To Move hold the Z key and move the mouse - To zoom in and out use the mousewheel)

Tip: You only have to do the Centerline and the Pits for testing

Go to Centerline -> New
Rightclick -> Add Segment -> Straight -> Move it to the end of a Curve (click and drag) (the created segment will be spawn in the bottem left corner)
Rightclick for adding the next segments

Important:*3 You have to Start with a Straight and End with a Curve and they have to connect (better zoom in to check if they are connected)

Finish the Centerline

Centerline -> Save as track.tcl
Centerline -> Merge
File -> Save -> Overwrite track.trh

Reopen TrackED -> Load track.trh (It should have now a Red line)

View -> Race Data -> Select MX Bikes

Create the Start / Finish line (Long)

Create the Splits (Click Splits for autogenerated)

Create Checkpoints -> Add

Select Pits -> Select Absolute -> Create the Pits (X and Z)

Create the Pitboards

Select Grid -> Select Absolute -> Create the Grid

Save -> into track as track.rdf

Update the .MAP and .TRH File


Replica Track Building - Final Folder Files

Copy/Paste the following Files from mxb_example_track into the Final Folder (track)

example.ini (Edit with Notepad and change the name etc.)
example.amb
clearsky.edf - cloudysky.edf - rainysky.edf - background.edf

Copy/Paste the following Files from your Trackfolder into the Final Folder (track)

track/track.map
track/track.trh
track/track.rdf (should be already saved into that folder)

Go sure that the .ini .amb .map .trh .rdf have the same name.

*2
Important: If you change anything on the Heightmap etc., you have to update the .MAP and .TRH File, also you have to  merge the centerline again!!
So, Run map.bat -> Run trh.bat -> Open TrackED -> File -> Load the .trh File -> Centerline -> Open... -> select the .tcl -> Merge  -> File -> Save -> Overwrite the .trh File

Otherwise it could be that your Bike is sinking into the Ground.

To speed up the map.bat process, use the following values

shadowmaps_scale = 0.3 / default 0.2
shadowmaps_supersampling = 1  / default 4

Copy/Paste the Final_folder into MX Bikes/tracks

Test the width of your track!

Problem List

map.bat doesn't create a file -> go to *1
trh.bat doesn't create a file -> go to *1

Cant load the Track/Game Crash -> go to*2 or *3
Bike is sinking -> go to *2

General Stuff

Textures must be in TGA or BMP truecolor format. Size must be power of 2 (256, 512, 1024, 2048, 4096). Textures can be rectangle ( for example: 256x512, 1024x64 )
Heightmap etc. +1 Pixel (1025x1025, 2049x2049 etc.)

Main Track folder


Final Track folder - without objects


6. Prepare your Base Terrain Heightmap

Tip: To work with your tested width in Earthsculptor you can do something like that:


Open Earthsculptor

File -> New


Import -> Heightmap image

Select the Brush Tool -> Set Texture -> Select your Texture (Make sure pure white is also selected, otherwise your texture will be colored)
->
Use following Settings to paint your texture on the track:


Now go back to the Terrain Tool and use following Settings:


Now save the Project into a new folder -> Save as... -> /ES Projects/ -> Track_Base_01

6.1 Terraform Tool

Select the Terraform Tool -> Level (Strength 1, Softness 0)

For this section i used the Stairs technique to prepare the track. Simply build stairs from the side you want to be on the same level.

->

Then use the Ramp Tool to even the stairs and smooth it. (Tip: Try different Strength's and Softness' to understand how it works and try different Radius' for the edges)

Tip: Activate the Grid in the Terrain Tools to better see what you are doing.

Now it should look like this:


For sections like this: Use the Ramp Tool (Strength 1, Softness 0)


It's possible that you have to lower or raise certain sections of the On/Off Track. You can use the Raise/Lower Tool or simply the Grab Tool. Just figure out how to use these tools.
Remember you can also combine those Tools.. e.g. Level an area and than grab this area to raise/lower it.

So this is my final Base layer: You see there aren't really any jumps etc.


Save again and Export -> Heightmap image

Remember: You can always make adjustments to this base layer to effect areas!

7. Create your Jumps

There are different ways to make Jumps. You can do it in Sketchup (how i did it), L3DT, Earthsculptor (i can't recommend this for a beginner, you'll need some good skills. Otherwise it's to time consuming and frustrating) or do it with gradients (Photoshop)

With the following Technique you will know excatly how the Jump will look like.

https://www.youtube.com/v/CUSQWQ2ynQE
credits to TFC

Tip: When you save the Jump make another save from the Front, so you know how the jump looks. (Camera -> Standard Views -> Front)

7.1 Place your Jumps in Photoshop over the Base Layer

Open the Jump and Copy/Paste it into your heightmap, always use a seperate layer for each jump. (you dont have to select the jump) Now select Negative Multiply and use Strg+T to scale, place and rotate the jump. Then bring the Opacity down to X% (you have to test it ingame, which % is the best.)

->

Tip: When you are done with your jumps duplicate your jump folder and merge the layers (Strg+E)

Apply a Gaussian Blur Filter -> Blur Filter -> Gaussian Blur (something between 1 - 1.7 should be enough, dont use too much)

Tip: Is the ramp to steep? You can cut the jump into two/three layers than scale the jump(+landing) just a little bit.


Tip: Organise your Project (specially the jumps/ruts)


7.2 Create your Berms/Ruts

Make a new path for each berm! Use the Path Tool to create the shape of your berm. Right Click -> Create selection -> Radius 0 -> OK
Make a new Layer for each berm! Now fill it with white -> de-select the selection -> Filter -> Blur Filter -> Gaussian Blur (use X radius / i used 2.7 for outside and 2.3 for inside berms -> trial and error) Bring down the Opacity to X % (trial and error)

-> -> ->

Tip: The thin sections of the berm 
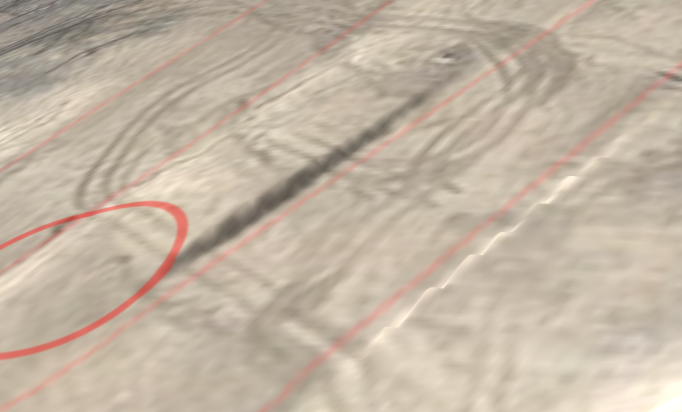
isnt really noticable later ingame. So make sure your wider berm is helping to get into the straight again.
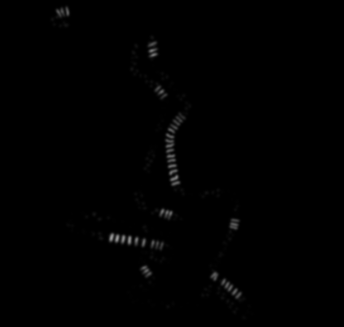
7.3 Create the Roughness

Tip: Use different layers, you will need seperate layers later for the texture masks!

Create the natural bumps:

Create a new layer -> Simply use a soft white brush and paint some dots -> Gaussian Blur -> Lower the Opacity
Create a new layer -> Simply use a soft black brush and paint some dots -> Gaussian Blur -> Lower the Opacity

Create the braking bumps:

Create a new layer -> Simply use a soft white brush and paint some braking bumps -> Gaussian Blur -> Lower the Opacity

Result:
->

Tip: You can always use a Mask to adjust your Roughness (soft brush, transparency ~25%)